
ART
BEAUTÉ ET BIEN-ÊTRE
ARTISANAT
CULTURE ET HISTOIRE
DIVERTISSEMENT
ENVIRONNEMENT
NOURRITURE ET BOISSONS
INGÉNIERIE INVERSE
SCIENCES
SPORTS
TECHNOLOGIE
TECHNOLOGIE PORTABLE
Adjustable-Pin Resistance Churn: Flat-Ended Pins Turned From Outside Set the Churn's Grip
Martin

Créé par

Martin

6. octobre 2026NO
3
0
0
0
0

Adjustable-Pin Resistance Churn: Flat-Ended Pins Turned From Outside Set the Churn's Grip

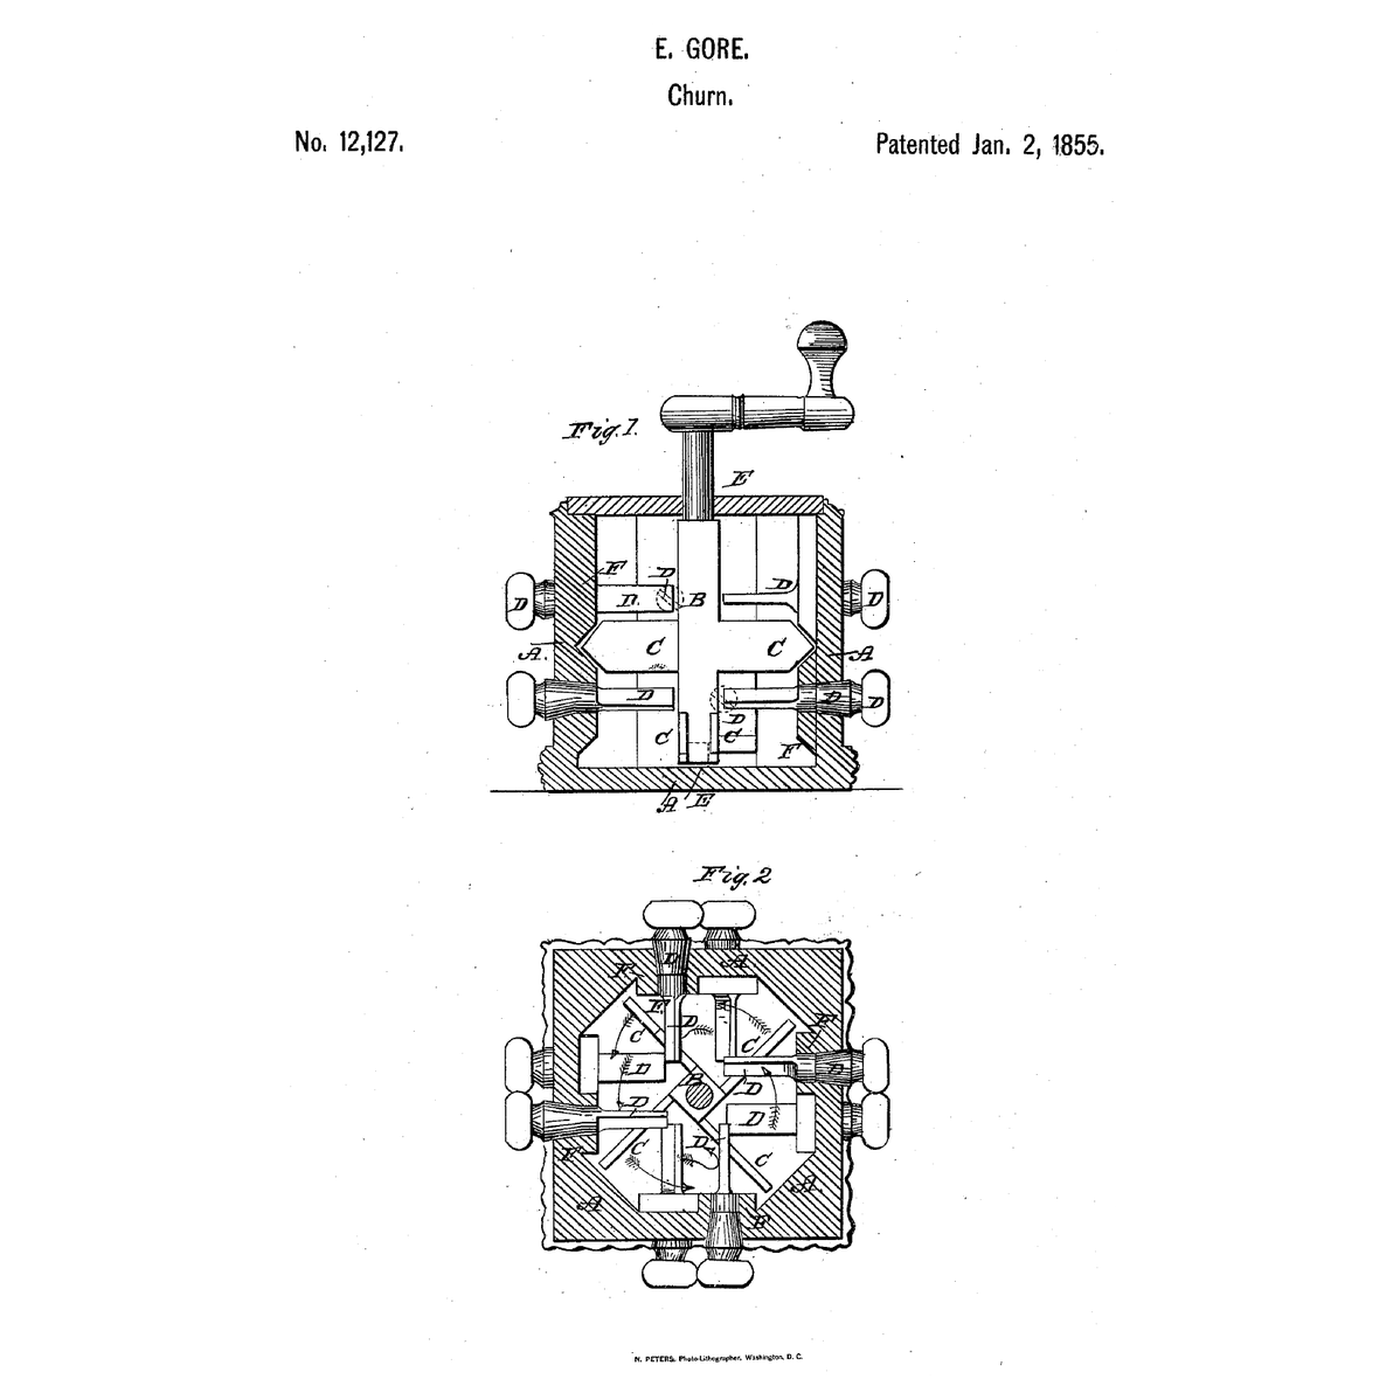
Gore let the maker set, from outside, how hard the cream is worked. Ezekiel Gore of Bennington, Vermont, received US 12,127, dated 2 January 1855, for a churn whose sides are pierced for "a series of adjustable pins, flattened at their inner extremities, which may be turned by the hand from the exterior of the churn, so as to present a greater or less surface of resistance to the cream." Thick cream gets the pins' edges, thin cream their sides; short ribs on the sides add agitation, and floats on the spindle sweep close past them. He wrote that the pins let the time of churning "be regulated to suit the pleasure of the operator." This rung compares the pins' areas, then prints the pins, bushings, floats, ribs and step, builds the churn, and makes butter.
Intermédiaire
About 4 hours, plus printing

Consignes

1

Edge or side

Chargement du notebook Jupyter…
2

Fixed breakers set for the job, before it

The embedded blueprint lifts its breakers to gather the butter. Gore turns pins from outside to set how much the cream is resisted.
3

Read US 12,127

"It is manifest that the resisting surface exposed to the moving mass of cream within the churn, will be greater or less according as the flattened ends of the pins D are turned edge wise or side wise. When the cream is thick the pins are turned so that only their edges will oppose the cream. When the latter is thin, then their sides are presented."
4

Print the parts

Print eight pins with their flat blades and thumb balls (/uploads/blueprints/adjustable-pin-resistance-churn-pin.stl), eight flanged bushings (/uploads/blueprints/adjustable-pin-resistance-churn-bushing.stl), two float hubs (/uploads/blueprints/adjustable-pin-resistance-churn-float-hub.stl), eight ribs (/uploads/blueprints/adjustable-pin-resistance-churn-rib.stl) and the step (/uploads/blueprints/adjustable-pin-resistance-churn-step.stl). Print the pins on their side. Print in PETG at 0.2 mm layers, 30 % infill, 4 walls; wash before first use.

Matériaux pour cette étape :

Filament PETGFilament PETG1 pièce

Outils nécessaires :

Imprimante 3D à filament (FDM)Imprimante 3D à filament (FDM)
5

Case and pins

Use a square food-grade container about 180 mm across and 200 mm deep. Drill 14 mm holes two to a side at two heights, offset from the floats' levels. Seat a bushing in each hole from inside with a leather washer under its flange and food-safe silicone round it. Push a pin through each from inside so its blade stands in the churn and its ball outside; a second leather washer pushed on outside gives the friction that holds its setting.

Matériaux pour cette étape :

Contenant de stockage de qualité alimentaireContenant de stockage de qualité alimentaire1 pièce

Bande de cuirBande de cuir1 pièce
Mastic siliconeMastic silicone1 pièce

Outils nécessaires :

Perceuse sans filPerceuse sans fil
Jeu de scies-clochesJeu de scies-cloches
Jeu de foretsJeu de forets
Papier abrasifPapier abrasif
6

Ribs, spindle, floats and cover

Seal the ribs upright to the walls between the pins with food-safe silicone. Stand the step in the bottom, a 10 mm square hardwood spindle in it, and slide the two float hubs on at levels that pass just above and below the pins. Cut the lid in half, fix one half with a hole for the spindle, and glue a crank arm and dowel handle on top.

Matériaux pour cette étape :

Mastic siliconeMastic silicone1 pièce
Goujons de bois durGoujons de bois dur1 pièce
Planche de pinPlanche de pin1 pièce
Colle à boisColle à bois1 pièce

Outils nécessaires :

Scie égoïneScie égoïne
Perceuse sans filPerceuse sans fil
Jeu de foretsJeu de forets
7

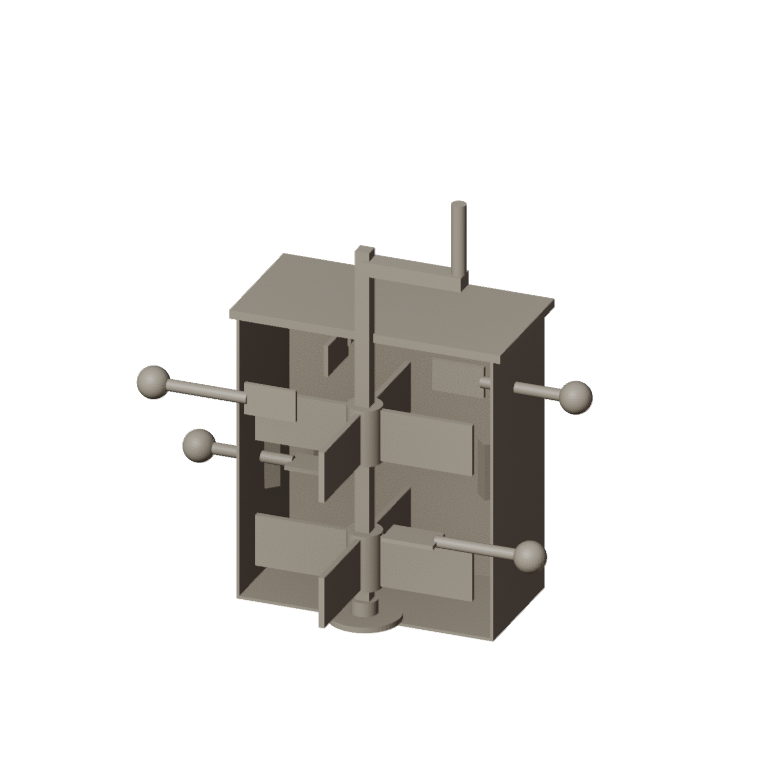
The build in 3D

FreeCAD model of this build, not of the patent: the square case cut away to show the spindle with two float hubs, the flat-ended pins at two levels with their thumb balls outside, and the ribs on the walls.
Fichier de designBLENDCC0 - Free
8

Set the pins and churn

Let the heavy cream stand until it reaches about 15 °C, checked with the thermometer. Pour in 2 litres. Turn the pins side-on for thin cream or edge-on for thick, and crank steadily; time until the butter comes. Turn the pins edge-on and crank slowly to gather it. Pour off the buttermilk, add cold water, churn a little and pour off again until it runs clear; work in a pinch of salt and weigh the butter.
Étape 8 - Image 1

Matériaux pour cette étape :

Crème liquide entièreCrème liquide entière2000 ml
Gros sel marinGros sel marin1 pièce
EauEau1 pièce

Outils nécessaires :

Thermomètre à sonde à demeureThermomètre à sonde à demeure
ChronomètreChronomètre
Balance de cuisine numériqueBalance de cuisine numérique
Grand cul-de-poule en acier inoxydableGrand cul-de-poule en acier inoxydable
9

Pins that turn themselves, a case that drips

Adjustable-pin churn troubleshooting.

Flow

Loading...
10

History and honest limits

**Ezekiel Gore** of Bennington, Vermont, received US 12,127, dated 2 January 1855 (the drawing sheet reads "E. Gore"). The specification names the spindle B and the floats C, then says the floats are attached "to the spindle C"; the spindle is meant. He said no particular novelty was claimed for the floats, and noted that some held butter made very quickly to be of poorer quality. He claimed making the pins with flat inner ends, turned right or left to present a large or small resisting surface. **Honest limits.** A container, leather washers and printed parts stand in for his case; the notebook compares areas, not measured forces. FDM prints hold food in their layer lines, so wash well and replace when worn. Your times and weights are the result.

Matériaux

10

Outils requis

10

Fichiers de conception

1

CC0 Domaine public

Ce blueprint est publié sous CC0. Vous êtes libre de copier, modifier, distribuer et utiliser ce travail pour tout usage, sans demander la permission.

Soutenez le Maker en achetant des produits via son Blueprint où il perçoit une Commission Maker définie par les Vendeurs, ou créez une nouvelle itération de ce Blueprint et incluez-le comme connexion dans votre propre Blueprint pour partager les revenus.

Commentaires

(0)

Se connecter pour participer à la discussion

Chargement des commentaires...