Collaboration
ART
BEAUTÉ ET BIEN-ÊTRE
ARTISANAT
CULTURE ET HISTOIRE
DIVERTISSEMENT
ENVIRONNEMENT
NOURRITURE ET BOISSONS
INGÉNIERIE INVERSE
SCIENCES
SPORTS
TECHNOLOGIE
TECHNOLOGIE PORTABLE
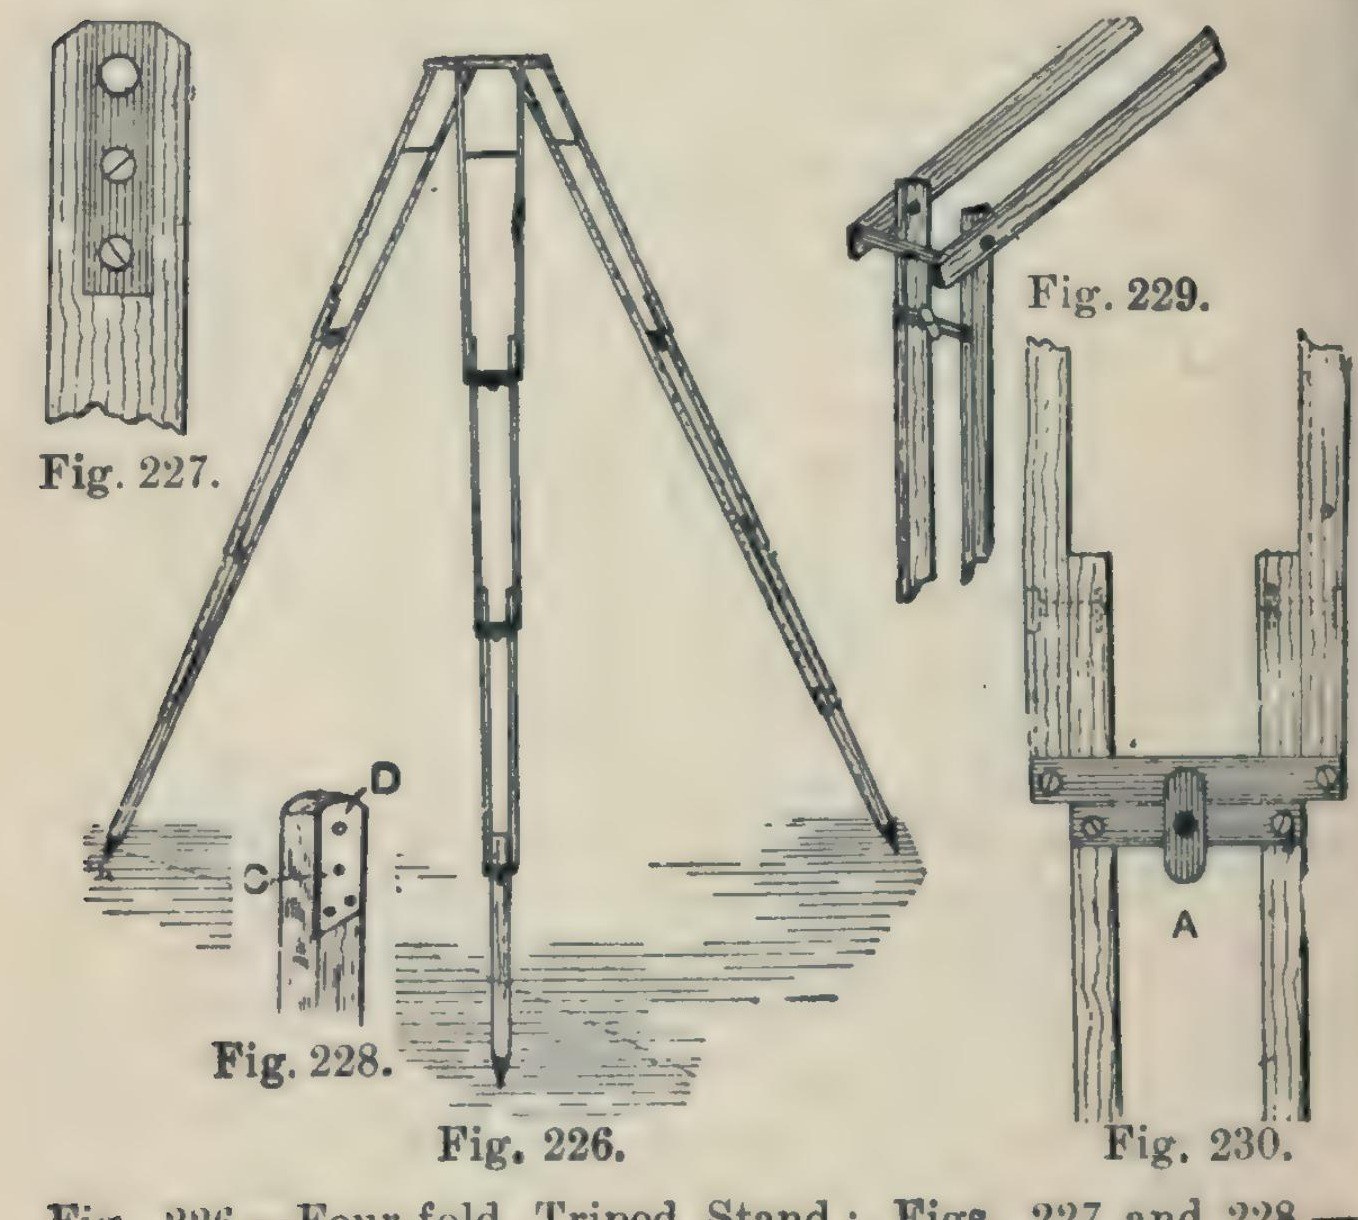


Camera Tripod: a Four-Fold Ash Tripod Stand (Hasluck, 1902)
A light, compact folding camera stand: three legs, each of seven ash laths riveted so it folds in four, locked open by brass buttons, on a triangular ash top with brass pins and a hole for the camera screw.
Hasluck says the same method makes stands that fold in three or two.
Source: Paul N. Hasluck, Photographic Cameras and Accessories (1902), pp. 153-157. Picture: Figs. 226-230 of the book.
Intermédiaire
Unknown
Consignes
1
1
Cut the ash laths
Cut the ash laths
Cut laths of good ash, true and square or the stand won't be rigid, and round the edges slightly: six 17 1/4 x 5/8 x 3/8 in, six 16 x 5/8 x 3/8 in, six 15 1/2 x 5/8 x 3/8 in, and three 14 x 5/8 x 5/8 in.
Matériaux pour cette étape :
 Planche de frêne1 21 laths
Outils nécessaires :
 Scie à dosseret
 Rabot de coupe
2
2
Fit the top ends and stretcher
Fit the top ends and stretcher
On each 17 1/4 in lath let in flush a 1/16 in brass plate, 1 1/4 in long, with a 3/16 in hole 1/4 in from the top, held by two countersunk brass screws; bore the wood to match and take off the top corners. On one lath of each pair cut a groove inside, about 3/16 in deep and 3 1/2 in long, starting 2 in from the top, and hinge a 1/8 in brass rod stretcher in it on a pin. On the other lath cut a curved groove 1 1/2 in long, 3/16 in wide, with a small hole at the bottom where the rod catches.
Matériaux pour cette étape :
 Feuille de laiton1 1/16 in plates
 Vis à bois1 small brass screws
 Barre de laiton1 1/8 in stretcher
Outils nécessaires :
 Monture de scie à métaux avec lames
 Lime à métaux
 Chignole à main
 Ciseaux à bois
 Tournevis plat
3
3
Bore and rivet the legs
Bore and rivet the legs
Bore the rivet holes: in the long laths 1 3/4 in from the lower end, counterbored so the copper rivet head sits flush, then 1/8 in through; in the 16 in and 15 1/2 in laths 1/2 in and 1 3/4 in from the ends; in each 14 in piece 1/2 in from one end, and taper its other end for a pointed iron shoe or a steel point and ferrule. Rivet the 21 laths into three legs with 1/8 in copper rivets and washers: a 16 in lath inside each 17 1/4 in one, a 15 1/2 in lath inside that, the 14 in foot between the last pair. Rivets flush, just tight enough to fold but not loose.
Matériaux pour cette étape :
 Rivets en cuivre1 1/8 in, with washers
 Métal inconnu3 iron shoes or steel points
Outils nécessaires :
 Vilebrequin et mècheChignole à main
 Marteau à river
4
4
Add cross strips and lock buttons
Add cross strips and lock buttons
Screw 1/16 in brass strips across the bottom ends of each pair of laths (Fig. 229). Under them screw strips carrying a small brass button riveted at the centre; turned, the button hooks over the strip above and locks the joint open (Fig. 230).
Matériaux pour cette étape :
Feuille de laiton1 cross strips, buttonsVis à bois1 pièceOutils nécessaires :
Monture de scie à métaux avec lamesLime à métauxTournevis platMarteau à river5
5
Make the top
Make the top
Plane ash to 1/2 in and draw an equilateral triangle with 8 1/2 in sides. Bisect the angles; 2 in from each corner draw a line at right angles, go 1/2 in in along the sides, and mark three rectangles 2 7/8 x 3/4 in; cut the outline (Fig. 231). Fix a 3/16 in brass rod, one end tapered, across each rectangle, bored 3/8 in from the outer edge and projecting about 1/2 in, for the legs to hang on. Bore a 1/4 in hole in the centre for the camera screw and glue felt on top.
Matériaux pour cette étape :
Planche de frêne1 topBarre de laiton3 3/16 in pins Feutre de laine1 pièce
 Colle animale1 pièce
Outils nécessaires :
Rabot de coupeScie à dosseretVilebrequin et mècheChignole à main6
6
Finish
Finish
Glasspaper and varnish the wood, and lacquer the brass.
Matériaux pour cette étape :
 Vernis à la gomme laque1 varnish
 Matériau inconnu1 brass lacquer
Outils nécessaires :
 Papier abrasif
Matériaux
10- 1 topEspace réservé
- 1 cross strips, buttonsEspace réservé
- 1 pièceEspace réservé
- 3 3/16 in pinsEspace réservé
- 1 1/8 in, with washersEspace réservé
- 3 iron shoes or steel pointsEspace réservé
- 1 pièceEspace réservé
- 1 pièceEspace réservé
- 1 varnishEspace réservé
- 1 brass lacquerEspace réservé
Outils requis
10- Espace réservé
- Espace réservé
- Espace réservé
- Espace réservé
- Espace réservé
- Espace réservé
- Espace réservé
- Espace réservé
- Espace réservé
- Espace réservé
Ce plan fabrique

CC0 Domaine public
Ce blueprint est publié sous CC0. Vous êtes libre de copier, modifier, distribuer et utiliser ce travail pour tout usage, sans demander la permission.
Soutenez le Maker en achetant des produits via son Blueprint où il perçoit une Commission Maker définie par les Vendeurs, ou créez une nouvelle itération de ce Blueprint et incluez-le comme connexion dans votre propre Blueprint pour partager les revenus.