Collaboration
ART
BEAUTÉ ET BIEN-ÊTRE
ARTISANAT
CULTURE ET HISTOIRE
DIVERTISSEMENT
ENVIRONNEMENT
NOURRITURE ET BOISSONS
INGÉNIERIE INVERSE
SCIENCES
SPORTS
TECHNOLOGIE
TECHNOLOGIE PORTABLE
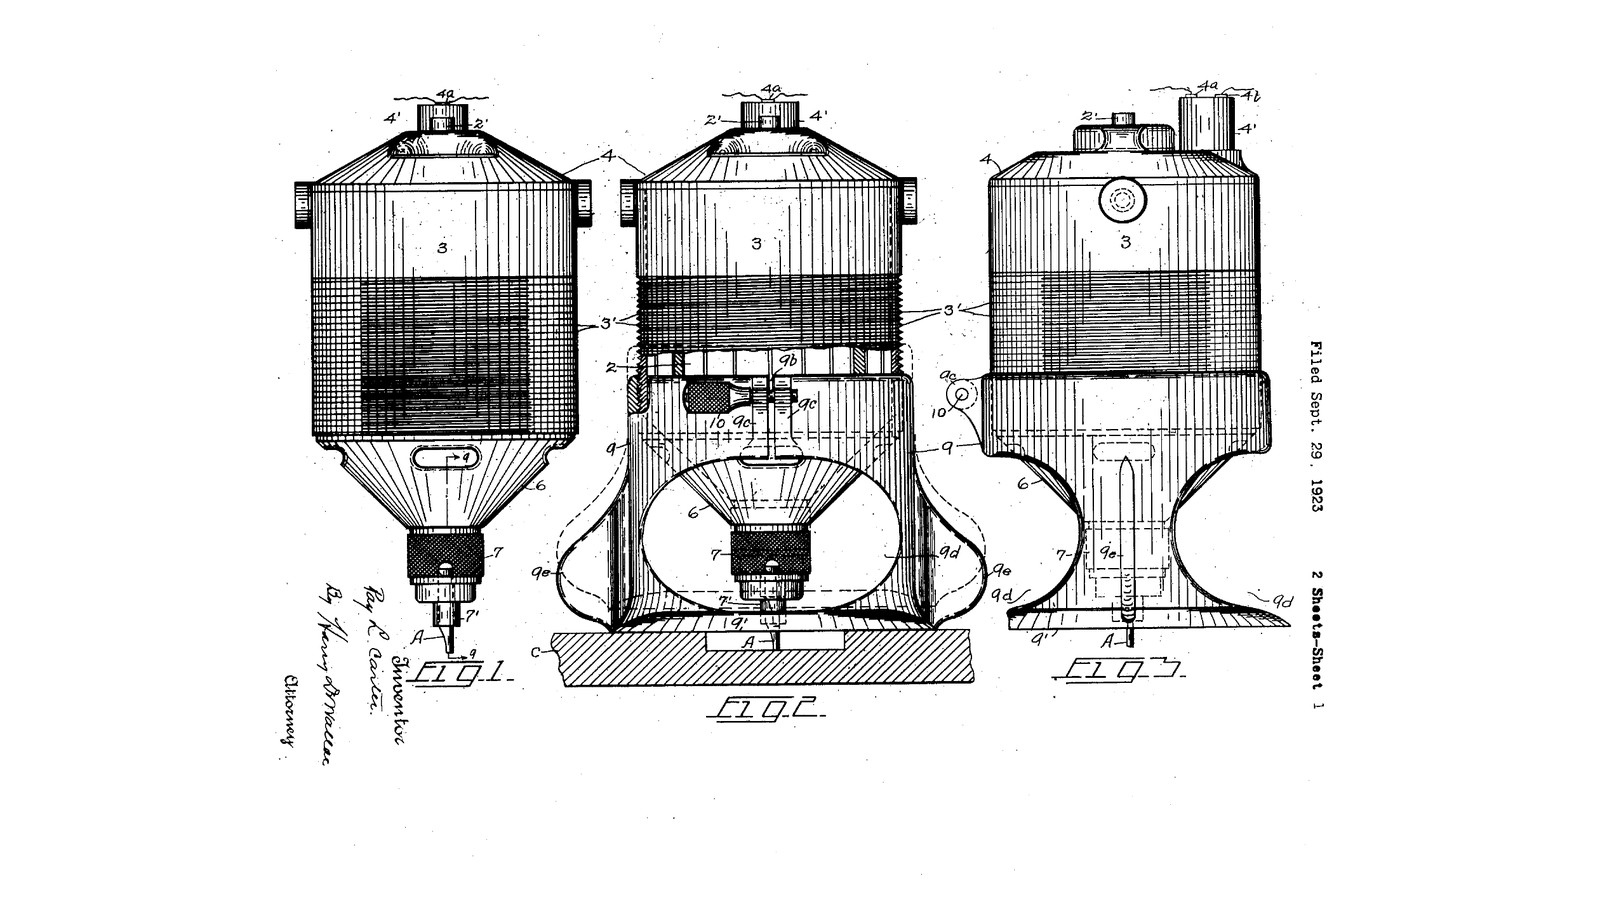


Screw-Depth Portable Router: The Motor's Threaded Casing Screws Into a Split Base, One Turn per Sixteenth (Carter, 1924)
Ray L. Carter of Syracuse, New York, received US 1,514,894, dated 11 November 1924, for the portable electric router: a small high-speed motor in an insulated casing light enough to hold in one hand, with a cutter in a chuck on its shaft. The casing is threaded outside and screws into the split, threaded top of a hollow base with a flat bottom. Each turn moves the cutter 1/16 inch, and a clamp screw across the split locks it. The base is cut away so the cutter can be seen and the chips can get out.
We print the casing and base in PETG at his pitch, round a small DC motor. The other sizes are ours.
Intermédiaire
About 2 days
Consignes
1
1
One turn, one sixteenth
One turn, one sixteenth
Chargement du notebook Jupyter…
2
2
Read US 1,514,894
Read US 1,514,894
"In practice, the threads of the shell 3 and support 9 are preferably about one-sixteenth inch pitch, so that each revolution of the motor or support in either direction moves the tool A correspondingly."
3
3
Print the motor casing
Print the motor casing
The casing 3: a tube for a 42 mm motor with a 60 mm thread at 1/16 inch pitch, an 18 mm hole and air slots in its bottom, and two holes 29 mm apart for the motor's face screws. Print it bottom down. PETG, 0.2 mm layers, 40 % infill, 5 walls; no supports.
4
4
Print the base
Print the base
The support 9: a hollow base with a flat plate 140 mm across and an opening 50 mm wide, its sides cut away, two wings, and the split, threaded top with clamp lugs. Print it plate down. PETG, 0.2 mm layers, 40 % infill, 5 walls; no supports.
5
5
Print and fit the parts
Print and fit the parts
Print the casing and the base in PETG. Clean the threads and screw the casing into the base by hand; it should turn smoothly all the way. If it is tight, run it in and out a few times. Check the base's bottom is flat by rubbing it on abrasive paper on a flat board.
Matériaux pour cette étape :
 Filament PETG1 pièce
Outils nécessaires :
 Imprimante 3D à filament (FDM)
 Ébavureur
 Pied à coulisse numérique 6 pouces
6
6
Motor, collet and wiring
Motor, collet and wiring
Fit the collet adapter on the motor's shaft and tighten its set screws. Push the motor down into the casing so its face sits on the casing's bottom with the collet through the hole, and screw it in with its two M4 face screws. Solder the supply leads through a toggle switch, sleeve the joints, and lead the cable out through the casing's open top. Set the DC supply to the motor's rated voltage.
Matériaux pour cette étape :
 Moteur électrique1 pièce
 Adaptateur à pince pour arbre moteur1 pièce
 Vis à tête cylindrique à six pans creux2 pièces
 Interrupteur à levier1 pièce
 Fil de câblage1 pièce
 Gaine thermorétractable1 pièce
Outils nécessaires :
 Alimentation en courant continu
 Fer à souder électrique
 Jeu de clés Allen
 Clé à molette
7
7
Set the depth and lock it
Set the depth and lock it
Fit a straight bit in the collet. Screw the casing into the base until the bit's end is level with the base's bottom on a flat board, then screw it in four more turns for a 1/4 inch (6.35 mm) deep cut. Put an M5 screw through the lugs with a wing nut and tighten it, closing the split on the thread.
Matériaux pour cette étape :
Vis à tête cylindrique à six pans creux1 pièce Écrou papillon1 pièce
Outils nécessaires :
 Coffret de fraises de défonceuseJeu de clés AllenPied à coulisse numérique 6 pouces
8
8
Rout a groove
Rout a groove
Clamp a board down. Hold the router by its casing and wings, base flat on the board, switch on, and move it along a clamped straightedge so the bit cuts a groove. Take deep grooves in two or three passes, a few turns deeper each time.
Outils nécessaires :
 Planche de bois dur
 Serre-joint à pompe
 Lunettes de sécurité
9
9
Troubleshooting
Troubleshooting
Router troubleshooting.
Flow
Loading...
10
10
History and honest limits
History and honest limits
**Ray L. Carter** of Syracuse, New York, US 1,514,894, dated 11 November 1924, filed 29 September 1923. He claimed a motor with a threaded casing, "a hollow cylinder having a split threaded portion adapted to engage the threaded portion of said casing whereby said tool may be moved relatively to the work", a plane bottom to move over the work, and means for locking. His motor ran on mains through a lamp socket at over 7,000 r.p.m.; ours is a small DC motor on a bench supply, a light-duty router. His casing was insulating material; ours is printed PETG. His fan and baffle disk are left out. The pitch is his; the other sizes are ours.
Matériaux
8- 1 pièceEspace réservé
- 1 pièceEspace réservé
- Espace réservé
- Espace réservé
- Espace réservé
- Espace réservé
- 1 pièceEspace réservé
- 1 pièceEspace réservé
Outils requis
11- Espace réservé
- Espace réservé
- Espace réservé
- Espace réservé
- Espace réservé
- Espace réservé
- Espace réservé
- 1 vendor sell this, none ship to you yetEspace réservé
- Espace réservé
- Espace réservé
- Espace réservé
Fichiers de conception
2Ce plan fabrique

Blueprints liés
Ces blueprints partagent des connaissances — techniques, matériaux ou principes

CC0 Domaine public
Ce blueprint est publié sous CC0. Vous êtes libre de copier, modifier, distribuer et utiliser ce travail pour tout usage, sans demander la permission.
Soutenez le Maker en achetant des produits via son Blueprint où il perçoit une Commission Maker définie par les Vendeurs, ou créez une nouvelle itération de ce Blueprint et incluez-le comme connexion dans votre propre Blueprint pour partager les revenus.