Collaboration
ART
BEAUTÉ ET BIEN-ÊTRE
ARTISANAT
CULTURE ET HISTOIRE
DIVERTISSEMENT
ENVIRONNEMENT
NOURRITURE ET BOISSONS
INGÉNIERIE INVERSE
SCIENCES
SPORTS
TECHNOLOGIE
TECHNOLOGIE PORTABLE
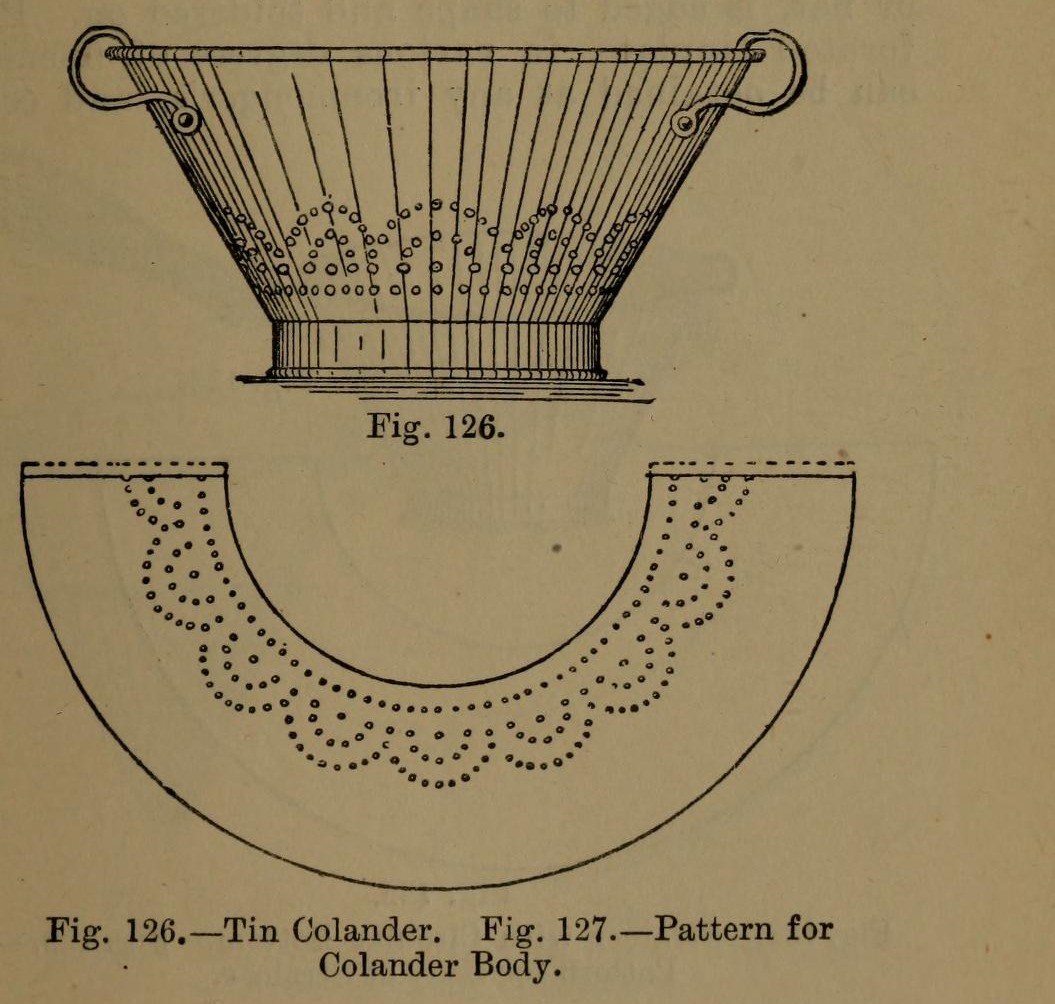


Colander: a Tinplate Colander with Perforated Body and Bottom (Hasluck, 1907)
A tinsmith's colander for straining: a tapered tinplate body and a hollowed bottom, both punched full of holes, standing on a wired hoop, with two bow handles.
The body pattern is a ring segment: outer radius = top diameter, inner radius = bottom diameter, which gives sides at 60 degrees.
Source: Paul N. Hasluck, Tinplate Work (1907), pp. 50-51. Unknown: sizes, solder. Picture: Figs. 126-127 of the book.
Intermédiaire
Unknown
Consignes
1
1
Set out the body pattern
Set out the body pattern
Choose the top and bottom diameters. On tinplate, strike an arc with radius equal to the top diameter and, from the same centre, one equal to the bottom diameter (Fig. 127); the sides then slope at 60 degrees. Mark the rows of holes, add edges for a grooved seam and the wire, and cut it out.
Matériaux pour cette étape :
 Tôle de fer-blanc1 body
Outils nécessaires :
 Compas à pointes sèches
 Pointe à tracer
 Cisaille à tôle
2
2
Break, punch and planish the body
Break, punch and planish the body
'Break' the pattern through the rollers, turning it the opposite way each pass, so it won't crease when bent. Punch the holes on a hardwood block, then flatten and planish the burrs.
Outils nécessaires :
 Rouleuse à tôles
 Emporte-pièce pour tôle
 Bloc de bois dur
 Marteau à planer
3
3
Seam and wire the body
Seam and wire the body
Set off the edges for a grooved seam, bend the body to shape and seam it. Solder the seam inside. Set off an edge on the wide end and wire it with No. 10 B.W.G. wire. If you like, raise a swage about 1 1/2 in below the wired edge: it stiffens the colander and looks better.
Matériaux pour cette étape :
 Fil de fer1 No. 10 B.W.G.
 Soudure étain-plomb1 seam
Outils nécessaires :
 Maillet en bois
 Piquet
 Fer à souder électrique
 Flux
4
4
Make and fit the bottom
Make and fit the bottom
Cut out the bottom, hollow it and edge it to fit the small end. Inside, mark circles from 1 in across at the centre, each 1 in wider than the last, out to the edge. Punch holes at short intervals round them and flatten the burrs on an upturned hollowing hammer. Solder the bottom on.
Matériaux pour cette étape :
Tôle de fer-blanc1 bottomSoudure étain-plomb1 bottomOutils nécessaires :
Compas à pointes sèchesCisaille à tôleEmporte-pièce pour tôleMarteau à planerFer à souder électriqueFlux5
5
Add the hoop and handles
Add the hoop and handles
Cut a strip 1 1/2 in wide, as long as the circumference of the bottom. Wire it with No. 10 B.W.G., round it, seam it and solder it on as the foot. Rivet a pair of bow handles opposite each other at the top.
Matériaux pour cette étape :
Tôle de fer-blanc1 hoopFil de fer1 hoopSoudure étain-plomb1 hoop Manche2 bow handles
 Rivets en fer1 number not given
Outils nécessaires :
Cisaille à tôleFer à souder électriqueFlux Marteau à river
6
6
Clean and scald
Clean and scald
Clean with turpentine and whiting, then polish with dry whiting. Before first use, steep it a short time in boiling water, as for any metal article for the kitchen.
Outils nécessaires :
 Térébenthine
 Carbonate de calcium (blanc de Meudon)
 Eau
Matériaux
5- 1 hoopEspace réservé
- 1 hoopEspace réservé
- 1 hoopEspace réservé
- 2 bow handlesEspace réservé
- 1 number not givenEspace réservé
Outils requis
15- Espace réservé
- Espace réservé
- Espace réservé
- Espace réservé
- Espace réservé
- Espace réservé
- Espace réservé
- Espace réservé
- Espace réservé
- Espace réservé
- Espace réservé
- Espace réservé
- Espace réservé
- Espace réservé
- Espace réservé
Matériaux des Blueprints connectés


Ce plan fabrique
CC0 Domaine public
Ce blueprint est publié sous CC0. Vous êtes libre de copier, modifier, distribuer et utiliser ce travail pour tout usage, sans demander la permission.
Soutenez le Maker en achetant des produits via son Blueprint où il perçoit une Commission Maker définie par les Vendeurs, ou créez une nouvelle itération de ce Blueprint et incluez-le comme connexion dans votre propre Blueprint pour partager les revenus.