Collaboration
ART
BEAUTÉ ET BIEN-ÊTRE
ARTISANAT
CULTURE ET HISTOIRE
DIVERTISSEMENT
ENVIRONNEMENT
NOURRITURE ET BOISSONS
INGÉNIERIE INVERSE
SCIENCES
SPORTS
TECHNOLOGIE
TECHNOLOGIE PORTABLE
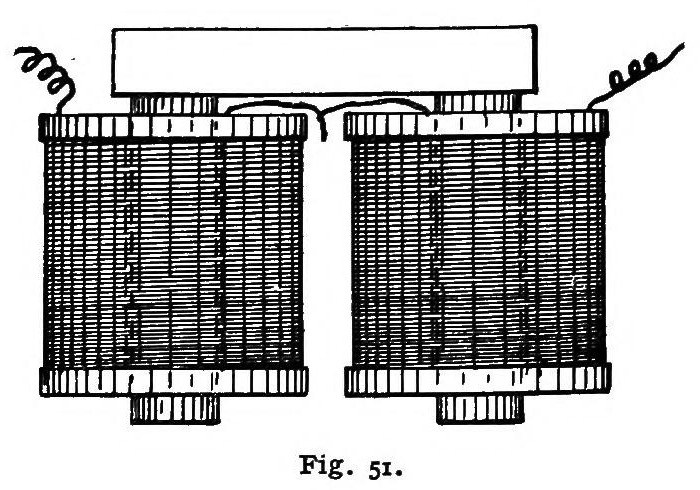


Electromagnet: Horseshoe Holding Magnet Sized by Its Pull (Underhill, 1903)
A holding electromagnet in its practical horseshoe form: two iron cores, each wound with wire, fastened to an iron yoke, and an iron armature across the poles. You size it from the pull you need: the pull sets the pole area, and the supply voltage sets the wire.
Variable: the pull. Each pound needs a set area of pole, depending on the iron.
Source: C. R. Underhill, The Electromagnet (1903), pp. 92, 106-118, 150. Unknown: sizes and the ampere-turns. Picture: Fig. 51 of the book.
Intermédiaire
Unknown
Consignes
1
1
Size the poles from the pull
Size the poles from the pull
Pull P (pounds) = B² × A / 72,134,000, where B is the flux density in lines per square inch and A the pole area in square inches. Working densities: wrought iron 90,000, cast steel 85,000, Mitis iron 80,000, ordinary cast iron 50,000, which give 112.3, 100.1, 88.72 and 34.66 lb per square inch of pole. Divide the pull you need by that figure to get the pole area. Underhill's example, for cast steel taken at 90,000: 10 lb needs 0.089 square inch, a core 0.336 inch across. A two-pole magnet holds twice the weight of a single pole at the same induction.
Outils nécessaires :
 Dimensions inconnues
2
2
Make the cores, yoke and armature
Make the cores, yoke and armature
Make the practical horseshoe magnet in three pieces besides the armature: two round cores and a yoke (back iron) to join them. Make an armature to lie across the two pole ends. Face the poles and the armature accurately; an uneven contact spreads the lines unevenly and weakens the pull. Ours: wrought iron. Not given: sizes, how the cores are fastened.
Matériaux pour cette étape :
 Barre de fer forgé1 two cores, yoke, armature
Outils nécessaires :
 Tour à métauxDimensions inconnues
3
3
Choose the wire for the supply
Choose the wire for the supply
Design the coil to stand the full supply voltage without overheating; never put a resistor in series with the magnet, as that wastes power and makes the magnet weaker. Pick the wire size that makes the coil's resistance equal to that of the line and the source, then try the next larger size, and keep the one giving more ampere-turns. A coil rises about 100 °F at about 0.9 watt per square inch of surface for a thin telephone-ringer coil, or 0.33 for a thick one (4 1/8 in across, 7 in long, 1 7/16 in thick), and the rise grows in proportion to the watts. Ours: the supply, e.g. 12 V.
Outils nécessaires :
 Alimentation en courant continuDimensions inconnues
4
4
Wind the cores and fasten them to the yoke
Wind the cores and fasten them to the yoke
Wind the wire directly onto each core between insulating end heads, and fasten the wound cores to the yoke. The joints between cores and yoke lose a little pull. Ours: enamelled copper wire. Not given: the winding method, the insulation.
Matériaux pour cette étape :
 Fil de cuivre émaillé1 two coils
 Isolant inconnu1 end heads and core insulation
 Métal inconnu1 core fastenings
Outils nécessaires :
 Méthode de filage inconnueTour à métaux
5
5
Switch on and hold
Switch on and hold
Connect the coils to the supply and put the armature against the faced poles: the magnet holds it with the pull it was sized for. When the armature touches the poles there is practically no leakage between them.
Outils nécessaires :
Alimentation en courant continuMatériaux
4- 1 two cores, yoke, armatureEspace réservé
- 1 two coilsEspace réservé
- 1 end heads and core insulationEspace réservé
- 1 core fasteningsEspace réservé
Outils requis
4- Espace réservé
- Espace réservé
- Espace réservé
- Espace réservé
Matériaux des Blueprints connectés


Ce plan fabrique

CC0 Domaine public
Ce blueprint est publié sous CC0. Vous êtes libre de copier, modifier, distribuer et utiliser ce travail pour tout usage, sans demander la permission.
Soutenez le Maker en achetant des produits via son Blueprint où il perçoit une Commission Maker définie par les Vendeurs, ou créez une nouvelle itération de ce Blueprint et incluez-le comme connexion dans votre propre Blueprint pour partager les revenus.