Collaboration
ART
BEAUTÉ ET BIEN-ÊTRE
ARTISANAT
CULTURE ET HISTOIRE
DIVERTISSEMENT
ENVIRONNEMENT
NOURRITURE ET BOISSONS
INGÉNIERIE INVERSE
SCIENCES
SPORTS
TECHNOLOGIE
TECHNOLOGIE PORTABLE
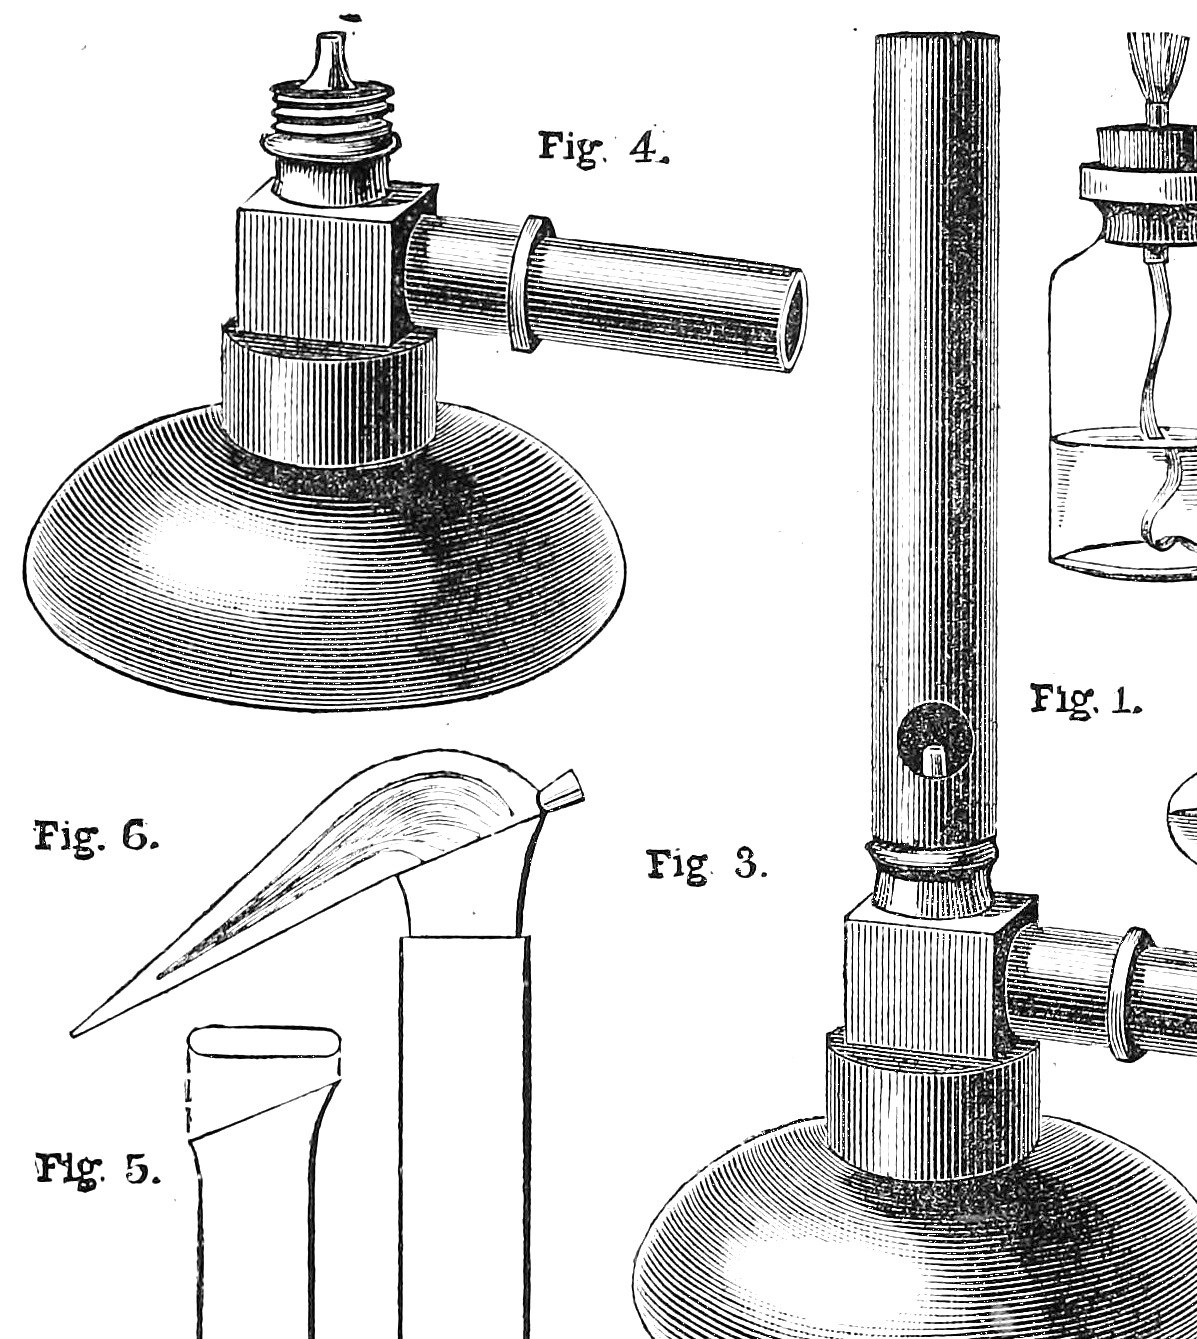


Gas Burner: a Home-Made Bunsen Burner from Brass Tube (Work, 1892)
A Bunsen burner: gas from a fine jet draws air in through two holes at the foot of an upright tube, and the mixture burns at the top with a hot blue flame that leaves no soot. H. B. Stocks (Work, 1892) makes one from a 3 1/2 in. brass tube 1/2 in. across, a short 3/8 in. tube for the gas, a brass boss and elbow from a gas bracket, and a bit of fine-bore tube from an old oil-can as the jet.
A sliding brass collar over the air-holes sets the flame.
Source: H. B. Stocks, How to Make a Cheap Spirit Lamp, Bunsen Burner, Blowpipes, etc., Work No. 167 (28 May 1892), p. 167. Picture: his Figs. 3-4.
Intermédiaire
Unknown
Consignes
1
1
Read Stocks
Read Stocks
"To make a Bunsen burner the following materials will be necessary:—A piece of brass tube 3 1/2 in. long, 1/2 in. diameter (external); a piece of tube 3/8 in. in diameter, 1 1/2 in. long; a brass boss similar to those on an ordinary bracket, but without a tap; a brass elbow tube; also a piece of tubing with very fine bore (small bit of tube from an old oil-can will do)."
2
2
Solder the elbow on the boss
Solder the elbow on the boss
Solder the brass elbow-piece onto the brass boss, with the tube that has a screw cut for a gallery uppermost.
Matériaux pour cette étape :
 Raccord fileté pour tuyauterie2 boss and elbow
 Soudure étain-plomb1 joint
 Flux1 joint
Outils nécessaires :
 Fer à souder
3
3
Fit the jet
Fit the jet
Cut the fine-bore tube 3/4 in. to 1 in. long and solder it inside the vertical tube of the elbow-piece so it projects about 1/2 in. If it is too small for the hole, plug round it with a little sheet lead, keeping it perfectly vertical and in the centre of the outer tube, then solder. The metal of the oil-can tube is not given (unknown).
Matériaux pour cette étape :
 Métal inconnu1 fine-bore tube
 Feuille de plomb1 packingSoudure étain-plomb1 joint
Outils nécessaires :
Fer à souder Cisaille à tôle
4
4
Make the burner tube
Make the burner tube
Take the brass tube 3 1/2 in. long, 1/2 in. across. If it is not of very thick brass it will be a little too large: turn a piece of very thin sheet brass 1/2 in. by 1 1/4 in. into a cylinder and solder it inside one end. Tap that end inside to screw onto the male thread of the elbow-piece. At the same end drill two holes about 3/8 in. across, exactly opposite each other, their centres 5/8 in. from the end: the air-holes.
Matériaux pour cette étape :
 Tube en laiton de 1/2 pouce de diamètre extérieur1 3 1/2 in.
 Feuille de laiton1 1/2 x 1 1/4 in.Soudure étain-plomb1 joint
Outils nécessaires :
Cisaille à tôleFer à souder Jeu de tarauds et filières
 Tourne-à-gauche
 Chignole à main
5
5
Assemble and test
Assemble and test
Screw the burner tube onto the elbow-piece and screw the 3/8 in. tube, 1 1/2 in. long, into the side opening. Push the india-rubber tube from the gas supply onto the side tube and light. A purplish-blue flame means air and gas are in the right proportion. A yellow tip means too much gas: plug the hole in the jet slightly.
Matériaux pour cette étape :
 Tube de laiton de 9,5 mm de diamètre extérieur1 1 1/2 in.
Outils nécessaires :
 Tube en caoutchouc
6
6
Fit the air collar
Fit the air collar
If the gas burns with a green flame and a hissing noise, the air-holes are too large. Cut sheet brass about 3/4 in. wide and 1 3/4 in. long and drill two holes 3/8 in. across, 1/2 in. from each end (their centres 3/16 in. further in). Turn it into a tube and push it onto the burner tube over the air-holes. Turn it until the two sets of holes do not quite match, so the right amount of air reaches the burner.
Matériaux pour cette étape :
Feuille de laiton1 3/4 x 1 3/4 in.Outils nécessaires :
Cisaille à tôleChignole à mainMatériaux
8- 2 boss and elbowEspace réservé
- 3 jointEspace réservé
- 1 jointEspace réservé
- 1 fine-bore tubeEspace réservé
- 1 packingEspace réservé
- Espace réservé
- 1 3/4 x 1 3/4 in.Espace réservé
- Espace réservé
Outils requis
6- 2 vendors sell this, none ship to you yetEspace réservé
- Espace réservé
- Espace réservé
- Espace réservé
- Espace réservé
- Espace réservé
Ce plan fabrique

CC0 Domaine public
Ce blueprint est publié sous CC0. Vous êtes libre de copier, modifier, distribuer et utiliser ce travail pour tout usage, sans demander la permission.
Soutenez le Maker en achetant des produits via son Blueprint où il perçoit une Commission Maker définie par les Vendeurs, ou créez une nouvelle itération de ce Blueprint et incluez-le comme connexion dans votre propre Blueprint pour partager les revenus.