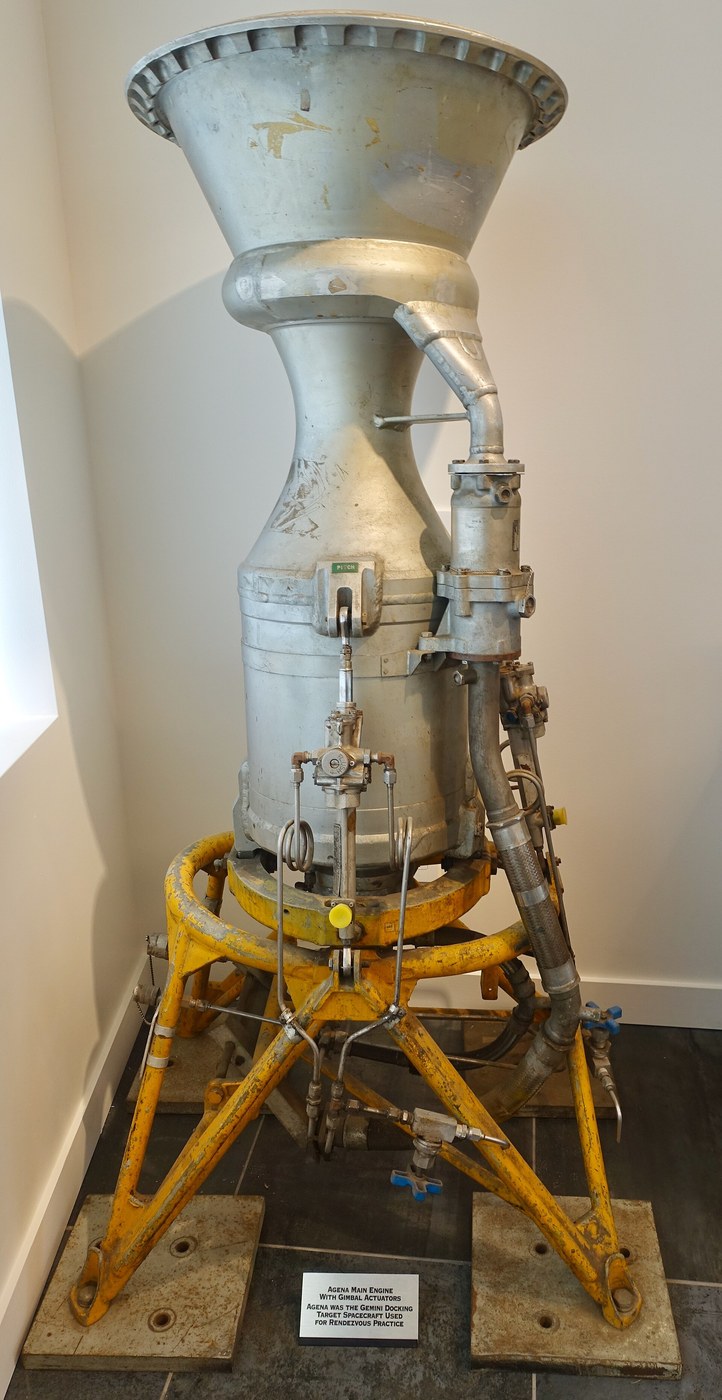


Gimballed Thrust Vectoring
Consignes
Prove the instability with a broom handle
Prove the instability with a broom handle
Feel the problem before instrumenting it.
- Balance a broom vertically on your palm and note what you must do to keep it up.
- Try it with your eyes closed.
- Now balance it the other way — hang it from your hand like a pendulum — and let go of the corrections.
Upright, it needs continuous correction and fails instantly without feedback; hanging, it is stable and needs nothing. A rocket under thrust is the upright case: thrust below, mass above, and every degree of tilt generating a moment that increases the tilt.
Notice what your hand actually does — it moves toward the direction of the fall. That is the counter-intuitive part and it is exactly what a gimballed engine does: to correct a tilt to the left, the engine swivels so the thrust pushes the BASE further left, rotating the vehicle back upright about its centre of mass.
This is why a rocket visibly leans and yet flies straight, and why gimbal deflections are small — one or two degrees is plenty, because the lever arm from engine to centre of mass is tens of metres.Matériaux pour cette étape :
 Goujon en bois1 pièce
Outils nécessaires :
 Téléphone avec vidéo au ralenti
 Mètre ruban
 Rapporteur d'angle numérique
Build a two-axis gimbal ring
Build a two-axis gimbal ring
Two perpendicular hinges give you pitch and yaw from one mount.
- Machine an outer ring that pivots on two opposed bearings about one axis.
- Machine an inner ring pivoting inside it about the perpendicular axis.
- Mount your engine — or a mass dummy with a thrust source — in the inner ring.
- Check the two rotation axes intersect exactly, and that both pass through the engine’s thrust axis.
If the axes do not intersect at a common point, gimballing in one axis translates the engine sideways as well as rotating it, and the two control channels start interfering. That cross-coupling turns an already difficult control problem into a much harder one.
Reverse-engineering note: this is also why the propellant feed lines to a gimballed engine use flexible bellows arranged so their stiffness is symmetric about both axes. An asymmetric duct pushes the gimbal a little in one direction, and the control loop must fight that bias continuously — burning actuator power and margin for nothing.Matériaux pour cette étape :
 Plaque d'aluminium1 pièce
 Roulement à billes4 pièces
 Goupille cylindrique en acier4 pièces
 Vis à tête cylindrique M58 pièces
Outils nécessaires :
 Étau de fraisage 4 pouces
 Tour à métaux
 Perceuse à colonne
 Comparateur à cadran
 Pied à coulisse numérique 6 poucesRapporteur d'angle numérique
 Clé dynamométrique
 Lunettes de sécurité transparentes
Add actuators and measure the response you can command
Add actuators and measure the response you can command
How fast the gimbal can move sets how unstable a vehicle you can fly.
- Fit two actuators — hobby servos are adequate at this scale — one per axis.
- Command a step change and film it, measuring the time to reach the commanded angle.
- Measure the maximum angular rate and the deflection range.
- Measure backlash by commanding a small reversal and seeing how much command produces no motion.
Backlash is the number that will hurt you. Any free play means a region where the loop commands a correction and nothing happens, and a control loop with a dead zone hunts — it overshoots, reverses, waits through the slack, overshoots the other way.
Actuator rate matters just as much. An unstable vehicle diverges at a characteristic rate, and the loop must be able to correct faster than it diverges. If the gimbal is slower than the tipping, no control law will save it.
Real vehicles use hydraulic actuators for exactly this reason, and some — including the Saturn V and the Shuttle — tapped high-pressure propellant from the turbopump as the hydraulic supply, so the engine powered its own steering.Matériaux pour cette étape :
 Servomoteur de modélisme1 jeu
 Récepteur radiocommandé1 jeu
 Guignol de commande1 jeu
 Chape1 jeu
 Plat en aluminium1 pièce
Outils nécessaires :
 Oscilloscope
 Multimètre numérique de laboratoire
 Alimentation de laboratoire réglableTéléphone avec vidéo au ralentiRapporteur d'angle numériquePied à coulisse numérique 6 pouces
 Station de soudageLunettes de sécurité transparentes
The control sketch
The control sketch
Upload this to the board before tuning. It reads the IMU, fuses gyro and accelerometer with a complementary filter, and drives both servos.
Note what the derivative term uses: the gyro rate directly, not a differentiated angle. Differentiating a noisy angle manufactures large spurious commands — the gyro already measures rate cleanly, so use it. The integral term is clamped, because an integrator that keeps accumulating while the servo is already at its limit will wind up and then overshoot badly when the error finally reverses.
Tune in the order Kp, then Kd, then Ki, one at a time, watching the serial telemetry.
Matériaux pour cette étape :
 Carte à microcontrôleur1 pièce
 Centrale inertielle (6 axes)1 pièce
 Fil de câblage1 reel
Outils nécessaires :
 Ordinateur avec l'IDE ArduinoMultimètre numérique de laboratoireOscilloscope
Close a PID loop and tune it on a test stand
Close a PID loop and tune it on a test stand
Now fly the instability on a stand where failure costs nothing.
- Mount the whole assembly on a single-axis pivot so it can tip but not fall.
- Add an inertial sensor measuring angle and angular rate.
- Implement a control loop: proportional to angle error, derivative on rate, a little integral for steady bias.
- Start with proportional only, increase gain until it oscillates, then add derivative and back the gain off.
Proportional alone gives an oscillation that never settles; adding derivative damps it; too much integral makes it sluggish and prone to wind-up. The derivative term is what makes this work — it responds to how fast the error is GROWING, so it starts correcting before the error is large.
Compare with the constant-speed propeller governor from the aviation batch: same negative feedback, same hunting failure when tuned too aggressively. The difference is that a governor is correcting a stable system and this loop is the only thing preventing a tumble.
Filter the derivative term. Rate signals are noisy, and differentiating noise produces large spurious commands that will shake the airframe — several early vehicles had control loops that excited their own structural bending modes, with the sensor reading the vibration the actuator had just created.Matériaux pour cette étape :
Centrale inertielle (6 axes)1 pièceCarte à microcontrôleur1 pièceFil de câblage1 reelOutils nécessaires :
OscilloscopeMultimètre numérique de laboratoireAlimentation de laboratoire réglableTéléphone avec vidéo au ralentiRapporteur d'angle numériqueStation de soudageLunettes de sécurité transparentesCompare the alternatives and see why gimbals won
Compare the alternatives and see why gimbals won
Several ways exist to steer a rocket. Measure what each costs.
- Build a jet vane — a small heat-resistant paddle that deflects the exhaust — and measure the side force and the thrust LOST to its drag.
- Model vernier thrusters: small fixed engines used only for control.
- Consider fluid injection: squirting liquid into one side of the nozzle to create an asymmetric shock.
- Tabulate side force, thrust penalty and complexity for each.
Jet vanes are simple, work from the instant of ignition, and sit in the exhaust stream eroding while stealing a few percent of thrust. Verniers are clean but are extra engines. Fluid injection has no moving parts in the flow and limited authority. Gimbals cost nothing in thrust and demand a mechanism, flexible plumbing and hydraulic power.
The V-2 used graphite jet vanes because gimballing a whole engine in 1942 was beyond the state of the art; they eroded badly and the accuracy suffered. As actuators improved, gimbals took over everywhere the thrust penalty mattered — which is to say, everywhere the rocket equation is watching.
Solid motors cannot gimbal a whole engine easily, so they steer by gimballing just the nozzle on a flexible bearing — a laminated stack of rubber and metal shims, stiff against thrust and compliant in bending. The Shuttle boosters steered exactly that way.Matériaux pour cette étape :
 Bloc de graphite1 piècePlat en aluminium1 pièce
 Papier millimétré1 pad
Outils nécessaires :
 Peson à ressort
 Thermomètre infrarougePied à coulisse numérique 6 pouces
 Jeu de limesTéléphone avec vidéo au ralenti
 Balance numériqueLunettes de sécurité transparentes
 Écran facial
Matériaux
15- 1 pièceEspace réservé
- 1 pièceEspace réservé
- à partir de€1.11
- 4 piècesEspace réservé
- 8 piècesEspace réservé
- à partir de€7.20
- Espace réservé
- 1 jeuEspace réservé
- 1 jeuEspace réservé
- 1 pièceEspace réservé
- 1 pièceEspace réservé
- 1 pièceEspace réservé
- 1 reelEspace réservé
- 1 pièceEspace réservé
- 1 padEspace réservé
Outils requis
20- Espace réservé
- 1 vendor sell this, none ship to you yetEspace réservé
- Espace réservé
- Espace réservé
- Espace réservé
- Espace réservé
- Espace réservé
- Espace réservé
- Espace réservé
- Espace réservé
- Espace réservé
- Espace réservé
- Espace réservé
- Espace réservé
- Espace réservé
- Espace réservé
- Espace réservé
- Espace réservé
- Espace réservé
- Espace réservé
Blueprints liés
Ces blueprints partagent des connaissances — techniques, matériaux ou principes

CC0 Domaine public
Ce blueprint est publié sous CC0. Vous êtes libre de copier, modifier, distribuer et utiliser ce travail pour tout usage, sans demander la permission.
Soutenez le Maker en achetant des produits via son Blueprint où il perçoit une Commission Maker définie par les Vendeurs, ou créez une nouvelle itération de ce Blueprint et incluez-le comme connexion dans votre propre Blueprint pour partager les revenus.