Collaboration
ART
BEAUTÉ ET BIEN-ÊTRE
ARTISANAT
CULTURE ET HISTOIRE
DIVERTISSEMENT
ENVIRONNEMENT
NOURRITURE ET BOISSONS
INGÉNIERIE INVERSE
SCIENCES
SPORTS
TECHNOLOGIE
TECHNOLOGIE PORTABLE
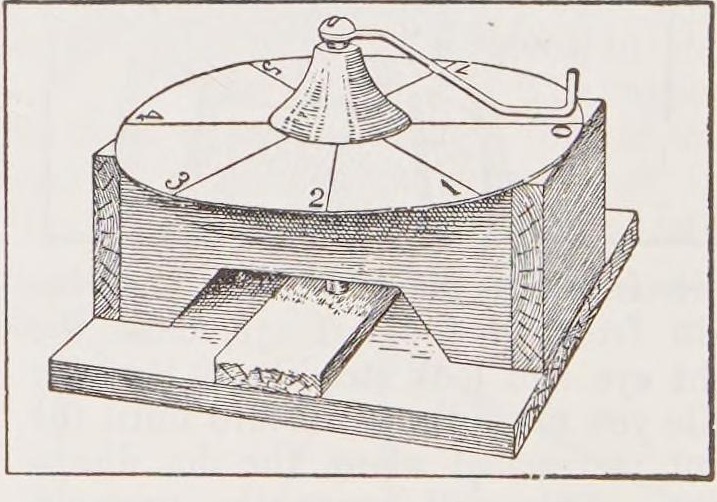


Home-Made Screw Micrometer: a Fine-Threaded Bolt and a Paper Dial (Boy Mechanic, 1913)
A simple micrometer for measuring thin things: a fine-threaded bolt turns through a nut set in a small wooden bench, a wire pointer soldered to its head sweeps a graduated pasteboard dial, and each turn moves the tip down by one thread.
Débutant
Two hours
Consignes
1
1
Reading the dial
Reading the dial
Chargement du notebook Jupyter…
2
2
Read the Boy Mechanic
Read the Boy Mechanic
"A simple, fairly accurate, and easily made apparatus of the micrometer form may be constructed."
3
3
Choose the bolt
Choose the bolt
Get an iron or brass bolt about 1/4 in across and 2-1/2 in long with as fine a thread as possible, threaded nearly to the head, with its nut. Cut a screwdriver slot in the head.
Matériaux pour cette étape :
 Vis à métaux1 pièce
 Écrou hexagonal1 pièce
Outils nécessaires :
 Scie à métaux
 Étau d'établi
4
4
Make the bench
Make the bench
Clamp two square-cornered wood blocks (about 1 x 3/4 x 2-1/2 in) side by side and nail small pieces across the ends; together they are about 2 in wide. Bore a 1/4 in hole through the centre in the 2 in direction. Unclamp, set the nut into one block in line with the hole, then cut a piece out so the blocks form a little bench. Glue its legs to a thin board about 2-1/2 in square.
Matériaux pour cette étape :
 Planche de bois dur1 pièce
 Clous1 pièce
 Colle à bois1 pièce
Outils nécessaires :
 Scie égoïne
 Vilebrequin et mèche
 Serre-joint à pompe
 Ciseaux à bois
 Marteau
5
5
Pointer and dial
Pointer and dial
Solder a stiff wire about 2 in long to the bolt head at right angles. Cut a disc of heavy pasteboard with a radius equal to the wire, divide its edge into equal spaces, and fix it on top of the bench. Screw the bolt down through the nut.
Matériaux pour cette étape :
 Fil de fer1 pièce
 Soudure étain-plomb1 pièce
 Carton contrecollé1 pièce
Outils nécessaires :
 Fer à souder
 Boussole
6
6
Anvil
Anvil
Fix a small piece of wood on the base between the bench legs and glue a small piece of metal on it where the bolt meets it.
Matériaux pour cette étape :
Planche de bois dur1 pièceColle à bois1 pièce7
7
Calibrate and measure
Calibrate and measure
Count the threads in one inch of the bolt on a rule: one turn moves the tip one thread. To measure, screw down onto the object, remove it, screw down to the base, and note how far the wire travels over the dial. Turns (with the part of a turn) divided by threads per inch = thickness in inches.
Outils nécessaires :
 Règle
8
8
Troubleshooting
Troubleshooting
Micrometer troubleshooting.
Flow
Loading...
9
9
History and honest limits
History and honest limits
From **The Boy Mechanic, Book 1** (Popular Mechanics, 1913), p. 130, credited to the Scientific American (checked on the archive.org scan boymechanic0000unse_n5a8). The 1/4-20 bolt and 50-division dial are our example.
Matériaux
8- 1 pièceEspace réservé
- 1 pièceEspace réservé
- 1 pièceEspace réservé
- 1 pièceEspace réservé
- 2 piècesEspace réservé
- 1 pièceEspace réservé
- 1 pièceEspace réservé
- 1 pièceEspace réservé
Outils requis
10- Espace réservé
- Espace réservé
- Espace réservé
- Espace réservé
- Espace réservé
- Espace réservé
- Espace réservé
- 2 vendors sell this, none ship to you yetEspace réservé
- Espace réservé
- Espace réservé
Ce plan fabrique

CC0 Domaine public
Ce blueprint est publié sous CC0. Vous êtes libre de copier, modifier, distribuer et utiliser ce travail pour tout usage, sans demander la permission.
Soutenez le Maker en achetant des produits via son Blueprint où il perçoit une Commission Maker définie par les Vendeurs, ou créez une nouvelle itération de ce Blueprint et incluez-le comme connexion dans votre propre Blueprint pour partager les revenus.