Collaboration
ART
BEAUTÉ ET BIEN-ÊTRE
ARTISANAT
CULTURE ET HISTOIRE
DIVERTISSEMENT
ENVIRONNEMENT
NOURRITURE ET BOISSONS
INGÉNIERIE INVERSE
SCIENCES
SPORTS
TECHNOLOGIE
TECHNOLOGIE PORTABLE


Woven-Reed Footstool: Nailed Dowel Frame, Wound Posts, Woven Top and Pairing-Weave Apron (Boy Mechanic, 1919)
Charles M. Miller's reed footstool from The Boy Mechanic, Book 3 (1919): a frame of 3/4 in dowel rails and posts with crossed 5/8 in braces, nailed through drilled holes, the posts and rails wound with flat reed, the top woven over No. 4 spokes and the apron in pairing weave, finished with a broken-down roll.
Intermédiaire
About 2 days
Consignes
1
1
Cut list
Cut list
Chargement du notebook Jupyter…
2
2
Read The Boy Mechanic, Book 3
Read The Boy Mechanic, Book 3
"Each piece of reed furniture has a framework, usually of dowels." The reed sizes are those of his reed basket (Boy Mechanic, Book 2).
3
3
Cut and drill the frame
Cut and drill the frame
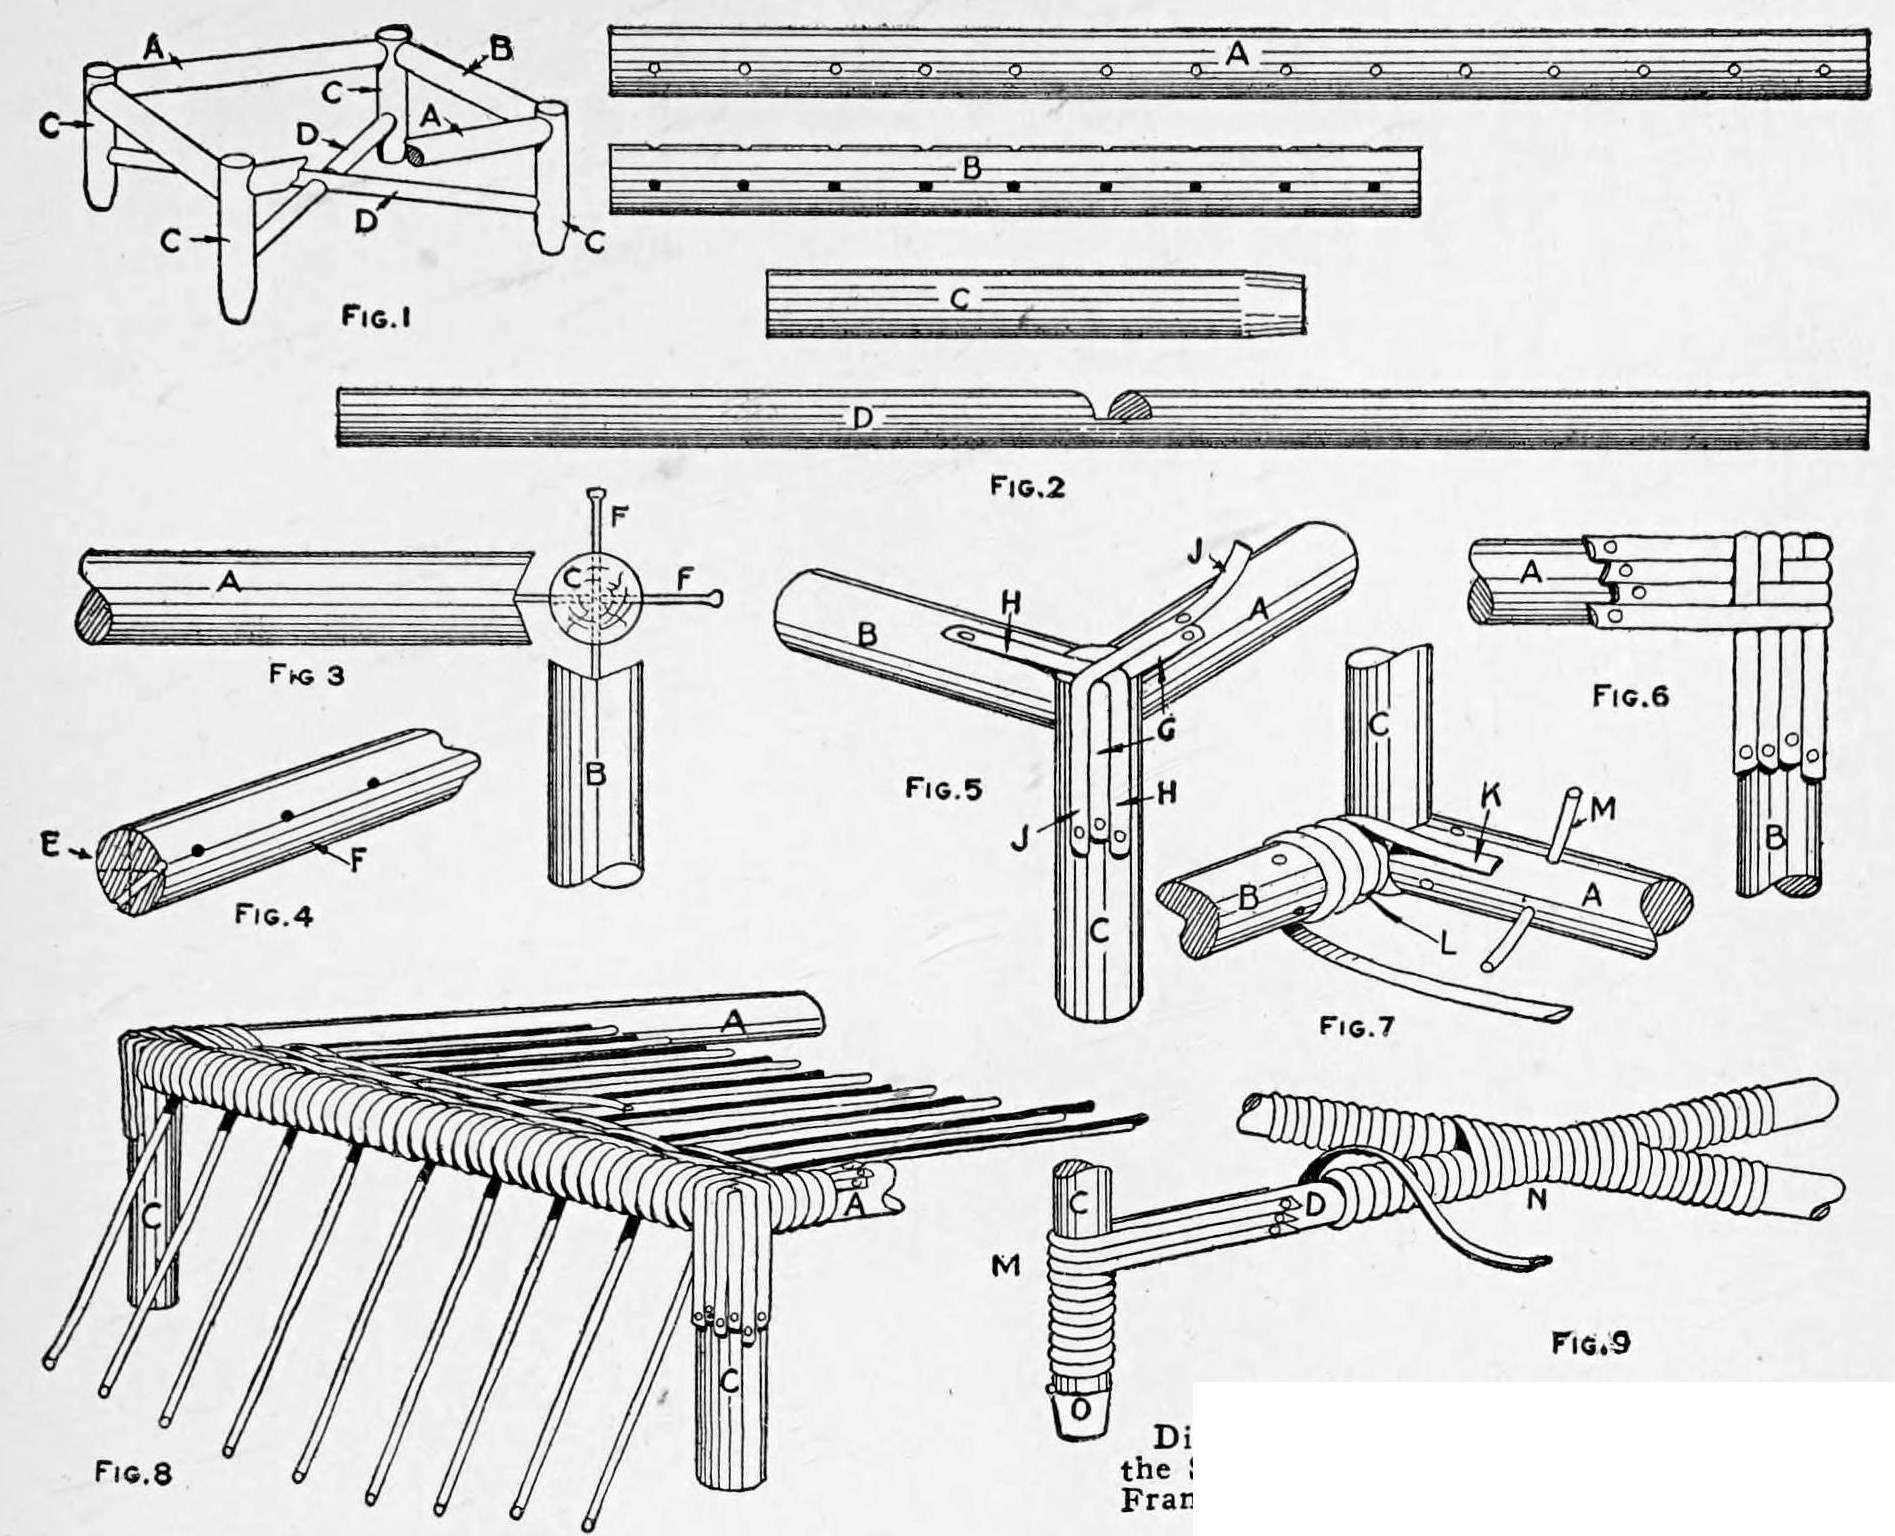
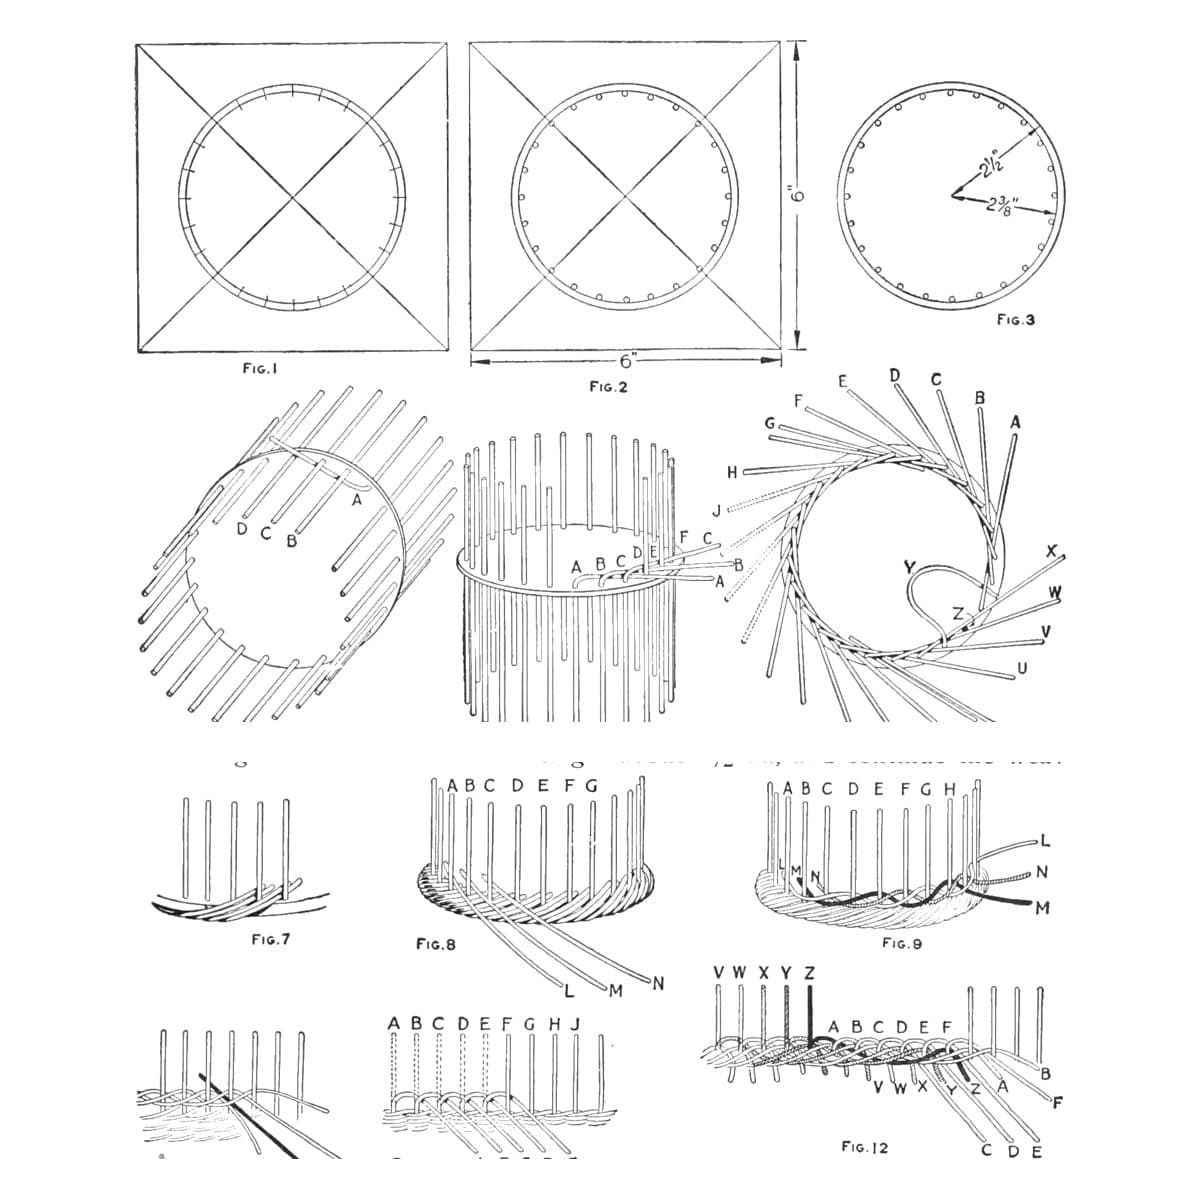
Cut two side rails 3/4 by 14 in, two end rails 3/4 by 9 in, four posts 3/4 by 7 in and two braces 5/8 by 17 in (trimmed to fit later). Notch the rail and brace ends with a coping saw to seat on the posts. Before assembly drill the spoke holes, 1/8 in for No. 4 reed, combining the top and end-side spoke holes as in Fig. 4 and drilling the side-rail holes straight (Fig. 2).
Matériaux pour cette étape :
 Tourillon en bois4 pièces
Outils nécessaires :
 Scie à chantourner
 Chignole à main
 Crayon
 Mètre ruban
4
4
Nail the frame
Nail the frame
Run the posts to the top of the frame and nail through them into the rail ends with ordinary 4-penny nails, drilling 1/16 in holes first. Set the side rails about 1/16 in below the post tops. Halve the braces at the centre on a slant so their tops lie level, try them, and nail them without pulling the frame out of square (Fig. 1).
Matériaux pour cette étape :
 Clous1 pièce
Outils nécessaires :
Chignole à main MarteauScie à chantourner
5
5
Wind the posts and end rails
Wind the posts and end rails
Cover the post tops with short pieces of winding reed tacked on with shoemaker's tacks, crossing in turn (Figs. 5, 6). Wind the end rails, marking each hole with pencil as the winding passes it; then open each hole through the winding with a bodkin (Fig. 7).
Matériaux pour cette étape :
 Canne fendue1 pièce
 Semences de montage1 pièce
Outils nécessaires :
Marteau AlêneCrayon
6
6
Weave the top
Weave the top
Put the 32 in No. 4 spokes through one end rail, down and out at the ends. Weave with a single No. 3 weaver, and after 3/4 in add a short extra spoke beside each spoke, weaving the pair as one; wind the weaver twice round the side rail each time. Insert the spokes in the other end rail before the weaving is within 2 or 3 in of it (Fig. 8).
Matériaux pour cette étape :
 Rotin1 pièce
Outils nécessaires :
 Ciseaux
 Seau de 20 litres
 Éponge
7
7
Wind braces and posts, weave the apron
Wind braces and posts, weave the apron
Wind the braces and posts, three strips round the post and tacked where each brace meets it, and both braces together where they cross (Fig. 9); finish the posts with brass caps or wind to within 1/8 in of the bottom. With the stool upside down, insert short spokes in the under side of the side rails and weave the apron in pairing weave, always passing one weaver twice round each post (Figs. 10-12). Cut the extra spokes even and break down the spokes into a roll, tucking the ends inside (Figs. 13-15). Singe off stray fibres carefully with a gas flame or blowtorch.
Matériaux pour cette étape :
Canne fendue1 pièceRotin1 pièceSemences de montage1 pièceOutils nécessaires :
Ciseaux Chalumeau à propaneÉpongeSeau de 20 litres
8
8
Troubleshooting
Troubleshooting
Reed weaving troubleshooting.
Flow
Loading...
9
9
History and honest limits
History and honest limits
From "A Woven-Reed Footstool" by Charles M. Miller, in **The Boy Mechanic, Book 3**, Popular Mechanics, 1919 (Project Gutenberg 71856; checked on the archive.org scan boymechanic0003unse, pp. 255-258). Fig. 2 shows the hole positions without figures, and he mentions an optional chloride-of-lime bleach that we leave out. The tools and metric figures are ours.
Matériaux
5- 4 piècesEspace réservé
- 1 pièceEspace réservé
- 1 pièceEspace réservé
- 1 pièceEspace réservé
- 1 pièceEspace réservé
Outils requis
10- Espace réservé
- Espace réservé
- 1 vendor sell this, none ship to you yetEspace réservé
- 1 vendor sell this, none ship to you yetEspace réservé
- Espace réservé
- Espace réservé
- Espace réservé
- Espace réservé
- Espace réservé
- Espace réservé
Ce plan fabrique
Blueprints liés
Ces blueprints partagent des connaissances — techniques, matériaux ou principes

CC0 Domaine public
Ce blueprint est publié sous CC0. Vous êtes libre de copier, modifier, distribuer et utiliser ce travail pour tout usage, sans demander la permission.
Soutenez le Maker en achetant des produits via son Blueprint où il perçoit une Commission Maker définie par les Vendeurs, ou créez une nouvelle itération de ce Blueprint et incluez-le comme connexion dans votre propre Blueprint pour partager les revenus.