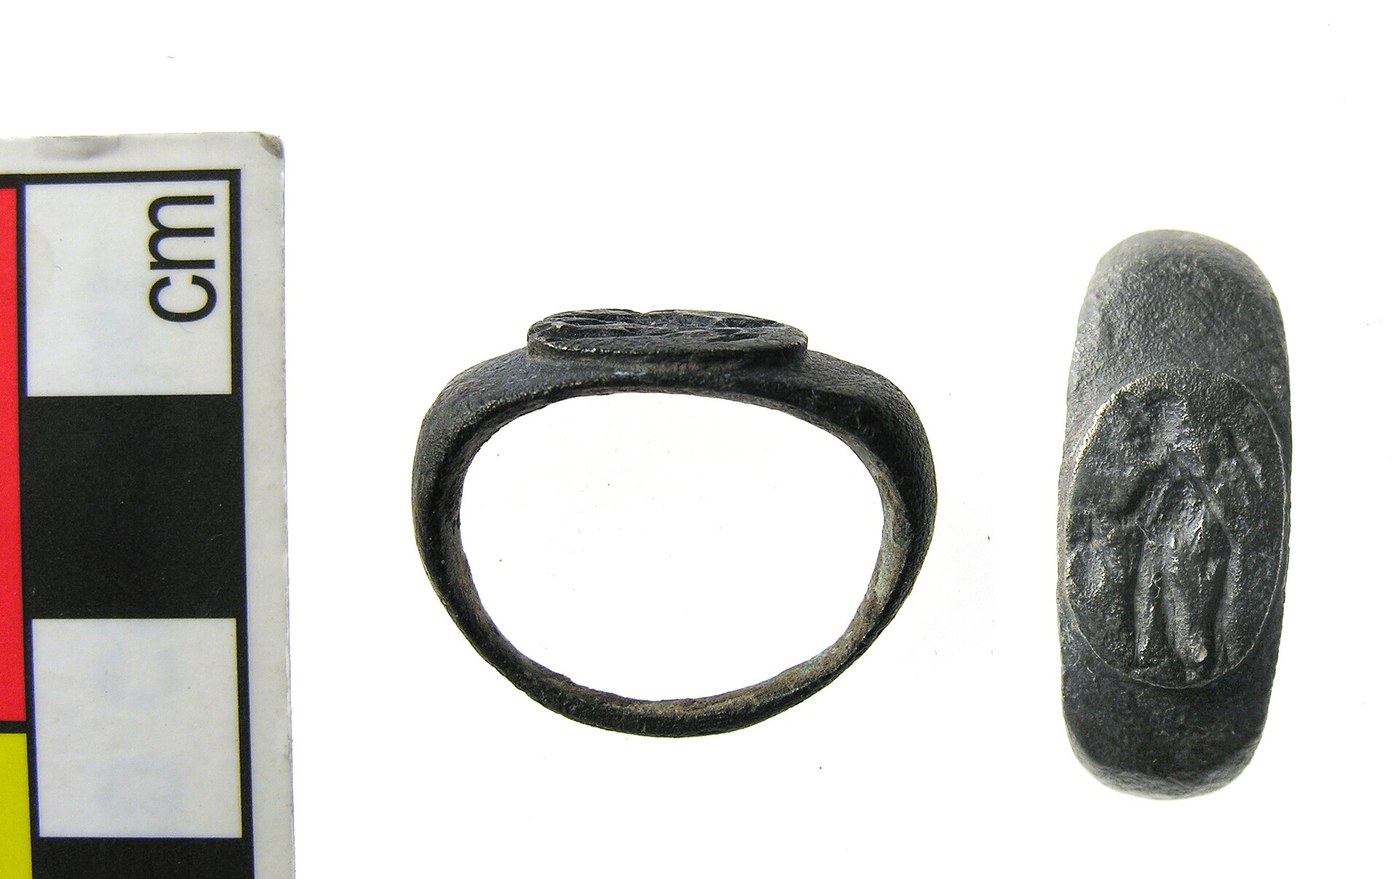


Roman Signet Ring
A Roman signet ring — the anulus signatorius — was not jewellery first. It was a signature. Before a literate bureaucracy and long before handwriting analysis, a document was closed with wax and stamped with a device only one person owned. The impression was the proof.
The design is cut in reverse and below the surface (intaglio), so pressing it into warm wax lifts a raised, correctly-oriented image. Romans made these in two forms: a carved hardstone — carnelian, jasper, agate — set into a metal hoop, and the device engraved straight into a gold, silver or base-metal bezel. This blueprint builds the second. It needs no lapidary equipment, it is entirely period-correct, and the engraving skill it teaches is the same one the gem-cutters used.
The trap for a modern maker is the wax test at the end. Almost everyone cuts the design the right way round, and discovers it only when the seal comes out mirrored. Cut it backwards from the first line.
Consignes
Draw the device at final size
Draw the device at final size
Draw your device inside a 14 x 11 mm oval — the bezel face. Keep it to bold shapes: an animal, a bird, a monogram of two or three letters. Fine detail will not survive engraving at this scale or read in wax.
Mirror the drawing
Mirror the drawing
Trace the drawing, flip the tracing over, and work from the flipped copy for the rest of the build. Every letter and every asymmetric shape must be backwards on the metal. This is the single most common failure in the whole blueprint.
Saw the bezel blank
Saw the bezel blank
Saw a 14 x 11 mm oval from 24 gauge sterling sheet with the jeweller's saw. File the edge smooth with a needle file.
Matériaux pour cette étape :
 Feuille d'argent sterling 925 de 0,5 mm1 pièce
Outils nécessaires :
 Bocfil de bijoutier
 Jeu de limes aiguilles
Cut the shank wire
Cut the shank wire
Cut 62 mm of 16 gauge sterling round wire for a UK size P / US size 7.5 shank. Add 3 mm for each size up.
Matériaux pour cette étape :
 Fil rond en argent massif calibre 160.062 mètre
Outils nécessaires :
Bocfil de bijoutierAnneal the wire
Anneal the wire
Heat the wire on the firebrick with the torch to a dull cherry red — about 600 to 650 °C — and hold it there for 30 seconds. Work in dim light; in bright light you will overshoot and melt it.
Let it air-cool for at least 10 seconds before quenching in water. Quenching sterling straight from red heat can crack or shatter the metal.
Outils nécessaires :
 Chalumeau à propane
 Briques réfractaires
Bend the shank round the mandrel
Bend the shank round the mandrel
Bend the annealed wire around the ring mandrel with the pliers until the two ends meet. The joint must close with no gap and no spring — solder will not bridge a gap.
Outils nécessaires :
 Triboulet à bagues
 Jeu de pinces de bijoutier
Solder the shank joint with hard solder
Solder the shank joint with hard solder
Flux the joint, lay on one 2 mm chip of hard solder, and heat the whole ring evenly until the solder flows — about 788 °C. Hard solder first, because the next joint must be soldered without reopening this one.
Matériaux pour cette étape :
 Jeu de brasure d'argent (tendre/moyenne/forte)1 jeu
 Pâte à décaper pour brasage (à la colophane)1 pièce
Outils nécessaires :
Chalumeau à propaneBriques réfractairesPickle the ring
Pickle the ring
Mix citric acid with water at 1 part acid to 5 parts water. Warm it, and leave the ring in for 5 minutes to strip flux glass and firescale. Lift it out with plastic tweezers — steel tweezers in pickle will copper-plate the silver pink.
Matériaux pour cette étape :
 Acide citrique100 g
File a flat seat on the shank
File a flat seat on the shank
File a flat 8 mm long across the top of the shank, opposite the joint. The bezel needs metal-to-metal contact along its whole length or the solder will not pull through.
Outils nécessaires :
Jeu de limes aiguillesSolder the bezel to the shank with medium solder
Solder the bezel to the shank with medium solder
Flux, seat the bezel on the flat, and solder with medium solder — it flows around 750 °C, below the hard solder already in the shank joint, so that joint stays put.
Matériaux pour cette étape :
Jeu de brasure d'argent (tendre/moyenne/forte)1 jeuPâte à décaper pour brasage (à la colophane)1 pièceOutils nécessaires :
Chalumeau à propaneBriques réfractairesPickle and sand the bezel flat
Pickle and sand the bezel flat
Pickle again for 5 minutes. Sand the bezel face flat with emery cloth, working 240 then 400 then 600 grit. A domed face will print unevenly in wax.
Matériaux pour cette étape :
Acide citrique100 g Toile émeri1 feuille
Scribe the mirrored design onto the bezel
Scribe the mirrored design onto the bezel
Transfer the mirrored drawing onto the bezel face and scribe the outline with the diamond scriber. Check it against the flipped tracing one last time before cutting.
Outils nécessaires :
 Pointe à tracer diamantée
Engrave the device
Engrave the device
Cut the design with the burin held at a shallow 10 to 15° angle, pushing from the shoulder, not the wrist. Cut every line to roughly 0.3 mm deep. Deeper lines print taller in the wax; inconsistent depth prints a patchy seal.
Outils nécessaires :
 Burin de graveur
Clean the cuts and burnish the field
Clean the cuts and burnish the field
Brush the swarf out of the cuts. Burnish the untouched field around the design with the agate burnisher — a polished field against matt cuts is what makes the impression read.
Outils nécessaires :
 Brunissoir d'agate
Test the seal in beeswax
Test the seal in beeswax
Melt beeswax into a 20 mm puddle and let it skin over. Rub the bezel with a trace of wax or oil so it releases, then press it straight down into the wax and lift cleanly.
The impression should be raised and read the right way round. If it reads backwards, the design was cut un-mirrored — the metal can be sanded flat and re-engraved.
Matériaux pour cette étape :
 Pastilles de cire d'abeille20 g
History & Context
History & Context
A signature you could lose. The anulus signatorius closed contracts, wills, letters and storeroom doors. A seal on a document was legal proof, which made losing the ring a genuine emergency — and made the design personal and hard to copy. Pliny the Elder complains in the Natural History that seal rings had become a vanity item; the complaint only makes sense because they were first a working tool.
Iron before gold. Early Republican Rome treated the plain iron ring as the proper citizen's ring, with gold rings restricted by custom and law to senators, magistrates and later equestrians — the ius anuli aurei, the right of the gold ring. That restriction eroded steadily through the Empire until gold rings were common among the well-off. So the metal of a Roman ring is a status marker, and its meaning changes by century. Be careful with any source that gives one flat rule for the whole Roman period.
Stone or metal. The prestige form was a hardstone intaglio — carnelian and its darker cousin sard, jasper, agate, banded onyx — set into a hoop. Glass paste copies were made in quantity for people who wanted the look at a fraction of the cost, and they survive in large numbers. Devices engraved directly into the metal bezel, the form built here, are also well attested. All three coexisted.
How the gems were actually cut. Not with a steel point. Carnelian is far harder than any Roman steel. The gem engraver used a small rotating wheel or drill driven by a bow, charged with a slurry of abrasive powder harder than the stone — emery, or corundum — so the abrasive did the cutting and the tool merely carried it. This is why intaglio work is slow and why the cuts have rounded, wheel-shaped ends rather than the sharp v-section a burin leaves in metal. Look closely at a real Roman gem intaglio and you can read the tool marks.
Why intaglio and not relief. Cutting into the surface gives a raised impression, protects the design from wear as the hand knocks about, and leaves the fragile detail below the surface where it cannot be rubbed away. A design in relief would have flattened within a year of daily wear.
What survives. Thousands of Roman rings and loose intaglios are in museum and public collections, and finds recorded by schemes like the UK's Portable Antiquities Scheme add more every year — many photographed and openly licensed. Loose intaglios outnumber intact rings, because the metal was worth melting and the stone was not.
Matériaux
7- Espace réservé
- 0.062 mètreEspace réservé
- Espace réservé
- Espace réservé
- 100 gEspace réservé
- 1 feuilleEspace réservé
- Espace réservé
Outils requis
9- Espace réservé
- Espace réservé
- Espace réservé
- Espace réservé
- Espace réservé
- Espace réservé
- Espace réservé
- Espace réservé
- Espace réservé
CC0 Domaine public
Ce blueprint est publié sous CC0. Vous êtes libre de copier, modifier, distribuer et utiliser ce travail pour tout usage, sans demander la permission.
Soutenez le Maker en achetant des produits via son Blueprint où il perçoit une Commission Maker définie par les Vendeurs, ou créez une nouvelle itération de ce Blueprint et incluez-le comme connexion dans votre propre Blueprint pour partager les revenus.