ART
BEAUTÉ ET BIEN-ÊTRE
ARTISANAT
CULTURE ET HISTOIRE
DIVERTISSEMENT
ENVIRONNEMENT
NOURRITURE ET BOISSONS
INGÉNIERIE INVERSE
SCIENCES
SPORTS
TECHNOLOGIE
TECHNOLOGIE PORTABLE


Plastic Syringe Set: Moulded Barrel and a Soft Polyethylene Piston
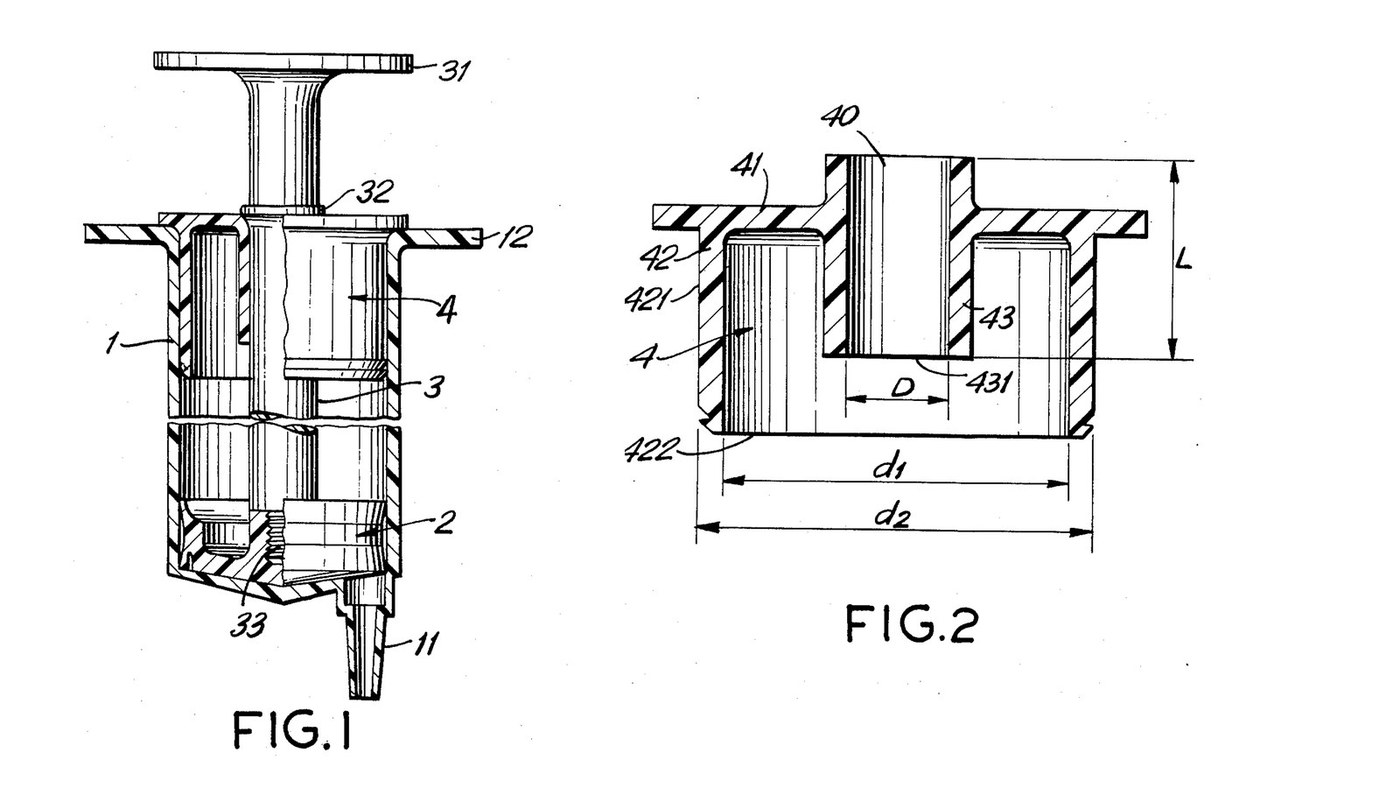
Four moulded parts make a plastic syringe with no rubber seal and no grease: a stiff barrel with a taper nozzle, a bell-shaped piston whose thin polyethylene lips seal against the wall, a slim plunger shaft, and a cap whose long sleeve guides the shaft so it cannot bend and tilt the piston (Adorján & Dávid, US 4,704,105, 1987). Mould one set of moulds per size for a set of syringes for hydraulic models.
The piston figures are the patent's. Polypropylene, LDPE, the sizes and the mould making are ours. Not for medical use. The picture: Figs. 1-2.
Avancé
3 days (moulds) + 1 hour per batch
Consignes
1
1
The moulding process
The moulding process
Drying, mould, injection, cooling and inspection all follow this blueprint. The steps below add only what the syringe needs.
2
2
Mill the barrel mould
Mill the barrel mould
Mill a two-plate mould for the barrel (1): a stiff-walled tube closed at one end by a nozzle (11) with a standard needle taper (ours: the Luer taper), and two finger grips (12) at the open end. One mould per syringe size you want, for example 5, 50 and 60 ml (ours).
Outils nécessaires :
 Fraiseuse
 Bloc d'aluminium pour moule d'injection (2 plaques)
 Bâti de moule d'injection
3
3
Mill the piston mould
Mill the piston mould
The piston (2) is a bell: a rim 5-7 mm high whose two edges flare out into lips 0.3-0.5 mm thick, a front groove 0.3-0.5 mm wide and 2-2.5 mm deep, and a central shank. The lips must come out 0.2-0.6 mm wider than the barrel bore; the rim between them no wider than the bore.
Outils nécessaires :
FraiseuseBloc d'aluminium pour moule d'injection (2 plaques)Bâti de moule d'injection Pied à coulisse numérique 6 pouces
4
4
Mill the shaft and cap moulds
Mill the shaft and cap moulds
Shaft (3): thumb rest (31), a bead (32) and an end projection (33) a little larger than the piston's bore. Cap (4): a disc with an outer collar (42) that force-fits the barrel and an inner sleeve (43) at least as long as the shaft is thick.
Outils nécessaires :
FraiseuseBloc d'aluminium pour moule d'injection (2 plaques)Bâti de moule d'injection5
5
Mould the barrels
Mould the barrels
Mould the barrels from virgin plastic. The patent asks only for a rigid plastic; ours: polypropylene.
Matériaux pour cette étape :
 Granulés de polypropylène1 batch
Outils nécessaires :
 Sécheur de granulés
 Presse à injecter
6
6
Mould the pistons
Mould the pistons
Mould the pistons from virgin polyethylene, which the patent wants at 65-90 degrees Shore (scale not stated). Ours: LDPE; check your grade's data sheet.
Matériaux pour cette étape :
 Granulés de LDPE1 batch
Outils nécessaires :
Sécheur de granulésPresse à injecter7
7
Mould the shafts and caps
Mould the shafts and caps
Mould shafts and caps. These may be reprocessed plastic, as they never touch the liquid. Ours: polypropylene.
Matériaux pour cette étape :
Granulés de polypropylène1 batchOutils nécessaires :
Presse à injecter8
8
Check the lip size
Check the lip size
Measure the barrel bore and a piston's lips. The lips must be 0.2-0.6 mm wider than the bore. Adjust the mould if not.
Outils nécessaires :
Pied à coulisse numérique 6 pouces9
9
Snap the shaft into the piston
Snap the shaft into the piston
Push the shaft's projection through the small bore at the back of the piston until it snaps into the wider cavity behind it.
10
10
Assemble
Assemble
Push the piston into the barrel. Thread the shaft through the cap's sleeve and force the cap's outer collar into the open end of the barrel. Its end face now stops the piston when you draw it fully back.
11
11
Lock the cap
Lock the cap
Press two dents, opposite each other, through the barrel wall into the cap collar with a hot tool so the cap cannot pull out. Ours: a soldering iron tip.
Outils nécessaires :
 Fer à souder électrique
12
12
Test the seal
Test the seal
Draw water and push it out, along the whole stroke, with no grease. It should move smoothly from the start and not leak past the lips. Note the size and file it into your set.
Outils nécessaires :
 Eau
 Bécher en verre
Matériaux
2- 1 batchEspace réservé
- 1 batchEspace réservé
Outils requis
9- Espace réservé
- Espace réservé
- Espace réservé
- Espace réservé
- Espace réservé
- Espace réservé
- Espace réservé
- Espace réservé
- Espace réservé


Blueprints liés
Ces blueprints partagent des connaissances — techniques, matériaux ou principes
CC0 Domaine public
Ce blueprint est publié sous CC0. Vous êtes libre de copier, modifier, distribuer et utiliser ce travail pour tout usage, sans demander la permission.
Soutenez le Maker en achetant des produits via son Blueprint où il perçoit une Commission Maker définie par les Vendeurs, ou créez une nouvelle itération de ce Blueprint et incluez-le comme connexion dans votre propre Blueprint pour partager les revenus.