Kolaborasi
SENI
KECANTIKAN & KESEHATAN
KERAJINAN
BUDAYA & SEJARAH
HIBURAN
LINGKUNGAN
MAKANAN & MINUMAN
REKAYASA BALIK
ILMU PENGETAHUAN
OLAHRAGA
TEKNOLOGI
PERANGKAT PAKAI
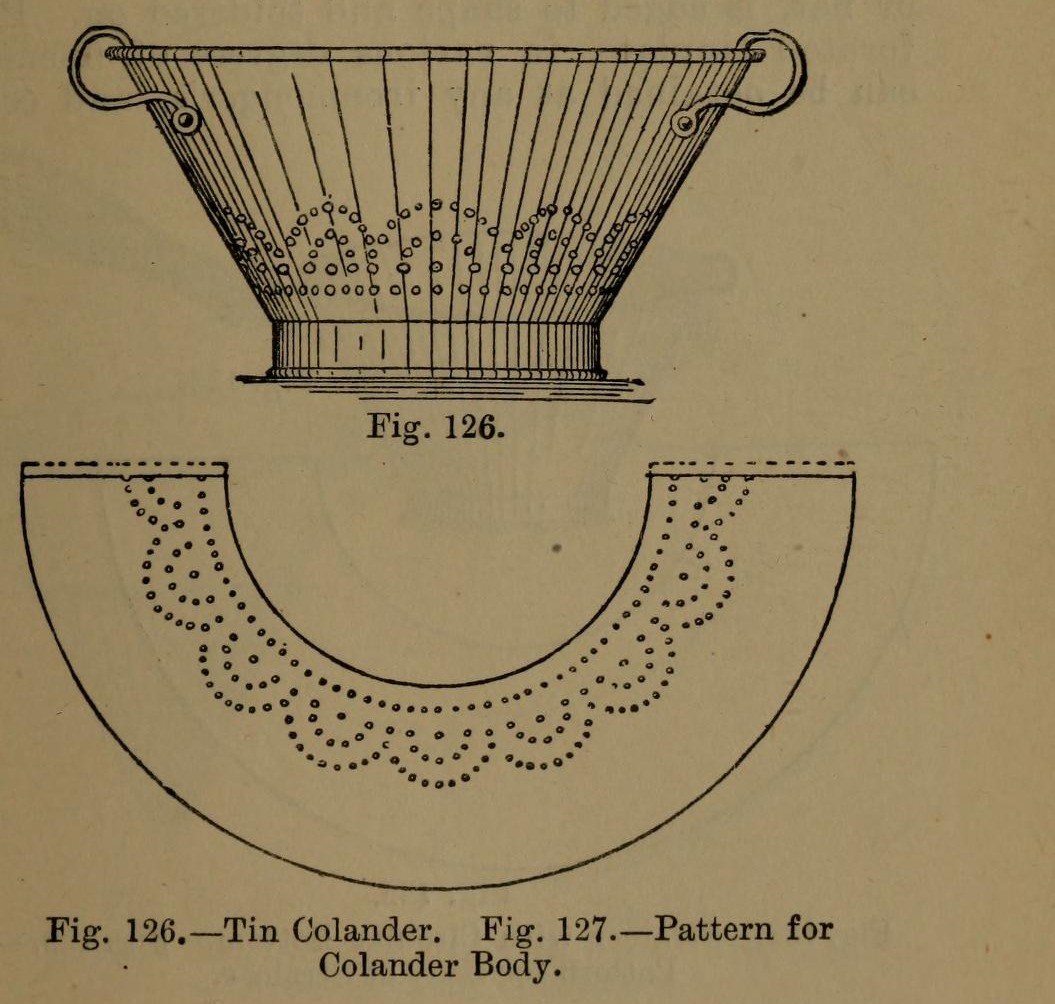


Colander: a Tinplate Colander with Perforated Body and Bottom (Hasluck, 1907)
A tinsmith's colander for straining: a tapered tinplate body and a hollowed bottom, both punched full of holes, standing on a wired hoop, with two bow handles.
The body pattern is a ring segment: outer radius = top diameter, inner radius = bottom diameter, which gives sides at 60 degrees.
Source: Paul N. Hasluck, Tinplate Work (1907), pp. 50-51. Unknown: sizes, solder. Picture: Figs. 126-127 of the book.
Menengah
Unknown
Instruksi
1
1
Set out the body pattern
Set out the body pattern
Choose the top and bottom diameters. On tinplate, strike an arc with radius equal to the top diameter and, from the same centre, one equal to the bottom diameter (Fig. 127); the sides then slope at 60 degrees. Mark the rows of holes, add edges for a grooved seam and the wire, and cut it out.
Material untuk langkah ini:
 Lembaran pelat timah1 body
Alat yang dibutuhkan:
 Jangka tusuk
 Penggores
 Gunting seng
2
2
Break, punch and planish the body
Break, punch and planish the body
'Break' the pattern through the rollers, turning it the opposite way each pass, so it won't crease when bent. Punch the holes on a hardwood block, then flatten and planish the burrs.
Alat yang dibutuhkan:
 Mesin rol pelat
 Pelubang pelat logam
 Balok Kayu Keras
 Palu perata
3
3
Seam and wire the body
Seam and wire the body
Set off the edges for a grooved seam, bend the body to shape and seam it. Solder the seam inside. Set off an edge on the wide end and wire it with No. 10 B.W.G. wire. If you like, raise a swage about 1 1/2 in below the wired edge: it stiffens the colander and looks better.
Material untuk langkah ini:
 Kawat besi1 No. 10 B.W.G.
 Patri timah-timbal1 seam
Alat yang dibutuhkan:
 Palu Kayu
 Pasak
 Solder Listrik
 Fluks
4
4
Make and fit the bottom
Make and fit the bottom
Cut out the bottom, hollow it and edge it to fit the small end. Inside, mark circles from 1 in across at the centre, each 1 in wider than the last, out to the edge. Punch holes at short intervals round them and flatten the burrs on an upturned hollowing hammer. Solder the bottom on.
Material untuk langkah ini:
Lembaran pelat timah1 bottomPatri timah-timbal1 bottomAlat yang dibutuhkan:
Jangka tusukGunting sengPelubang pelat logamPalu perataSolder ListrikFluks5
5
Add the hoop and handles
Add the hoop and handles
Cut a strip 1 1/2 in wide, as long as the circumference of the bottom. Wire it with No. 10 B.W.G., round it, seam it and solder it on as the foot. Rivet a pair of bow handles opposite each other at the top.
Material untuk langkah ini:
Lembaran pelat timah1 hoopKawat besi1 hoopPatri timah-timbal1 hoop Gagang2 bow handles
 Paku keling besi1 number not given
Alat yang dibutuhkan:
Gunting sengSolder ListrikFluks Palu keling
6
6
Clean and scald
Clean and scald
Clean with turpentine and whiting, then polish with dry whiting. Before first use, steep it a short time in boiling water, as for any metal article for the kitchen.
Alat yang dibutuhkan:
 Terpentin
 Kalsium karbonat (kapur tulis halus)
 Air
Bahan
5- 1 hoopPlaceholder
- 1 hoopPlaceholder
- 1 hoopPlaceholder
- 2 bow handlesPlaceholder
- 1 number not givenPlaceholder
Alat yang Diperlukan
15- Placeholder
- Placeholder
- Placeholder
- Placeholder
- Placeholder
- Placeholder
- Placeholder
- Placeholder
- Placeholder
- Placeholder
- Placeholder
- Placeholder
- Placeholder
- Placeholder
- Placeholder
Bahan cetak biru terhubung


Cetak biru ini membuat
CC0 Domain Publik
Cetak biru ini dirilis di bawah CC0. Anda bebas untuk menyalin, memodifikasi, mendistribusikan, dan menggunakan karya ini untuk tujuan apa pun, termasuk komersial, tanpa meminta izin.
Dukung Maker dengan membeli produk melalui Cetak Biru mereka di mana mereka mendapatkan Komisi Pembuat yang ditetapkan oleh Penjual, atau buat iterasi baru dari Cetak Biru ini dan masukkan sebagai koneksi di milik Anda sendiri.