SENI
KECANTIKAN & KESEHATAN
KERAJINAN
BUDAYA & SEJARAH
HIBURAN
LINGKUNGAN
MAKANAN & MINUMAN
REKAYASA BALIK
ILMU PENGETAHUAN
OLAHRAGA
TEKNOLOGI
PERANGKAT PAKAI
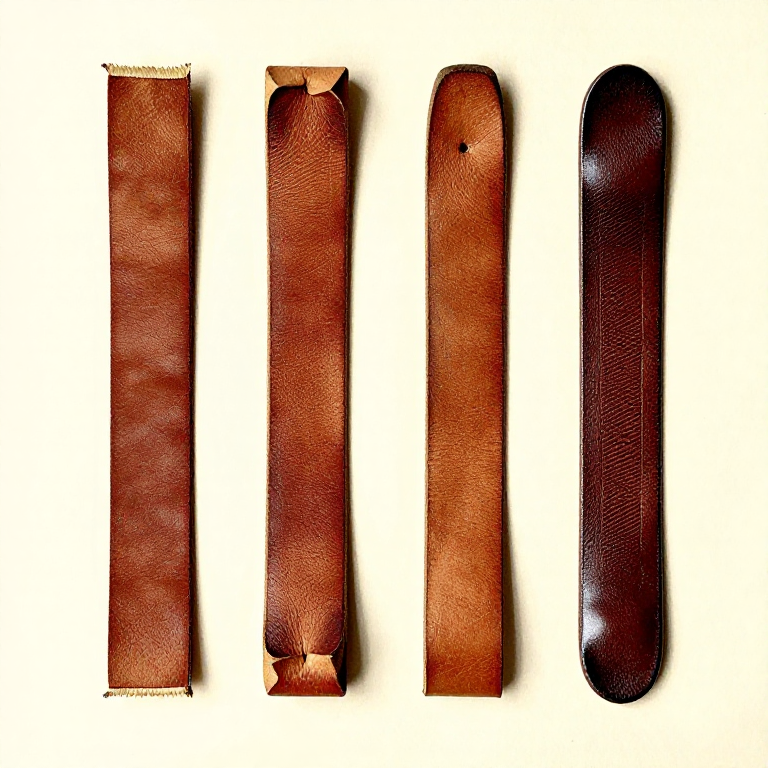


Edges That Last: The Part Everyone Sees and Nobody Plans For
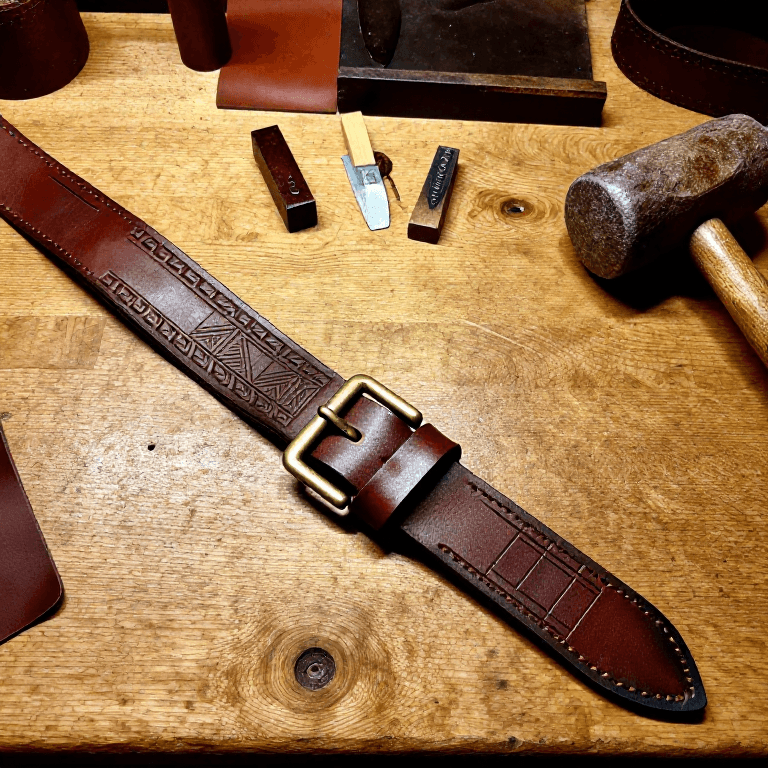
A cut edge in leather is a raw edge. The fibres of the flesh side run straight out into the air, and they fray, absorb dirt and darken. It is the first thing that makes a handmade piece look handmade in the wrong way.
Finishing an edge closes those fibres back down into a smooth dense surface that is nearly as hard as the grain. On vegetable-tanned leather this is done with water, friction and heat — no product is strictly required — and it takes about five minutes per edge to do properly.
It is also the operation that cannot be done later: once a seam is stitched shut, its edges are as good as they will ever be.
Menengah
3 hours
Instruksi
1
1
Sand square, then bevel both sides
Sand square, then bevel both sides
**Start square.** If the edge is not straight and perpendicular, no amount of burnishing fixes it. Sand along the edge with a block — 220 grit, then 400 — until it is flat and the two faces meet it at right angles.
On a glued and stitched assembly, sand the two layers down together so they become one edge. A step between layers will be visible for ever.
**Then bevel.** An edge beveller is a small gouge that shaves a consistent chamfer off the corner. Run it along both the grain side and the flesh side, in one smooth pull, with the tool held at a steady angle.
Bevellers come in sizes — a #1 for thin leather up to about 4 oz, #2 for 5 to 7 oz, #3 and up for heavy. Too large a beveller on thin leather removes most of the edge; too small on thick leather leaves a corner.
The bevel does two things: it rounds the edge so it takes a burnish, and it removes the sharp corner that would otherwise scuff pale and ragged in a month's use.
Material untuk langkah ini:
 Kulit samak nabati2 buah
Alat yang dibutuhkan:
 Alat pembentuk tepi miring
 Penyerong tepi kulit
 Penggaris
2
2
Burnishing: water, friction, heat
Burnishing: water, friction, heat
Burnishing works because vegetable-tanned leather is collagen fibre that can be wetted, compressed and dried in a new shape. Friction supplies heat, the heat drives out the water, and the fibres set as a hard smooth layer.
**Wet the edge only.** A damp finger, a cotton bud, a sponge. Damp, not soaked — water spreading onto the grain side leaves a permanent mark.
**Rub hard and fast** with a burnisher: a slicker of hardwood or bone with grooves of different sizes, an agate, a piece of canvas, or a wooden dowel in a drill. Back and forth along the edge, with real pressure.
**The edge tells you when it is done.** It goes from fuzzy and matt to smooth and glossy, and it darkens. It should feel hard and slightly warm.
**Repeat.** Two or three cycles of wet, burnish, let dry beat one long session. Each one sets the fibres a little harder.
**Chrome-tanned leather will not do this.** The tannage does not set with water and heat, so its edges are finished with paint instead — several thin coats of edge paint, sanded between. That is why most modern bags have a painted edge and a saddler's belt has a burnished one.
Material untuk langkah ini:
Kulit samak nabati2 buah Kulit samak krom1 buah
Alat yang dibutuhkan:
 Penggosok akikAlat pembentuk tepi miring
3
3
What to burnish with, and whether it is needed
What to burnish with, and whether it is needed
**Water alone** works, and on good firm leather it is enough. It is also reversible: a water-burnished edge that gets soaked will lift again.
**Gum tragacanth** is the traditional edge dressing — a plant gum that lays the fibres down and holds them while they set. Brush a thin coat on, let it soak in, burnish while damp. It gives a harder, more durable edge than water and is still breathable.
**Beeswax or saddle soap** rubbed into the edge before the final burnish gives the highest gloss and the best water resistance. The friction melts the wax into the fibres. This is the finish on a good belt.
**Edge paint** is a flexible acrylic that sits on top rather than soaking in. Necessary on chrome tan, optional on vegetable tan, and the usual choice when the edge must be a colour the leather is not.
Order matters: **dye first, then burnish.** Dye will not penetrate a burnished edge, so an edge burnished before dyeing stays pale. This is the commonest order-of-operations mistake after trying to punch holes in a finished piece.
Material untuk langkah ini:
 Gom tragakan (kitre)1 buah
 Malam Lebah1 buah
 Pewarna kulit1 buahKulit samak nabati1 buah
Alat yang dibutuhkan:
Penggosok akik4
4
Reading a bad edge
Reading a bad edge
Every edge fault has one cause, and they are worth knowing because the fix is usually to go back a step rather than to burnish harder.
**Fuzzy and will not shine.** Either the leather is not vegetable tanned, or the edge was too dry, or there was not enough friction. Try more water and more speed first.
**Shiny in patches.** Uneven pressure, or the edge was not sanded flat before starting. Sand it back and begin again.
**Dark spots spreading onto the grain.** Too much water. It will mostly dry out on vegetable tan and it may not go entirely.
**A visible step between two glued layers.** They were not sanded together. Sand them as one edge before bevelling.
**A ragged edge that will not sand true.** The original cut was bevelled — the knife was leaning. Nothing fixes that except cutting the piece narrower, which is why the cutting rung insists on a vertical blade.
**Cracked after a few months.** Over-burnished and dried too hard, with no oil in the leather. A light dressing of oil before the final burnish prevents it.
Material untuk langkah ini:
Kulit samak nabati2 buahAlat yang dibutuhkan:
Penggosok akikAlat pembentuk tepi miringBahan
5- 2 buahPlaceholder
- 1 buahPlaceholder
- 1 buahPlaceholder
- 1 buahPlaceholder
- 1 buahPlaceholder
Blueprint terkait
Blueprint ini berbagi pengetahuan — teknik, bahan, atau prinsip
CC0 Domain Publik
Cetak biru ini dirilis di bawah CC0. Anda bebas untuk menyalin, memodifikasi, mendistribusikan, dan menggunakan karya ini untuk tujuan apa pun, termasuk komersial, tanpa meminta izin.
Dukung Maker dengan membeli produk melalui Cetak Biru mereka di mana mereka mendapatkan Komisi Pembuat yang ditetapkan oleh Penjual, atau buat iterasi baru dari Cetak Biru ini dan masukkan sebagai koneksi di milik Anda sendiri.