Kolaborasi
SENI
KECANTIKAN & KESEHATAN
KERAJINAN
BUDAYA & SEJARAH
HIBURAN
LINGKUNGAN
MAKANAN & MINUMAN
REKAYASA BALIK
ILMU PENGETAHUAN
OLAHRAGA
TEKNOLOGI
PERANGKAT PAKAI
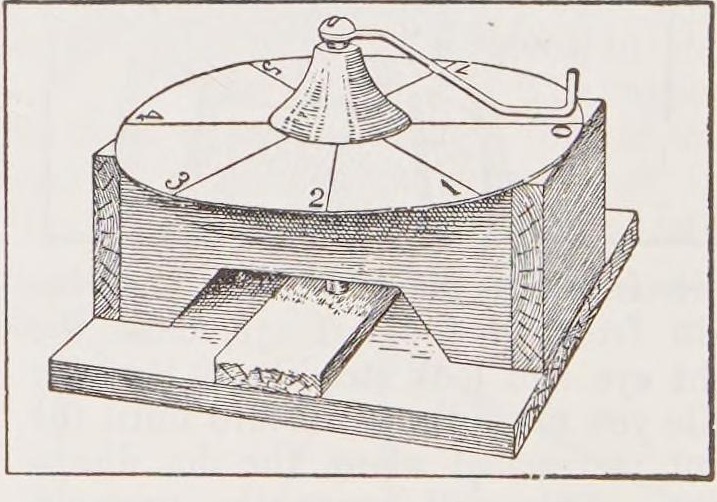


Home-Made Screw Micrometer: a Fine-Threaded Bolt and a Paper Dial (Boy Mechanic, 1913)
A simple micrometer for measuring thin things: a fine-threaded bolt turns through a nut set in a small wooden bench, a wire pointer soldered to its head sweeps a graduated pasteboard dial, and each turn moves the tip down by one thread.
Pemula
Two hours
Instruksi
1
1
Reading the dial
Reading the dial
Memuat notebook Jupyter…
2
2
Read the Boy Mechanic
Read the Boy Mechanic
"A simple, fairly accurate, and easily made apparatus of the micrometer form may be constructed."
3
3
Choose the bolt
Choose the bolt
Get an iron or brass bolt about 1/4 in across and 2-1/2 in long with as fine a thread as possible, threaded nearly to the head, with its nut. Cut a screwdriver slot in the head.
Material untuk langkah ini:
 Sekrup mesin1 buah
 Mur Segi Enam1 buah
Alat yang dibutuhkan:
 Gergaji Besi
 Ragum Meja
4
4
Make the bench
Make the bench
Clamp two square-cornered wood blocks (about 1 x 3/4 x 2-1/2 in) side by side and nail small pieces across the ends; together they are about 2 in wide. Bore a 1/4 in hole through the centre in the 2 in direction. Unclamp, set the nut into one block in line with the hole, then cut a piece out so the blocks form a little bench. Glue its legs to a thin board about 2-1/2 in square.
Material untuk langkah ini:
 Papan Kayu Keras1 buah
 Paku1 buah
 Lem Kayu1 buah
Alat yang dibutuhkan:
 Gergaji Tangan
 Bor engkol dan mata bor
 Klem batang
 Pahat kayu
 Palu
5
5
Pointer and dial
Pointer and dial
Solder a stiff wire about 2 in long to the bolt head at right angles. Cut a disc of heavy pasteboard with a radius equal to the wire, divide its edge into equal spaces, and fix it on top of the bench. Screw the bolt down through the nut.
Material untuk langkah ini:
 Kawat besi1 buah
 Patri timah-timbal1 buah
 Karton lapis lem1 buah
Alat yang dibutuhkan:
 Solder
 Kompas
6
6
Anvil
Anvil
Fix a small piece of wood on the base between the bench legs and glue a small piece of metal on it where the bolt meets it.
Material untuk langkah ini:
Papan Kayu Keras1 buahLem Kayu1 buah7
7
Calibrate and measure
Calibrate and measure
Count the threads in one inch of the bolt on a rule: one turn moves the tip one thread. To measure, screw down onto the object, remove it, screw down to the base, and note how far the wire travels over the dial. Turns (with the part of a turn) divided by threads per inch = thickness in inches.
Alat yang dibutuhkan:
 Penggaris
8
8
Troubleshooting
Troubleshooting
Micrometer troubleshooting.
Flow
Loading...
9
9
History and honest limits
History and honest limits
From **The Boy Mechanic, Book 1** (Popular Mechanics, 1913), p. 130, credited to the Scientific American (checked on the archive.org scan boymechanic0000unse_n5a8). The 1/4-20 bolt and 50-division dial are our example.
Bahan
8- 1 buahPlaceholder
- 1 buahPlaceholder
- 1 buahPlaceholder
- 1 buahPlaceholder
- 2 buahPlaceholder
- 1 buahPlaceholder
- 1 buahPlaceholder
- 1 buahPlaceholder
Alat yang Diperlukan
10- Placeholder
- Placeholder
- Placeholder
- Placeholder
- Placeholder
- Placeholder
- Placeholder
- 2 vendors sell this, none ship to you yetPlaceholder
- Placeholder
- Placeholder
Cetak biru ini membuat

CC0 Domain Publik
Cetak biru ini dirilis di bawah CC0. Anda bebas untuk menyalin, memodifikasi, mendistribusikan, dan menggunakan karya ini untuk tujuan apa pun, termasuk komersial, tanpa meminta izin.
Dukung Maker dengan membeli produk melalui Cetak Biru mereka di mana mereka mendapatkan Komisi Pembuat yang ditetapkan oleh Penjual, atau buat iterasi baru dari Cetak Biru ini dan masukkan sebagai koneksi di milik Anda sendiri.