
SENI
KECANTIKAN & KESEHATAN
KERAJINAN
BUDAYA & SEJARAH
HIBURAN
LINGKUNGAN
MAKANAN & MINUMAN
REKAYASA BALIK
ILMU PENGETAHUAN
OLAHRAGA
TEKNOLOGI
PERANGKAT PAKAI
Metal Band Saw: Horizontal Saw on a Welded Steel Frame
Martin

Dibuat oleh

Martin

23. Oktober 2026NO
9
0
0
0
0

Metal Band Saw: Horizontal Saw on a Welded Steel Frame

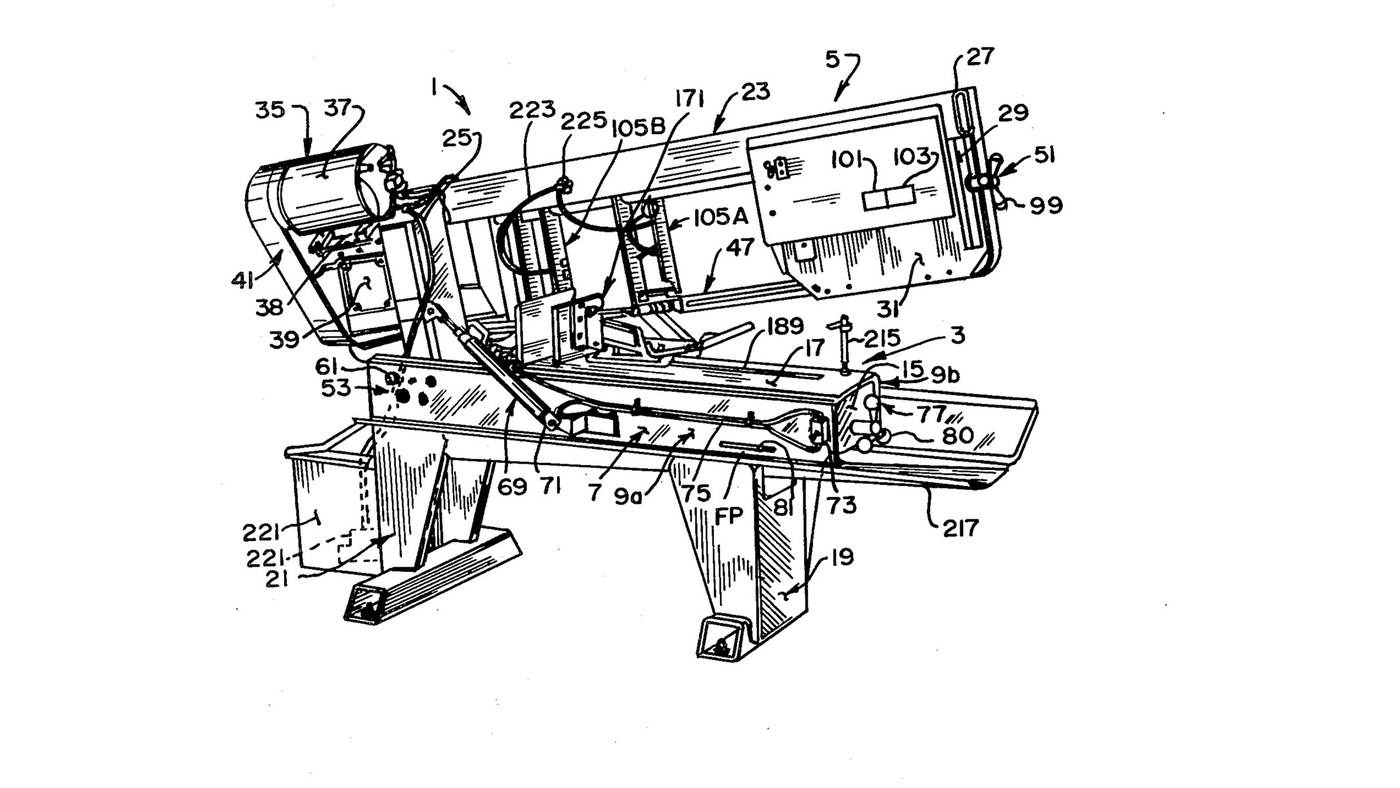
Curtis Eccardt's horizontal power band saw (Emerson Electric, US 4,364,294, 1982), built from welded steel channel and tube instead of iron castings to cut its cost. The saw head swings down on trunnions over the bed; a hydraulic cylinder with a valve sets how fast it feeds, a spring counterbalances it, and a spring tensioner shows the blade tension on a scale. Two guides with rollers twist the blade's lower run 90° so its teeth face down into the work, and carbide inserts hold it there. The patent gives no sizes, speeds or ratings; the welder and wrenches are ours. The picture: the patent's Fig. 1.
Lanjutan
4 days

Instruksi

1

Weld the bed

Stand two steel channels (9a, 9b) parallel, webs upright and flanges facing in, and weld gussets (15) between their webs. Bolt a bed plate (17) across the top flanges as the work surface. Ours: MIG welder, drill press for the bolt holes.

Material untuk langkah ini:

Profil baja kanal UProfil baja kanal U2 buah
Pelat baja lunakPelat baja lunak1 buah
Baut kepala segi enam - mutu 8.8Baut kepala segi enam - mutu 8.81 buah

Alat yang dibutuhkan:

Mesin las MIGMesin las MIG
Mesin Bor DudukMesin Bor Duduk
Kunci InggrisKunci Inggris
2

Weld and bolt on the legs

Weld formed sheet-steel legs onto horizontal floor members to make front and rear leg weldments (19, 21), and bolt them under the bed.

Material untuk langkah ini:

Lembaran bajaLembaran baja1 buah
Pipa baja bulatPipa baja bulat1 buah
Baut kepala segi enam - mutu 8.8Baut kepala segi enam - mutu 8.81 buah

Alat yang dibutuhkan:

Mesin las MIGMesin las MIG
Kunci InggrisKunci Inggris
3

Weld the head

Weld a head post (25) of square or rectangular steel tube square to a head beam (27) of rectangular tube. Weld a bracket leg (29) down from the beam's outer end, and fix support plates at both ends (31, 33).

Material untuk langkah ini:

Pipa baja bulatPipa baja bulat1 buah
Pelat baja lunakPelat baja lunak1 buah

Alat yang dibutuhkan:

Mesin las MIGMesin las MIG
4

Fit the trunnions and align the pivot

Fix a shaft through the head post with its ends out as trunnions (55a, 55b), in bushings in two bearing blocks (59a, 59b) bolted inside the channel webs. Each block has one close-fit bolt hole and three oversize ones: shift the blocks until the pivot is parallel to the bed plate, then torque the bolts. A set screw (67) takes out end play.

Material untuk langkah ini:

Poros bajaPoros baja1 buah
Bus LogamBus Logam2 buah
Dudukan bantalanDudukan bantalan2 buah
Baut kepala segi enam - mutu 8.8Baut kepala segi enam - mutu 8.88 buah
Baut tanam ujung cekungBaut tanam ujung cekung1 buah

Alat yang dibutuhkan:

Mesin Bor DudukMesin Bor Duduk
Kunci MomenKunci Momen
5

Mount motor, belt drive and gearbox

Mount the electric motor (37) on a plate (38) pivoted on the head beam, and couple it by a multi-speed belt and pulleys (41) to a gearbox (39). Fit the drive wheel (43) on the gearbox output shaft.

Material untuk langkah ini:

Motor listrikMotor listrik1 buah
Pelat baja lunakPelat baja lunak1 buah
Sabuk penggerakSabuk penggerak1 buah
KatrolKatrol1 buah
Gearbox reduksiGearbox reduksi1 buah
Roda gergaji pitaRoda gergaji pita1 buah

Alat yang dibutuhkan:

Kunci InggrisKunci Inggris
6

Build the idler tensioner

Weld an idler yoke (87) of rolled steel plate, pivot it on the head beam with a pin (89), and cantilever the idler axle from it with the idler wheel (45) on bearings (85). A threaded rod (91) pulls the yoke through a coil spring (93) held between compression plates and a U-bolt (97); a knob (99) turns the rod. An indicator (101) on the spring reads the tension on a scale (103).

Material untuk langkah ini:

Pelat baja lunakPelat baja lunak1 buah
Pin bajaPin baja1 buah
Poros bajaPoros baja1 buah
Roda gergaji pitaRoda gergaji pita1 buah
Bantalan PeluruBantalan Peluru1 buah
Batang berulirBatang berulir1 buah
Coil SpringCoil Spring1 buah
Baut UBaut U1 buah
Kenop kendaliKenop kendali1 buah

Alat yang dibutuhkan:

Mesin las MIGMesin las MIG
Kunci InggrisKunci Inggris
7

Build the two blade guides

In each guide channel (111) mount two guide rollers (115a, 115b) on ball bearings on eccentric bushings, one fixed and one adjusted to the blade thickness. Add a carbide thrust insert (133) on the blade's back edge and two carbide side inserts (137a fixed, 137b on a sprung swing bracket set by a bolt and knob). Clamp the guides on two bar tracks (107).

Material untuk langkah ini:

Rol pemanduRol pemandu4 buah
Bantalan PeluruBantalan Peluru4 buah
Bus eksentrikBus eksentrik4 buah
Sisipan karbidaSisipan karbida6 buah
Coil SpringCoil Spring2 buah
Kenop kendaliKenop kendali2 buah
Pipa baja bulatPipa baja bulat1 buah

Alat yang dibutuhkan:

Kunci InggrisKunci Inggris
8

Fit the blade and set the tension

By hand, run the endless blade (47) round the drive and idler wheels and through both guides; the rollers twist its lower run about 90° so the teeth face down. Turn the tension knob until the scale shows the tension you want.

Material untuk langkah ini:

Mata gergaji pitaMata gergaji pita1 buah
9

Fit the feed cylinder and counterbalance

Connect a hydraulic cylinder (71) between bed channel and head post above the trunnions, filled with oil and piped through tubing (75) to a control valve (73): the valve sets the feed rate and, closed, holds the head. Fit a coil spring (78) on a threaded linkage (79) between an end gusset and the head post below the trunnions, adjusted by a knob (80), to counterbalance the head.

Material untuk langkah ini:

Silinder hidraulikSilinder hidraulik1 buah
Oli hidrolikOli hidrolik1 batch
Pipa hidrolikPipa hidrolik1 buah
Katup pengatur aliranKatup pengatur aliran1 buah
Coil SpringCoil Spring1 buah
Batang berulirBatang berulir1 buah
Kenop kendaliKenop kendali1 buah

Alat yang dibutuhkan:

Kunci InggrisKunci Inggris
10

Bolt on the vice

Bolt the quick-acting vice to the bed plate to clamp the work square under the blade.

Material untuk langkah ini:

Ragum MesinRagum Mesin1 buah
Baut kepala segi enam - mutu 8.8Baut kepala segi enam - mutu 8.81 buah

Alat yang dibutuhkan:

Kunci InggrisKunci Inggris

Bahan

29

Alat yang Diperlukan

4

CC0 Domain Publik

Cetak biru ini dirilis di bawah CC0. Anda bebas untuk menyalin, memodifikasi, mendistribusikan, dan menggunakan karya ini untuk tujuan apa pun, termasuk komersial, tanpa meminta izin.

Dukung Maker dengan membeli produk melalui Cetak Biru mereka di mana mereka mendapatkan Komisi Pembuat yang ditetapkan oleh Penjual, atau buat iterasi baru dari Cetak Biru ini dan masukkan sebagai koneksi di milik Anda sendiri.

Diskusi

(0)

Masuk untuk bergabung dengan diskusi

Memuat komentar...