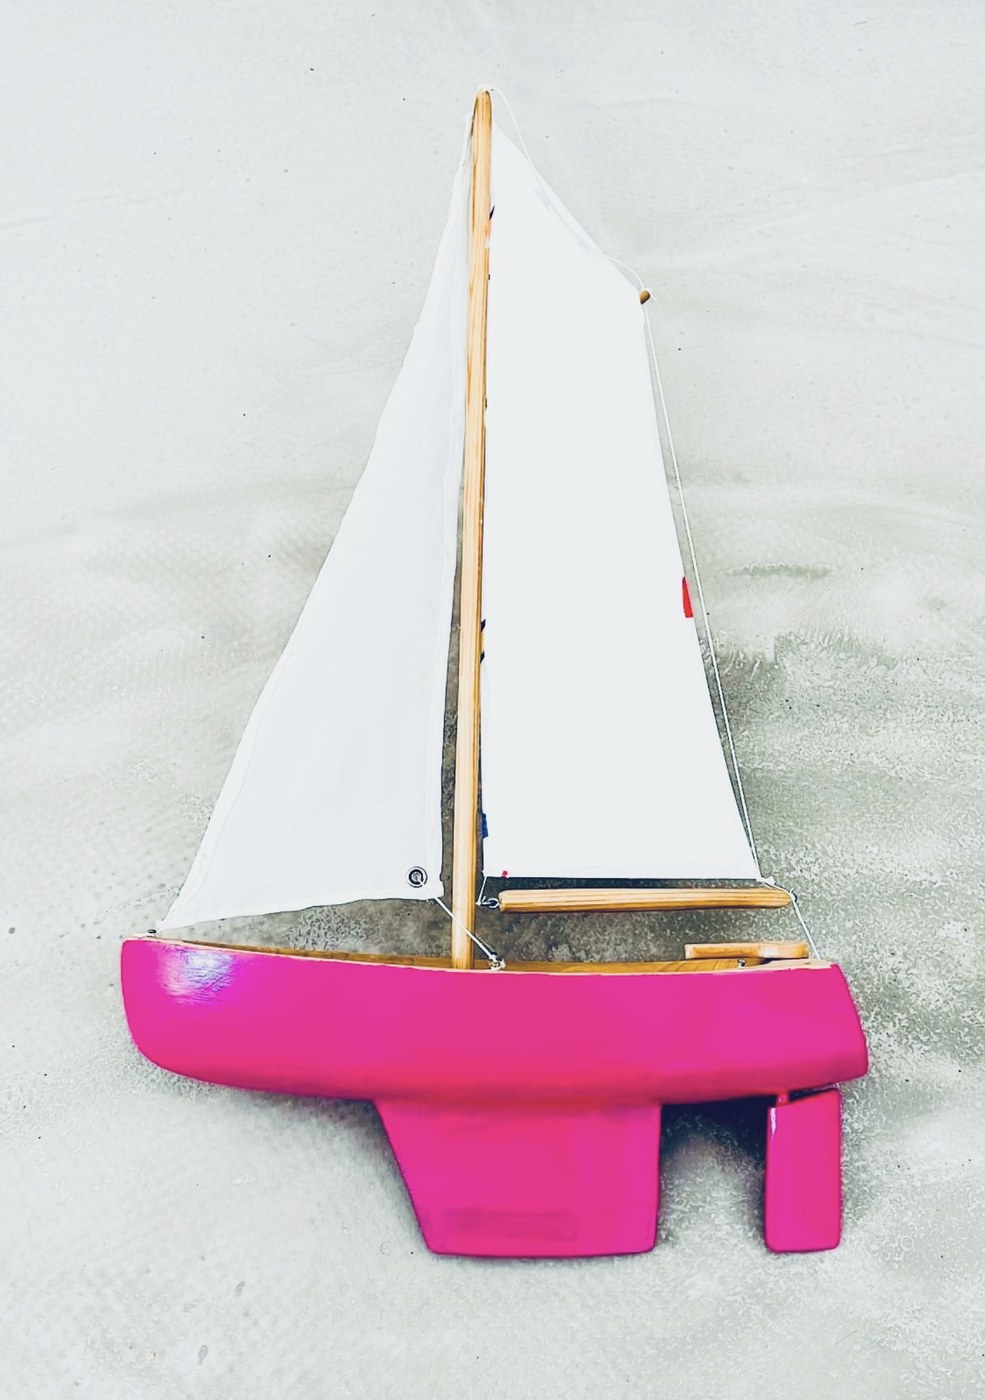


Pond Yacht
A pond yacht is a model sailing boat with no radio and no crew. You set the sails and the rudder on the bank, push it off, and it has to solve the rest of the crossing by itself. That constraint is what makes it a real engineering problem rather than a toy: the boat must be self-righting, self-steering and balanced before it leaves your hand.
Three things decide whether it sails or lies on its side. Ballast low enough to stand the boat back up. A sail plan whose centre of effort sits in the right relationship to the hull's centre of lateral resistance, or the boat gripes up into the wind and stops. And a rudder set to hold the course you intend.
Build it from a carved hull and a keel you can move fore and aft while you tune it. Get those three right and it will cross a pond on its own — which is exactly what the London and Paris clubs were racing on in the nineteenth century.
Instruksi
Draw the hull to a 600 mm length
Draw the hull to a 600 mm length
Draw a side profile and a deck plan for a hull 600 mm long and 130 mm on the beam. Long and narrow sails better than short and wide; the length is what sets the speed.
Alat yang dibutuhkan:
 Penggaris
Stack and glue the hull blank
Stack and glue the hull blank
Glue basswood boards face to face until the stack is thicker than the finished hull depth. This is bread-and-butter construction — laminating first means no piece has to be carved across the grain.
Material untuk langkah ini:
 Balok kayu linden untuk ukir2 buah
 Lem Kayu PVA30 ml
Cut the profile, then the plan
Cut the profile, then the plan
Saw the side profile first, tape the offcuts back on, and saw the deck plan. Cutting both views before carving leaves a blank that is already the right shape in two directions.
Alat yang dibutuhkan:
 Gergaji Tangan
Carve the hull to templates
Carve the hull to templates
Cut card templates for three or four stations and carve down until each one seats without a gap. Templates keep both sides identical; eye alone does not, and an asymmetric hull turns in one direction.
Alat yang dibutuhkan:
 Set pahat ukir kayu
Hollow the hull from below
Hollow the hull from below
Hollow the inside to a wall thickness of about 6 mm, leaving solid blocks where the mast and keel will land. Weight removed from the hull is weight you can put in the ballast, where it does useful work.
Fit and seal the deck
Fit and seal the deck
Glue a thin deck over the hull and seal the joint all round. Water inside a free-sailing boat is unrecoverable in the middle of a pond.
Material untuk langkah ini:
 Lembaran Kayu Basswood1 buah
Make a fin keel with a slotted mount
Make a fin keel with a slotted mount
Cut a fin from brass or steel plate, 150 mm deep, and mount it in a fore-and-aft slot so it can slide. Being able to move the keel is the single most useful tuning adjustment on the boat.
Material untuk langkah ini:
 Batang Kuningan1 buah
Bolt the ballast to the keel foot
Bolt the ballast to the keel foot
Bolt a steel bar to the bottom of the fin as ballast — around a third of the all-up weight is a reasonable starting point. Historical boats used lead; steel is used here because lead is a cumulative poison and there is no reason to hand a child a lead bulb.
Float the bare hull and read the waterline
Float the bare hull and read the waterline
Float the hull with keel and ballast fitted, and mark where the water sits. Trim it level by shifting the keel in its slot before you go any further.
Step the mast in a movable box
Step the mast in a movable box
Fit the mast into a step that allows it to move fore and aft by 20 mm and to rake. Sail balance is tuned here, and a fixed mast step removes the adjustment you will need most.
Material untuk langkah ini:
 Batang Dowel Kayu1 buah
Cut mainsail and jib from ripstop
Cut mainsail and jib from ripstop
Cut a mainsail and a jib from lightweight ripstop, adding a shallow curve to the luff so the sail takes a belly rather than sitting flat.
Material untuk langkah ini:
 Nilon ripstop1 sqm
Hem the edges and reinforce the corners
Hem the edges and reinforce the corners
Hem all three edges of each sail and patch the corners before fitting eyelets. Unhemmed ripstop unravels from the first sail onward.
Rig the standing rigging
Rig the standing rigging
Rig a forestay and two shrouds and tension them just enough to hold the mast straight. Over-tight rigging bends a light mast into a curve.
Fit the rudder and a friction hinge
Fit the rudder and a friction hinge
Hang a rudder on the transom with enough friction in the pivot to hold a set angle. On a free-sailing boat the rudder is a trim setting, not a control.
Find the balance on the water
Find the balance on the water
Sail it across the pond on a reach. If it turns into the wind and stalls, move the mast forward or the keel aft; if it bears away downwind, do the reverse. Change one thing at a time and write down what you changed.
Set the sheets for the leg you want
Set the sheets for the leg you want
Cleat the sheets to suit the crossing — sails in tight for close work, eased for a reach — then launch. The boat holds whatever you set until it reaches the far bank.
History & Context
History & Context
Where it was sailed. Model yacht sailing grew up around the ornamental water of city parks — the tradition of sailing wooden pond yachts at the Jardin du Luxembourg in Paris dates from 1881, and London had model yacht clubs through the same period, with the sport becoming widely fashionable after the First World War. Racing was typically on long narrow ponds, and the number of times a boat had to be stopped and reset at the bank counted against you in the result. That rule is the reason self-steering was invented at all.
Weighted rudders first. The earliest steering gears were free-swinging rudders with a weight attached. When the boat heeled, the weight swung the rudder and pushed the boat back up toward the wind. Skippers carried a set of rudders with different weights and chose one to match the day's conditions — the boat was tuned by swapping hardware, before the race, with no adjustment afterwards.
Braine gear, 1904. George Braine, of the Kensington Gardens model yacht club in London, connected the rudder to the mainsheet: a quadrant on the rudder stock is driven by the tension in the sheet and damped with a rubber band, so as the sail swings under a gust the rudder moves to bring the boat back on course. It was used very widely on both racing and recreational boats, and it is a genuinely elegant piece of feedback engineering — the disturbance itself supplies the correction.
Vane gear, and after. Wind-vane steering, in which a vane senses the apparent wind angle and drives the rudder, followed later and is the ancestor of the self-steering gear used on full-size ocean-going yachts to this day. The line runs from a toy boat on a park pond to equipment that has carried people across oceans single-handed. Radio control eventually replaced free sailing in most clubs, but vintage classes still race the old way, with the boat solving the crossing alone.
Bahan
6- Placeholder
- 30 mlPlaceholder
- 1 buahPlaceholder
- 1 buahPlaceholder
- 1 buahPlaceholder
- 1 sqmPlaceholder
Alat yang Diperlukan
3- Placeholder
- Placeholder
- Placeholder
CC0 Domain Publik
Cetak biru ini dirilis di bawah CC0. Anda bebas untuk menyalin, memodifikasi, mendistribusikan, dan menggunakan karya ini untuk tujuan apa pun, termasuk komersial, tanpa meminta izin.
Dukung Maker dengan membeli produk melalui Cetak Biru mereka di mana mereka mendapatkan Komisi Pembuat yang ditetapkan oleh Penjual, atau buat iterasi baru dari Cetak Biru ini dan masukkan sebagai koneksi di milik Anda sendiri.