
SENI
KECANTIKAN & KESEHATAN
KERAJINAN
BUDAYA & SEJARAH
HIBURAN
LINGKUNGAN
MAKANAN & MINUMAN
REKAYASA BALIK
ILMU PENGETAHUAN
OLAHRAGA
TEKNOLOGI
PERANGKAT PAKAI
Push Button: Normally Open Momentary Switch with a Cushioned Contact (De Reamer, GE 1939)
Ed

Dibuat oleh

Ed

28. Oktober 2026FI
1
0
0
0
0

Push Button: Normally Open Momentary Switch with a Cushioned Contact (De Reamer, GE 1939)

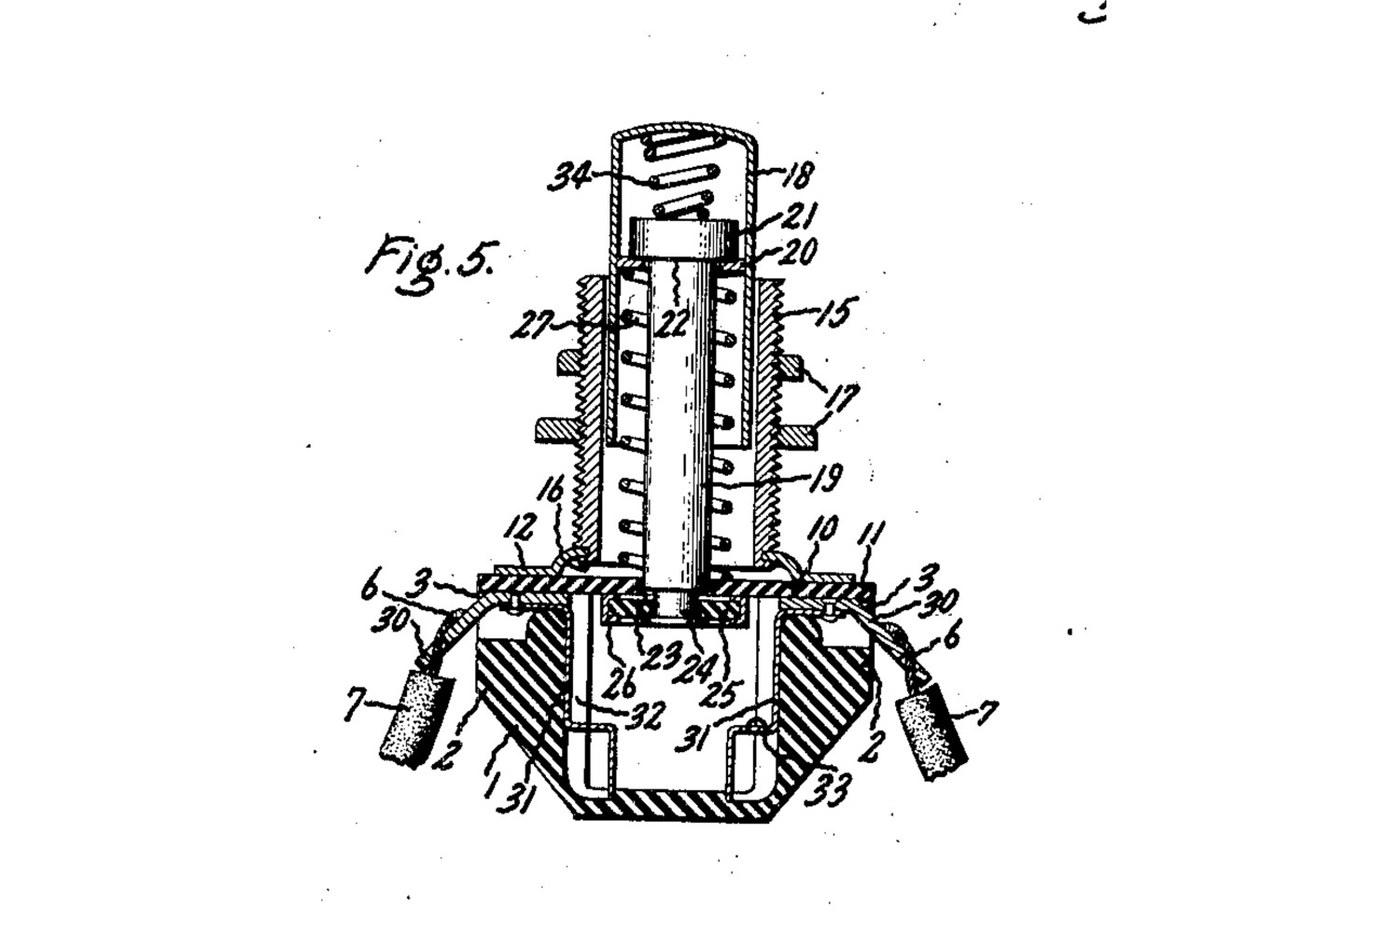
A panel push button that closes a circuit only while you press it. A spring holds the button out, and a metal rim on the end of its rod sits clear of two contacts. Press it and the rim bridges both contacts. A second spring inside the button lets the rod give, so the contacts never take more than that spring's force. Source: Frank C. De Reamer, US 2,166,803 (General Electric, 1939), Fig. 5. Unknown: the insulating material, the metals and every size. De Reamer gives none of them, so they are linked to unknown heads. The tools are ours. Picture: the patent's Fig. 5.
Lanjutan
2 days

Instruksi

1

Mould the housing

Mould a cup-shaped housing of insulating material, with a boss on each of two opposite sides, a recess in the top of each boss, a groove inside below each boss, and a bead round the top. Unknown: the material, the sizes and the moulding.

Material untuk langkah ini:

Bahan isolasi tidak diketahuiBahan isolasi tidak diketahui1 as required

Alat yang dibutuhkan:

Cetakan kompresiCetakan kompresi
Dimensi tidak diketahuiDimensi tidak diketahui
2

Make the terminals and contacts

Bend two angled metal strips. The upper end of each sits in a boss recess, and the lower end is a solder lug. Fix each upper end to a contact that fits the groove inside the housing, stepped at its bottom end. Unknown: the metal.

Material untuk langkah ini:

Logam tidak diketahuiLogam tidak diketahui1 as required

Alat yang dibutuhkan:

Gunting sengGunting seng
Tang Berujung RataTang Berujung Rata
Dimensi tidak diketahuiDimensi tidak diketahui
3

Make the sleeve, plate and cover

Turn a threaded sleeve and cut its thread. Spin its lower end over onto a metal plate with tangs. Cut a cover of insulating sheet with ears that reach over the bosses and a hole in the middle to guide the rod.

Material untuk langkah ini:

Logam tidak diketahuiLogam tidak diketahui1 as required
Bahan isolasi tidak diketahuiBahan isolasi tidak diketahui1 as required

Alat yang dibutuhkan:

Mesin Bubut LogamMesin Bubut Logam
Set pahat bubut (HSS)Set pahat bubut (HSS)
Pemegang sney ulirPemegang sney ulir
Gunting sengGunting seng
Jangka Sorong VernierJangka Sorong Vernier
Dimensi tidak diketahuiDimensi tidak diketahui
4

Make the push button

Make a drawn metal tube closed at the top, and a rod with a head. Put a small coil spring in the top of the tube, then the rod's head. Wedge a washer into the tube under the head. Leave clearance so the rod can swivel a little. Turn the rod's lower end down to a smaller diameter. Unknown: the metal.

Material untuk langkah ini:

Logam tidak diketahuiLogam tidak diketahui1 as required
Set Pegas TekanSet Pegas Tekan1 spring

Alat yang dibutuhkan:

Mesin Bubut LogamMesin Bubut Logam
Set pahat bubut (HSS)Set pahat bubut (HSS)
Jangka Sorong VernierJangka Sorong Vernier
Dimensi tidak diketahuiDimensi tidak diketahui
5

Assemble

Set the terminals in their recesses and the contacts in their grooves. Slide the button into the sleeve, with a coil spring round the rod between the cover and the wedged washer. Pass the rod's end through the cover's hole. Put on it a loose insulating washer with a metal rim round its edge. Hammer the rod's end over into a flange. Lay the cover on the housing, so its ears clamp the terminals, and bend the plate's tangs over the bead.

Material untuk langkah ini:

Bahan isolasi tidak diketahuiBahan isolasi tidak diketahui1 as required
Logam tidak diketahuiLogam tidak diketahui1 as required
Set Pegas TekanSet Pegas Tekan1 spring

Alat yang dibutuhkan:

Ragum MejaRagum Meja
Palu kepala bulatPalu kepala bulat
Tang Berujung RataTang Berujung Rata
Kacamata pengamanKacamata pengaman
6

Mount and wire it

Put the sleeve through a hole in the panel and clamp the panel between two nuts on the thread. Solder the bared wire ends to the two lugs.

Material untuk langkah ini:

Mur Segi EnamMur Segi Enam2 pcs
Kawat Timah SolderKawat Timah Solder1 as required

Alat yang dibutuhkan:

SolderSolder
Tang Berujung RataTang Berujung Rata
7

Check it

At rest, the rim sits against the underside of the cover and the circuit is open. Pressed, the rim meets the stepped ends of both contacts and closes it. The checking is ours: the meter reads open, then closed while pressed.

Alat yang dibutuhkan:

MultimeterMultimeter

Bahan

5

Alat yang Diperlukan

13

Cetak biru ini membuat

CC0 Domain Publik

Cetak biru ini dirilis di bawah CC0. Anda bebas untuk menyalin, memodifikasi, mendistribusikan, dan menggunakan karya ini untuk tujuan apa pun, termasuk komersial, tanpa meminta izin.

Dukung Maker dengan membeli produk melalui Cetak Biru mereka di mana mereka mendapatkan Komisi Pembuat yang ditetapkan oleh Penjual, atau buat iterasi baru dari Cetak Biru ini dan masukkan sebagai koneksi di milik Anda sendiri.

Diskusi

(0)

Masuk untuk bergabung dengan diskusi

Memuat komentar...