Kolaborasi
SENI
KECANTIKAN & KESEHATAN
KERAJINAN
BUDAYA & SEJARAH
HIBURAN
LINGKUNGAN
MAKANAN & MINUMAN
REKAYASA BALIK
ILMU PENGETAHUAN
OLAHRAGA
TEKNOLOGI
PERANGKAT PAKAI
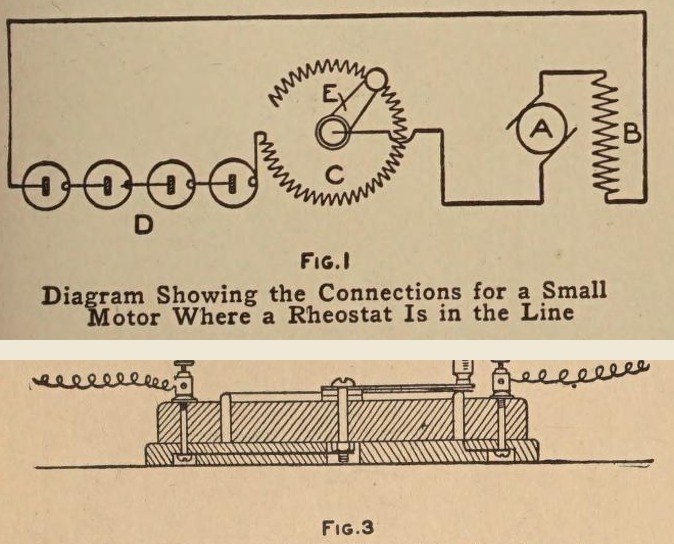


Rheostat: a Small Ring Rheostat for Toy Motors (Boy Mechanic, 1915)
A small variable resistor to set the speed of a toy motor: resistance wire wound on a fibre strip bent into a ring, set in a groove in a hardwood base, with a brass arm that slides round the bared top of the winding.
Wired in series with the motor, it works like a valve in a water pipe.
Source: The Boy Mechanic, Book 2 (1915), pp. 393-394. Unknown: wire alloy. Picture: Figs. 1 and 3 of the book.
Menengah
Unknown
Instruksi
1
1
Wind the resistance strip
Wind the resistance strip
Smooth a strip of thin fibre about 1/16 in thick, 1/2 in wide and 10 in long. Wind it with No. 22 cotton-covered resistance wire, close turns from 1/4 in from one end to 1/4 in from the other, securing the ends through small drilled holes and leaving 3 to 4 in free. Bend the strip into a ring round a round object, winding outward, and note its inside and outside diameters.
Material untuk langkah ini:
 Bahan tidak diketahui1 fibre strip
 Kawat resistansi perak Jerman1 No. 22
Alat yang dibutuhkan:
 Bor tangan
2
2
Make the base
Make the base
Round the corners and top edges of a seasoned hardwood block 1/2 x 4 1/2 x 4 1/2 in, mark the ring's two diameters from the centre, and saw out the circles so the ring fits between them. Screw this onto a second board 1/4 x 4 3/4 x 4 3/4 in from below with countersunk screws. Drill a hole for one wire end, fit two back-connected binding posts in the corners, and cut grooves underneath for the leads; one post goes to the winding, the other to the centre bolt.
Material untuk langkah ini:
 Papan Kayu Keras2 1/2 and 1/4 in
 Sekrup kayu1 buah
 Terminal panel2 buah
Alat yang dibutuhkan:
 Jangka tusuk
 Gergaji punggungBor tangan
 Obeng pipih
3
3
Make and mount the arm
Make and mount the arm
Cut the arm from 1/16 in sheet brass, 2 in long, 1/2 in wide at one end and 1/4 in at the other. Under the narrow end solder thin spring brass to bear on the ring; fit a small handle on top. Mount it on a 1/8 in brass bolt about 1 in long through the centre, with washers under it, the base hole countersunk underneath 1/2 in wide and 1/4 in deep. Solder a short brass strip to the nut, set in a recess, and lock with a second nut or a spring washer.
Material untuk langkah ini:
 Lembaran Kuningan1 arm, spring
 Logam tidak diketahui1 1/8 in brass bolt
 Ring Rata3 buah
 Spring Washer1 buah
 Patri timah-timbal1 buah
Alat yang dibutuhkan:
 Gunting sengBor tangan
 Solder Listrik
4
4
Bare the track and finish
Bare the track and finish
Set the ring in its groove. Sand the insulation off the top edge of the winding so the spring contact touches the wire. Give the wood a coat of shellac.
Material untuk langkah ini:
 Pernis sirlak1 buah
Alat yang dibutuhkan:
 Amplas
 Kuas halus
Bahan
11- 1 fibre stripPlaceholder
- 1 No. 22Placeholder
- 2 1/2 and 1/4 inPlaceholder
- 1 buahPlaceholder
- Placeholder
- 1 arm, springPlaceholder
- 1 1/8 in brass boltPlaceholder
- 3 buahPlaceholder
- 1 buahPlaceholder
- 1 buahPlaceholder
- 1 buahPlaceholder
Alat yang Diperlukan
8- Placeholder
- Placeholder
- Placeholder
- Placeholder
- Placeholder
- Placeholder
- Placeholder
- Placeholder
Cetak biru ini membuat
CC0 Domain Publik
Cetak biru ini dirilis di bawah CC0. Anda bebas untuk menyalin, memodifikasi, mendistribusikan, dan menggunakan karya ini untuk tujuan apa pun, termasuk komersial, tanpa meminta izin.
Dukung Maker dengan membeli produk melalui Cetak Biru mereka di mana mereka mendapatkan Komisi Pembuat yang ditetapkan oleh Penjual, atau buat iterasi baru dari Cetak Biru ini dan masukkan sebagai koneksi di milik Anda sendiri.