Kolaborasi
SENI
KECANTIKAN & KESEHATAN
KERAJINAN
BUDAYA & SEJARAH
HIBURAN
LINGKUNGAN
MAKANAN & MINUMAN
REKAYASA BALIK
ILMU PENGETAHUAN
OLAHRAGA
TEKNOLOGI
PERANGKAT PAKAI
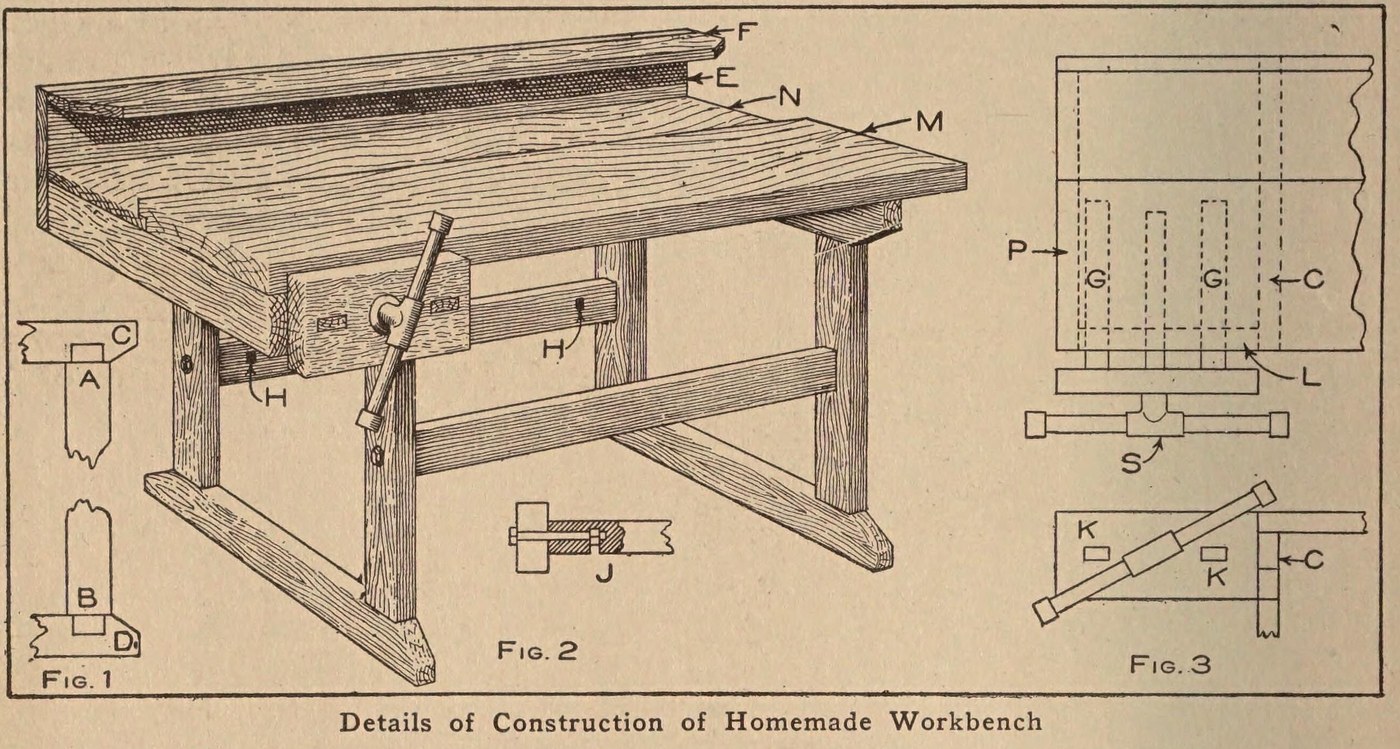


Workbench: a Pine Bench with a Laminated Maple Top and Vise (Boy Mechanic, 1913)
The same pine bench with a harder top: 14 maple strips set on edge, glued and screwed together, with a back board, a tool rack and a wooden vise on an iron bench screw.
Source: C. E. McKinney, Jr., 'Homemade Workbench', The Boy Mechanic, Book 1 (1913), pp. 442-443. Picture: Figs. 1-3 of the book.
Menengah
Unknown
Instruksi
1
1
Make the two leg frames
Make the two leg frames
Cut four 2 x 4 in pine legs 23 in long with a tenon on each end 1/2 in thick, 3 1/2 in wide and 1 1/2 in long (Fig. 1, A and B). Cut four crosspieces of the same stock 20 in long, mortised in the narrow edge 1 1/4 in from each end, and slope their corners from the leg out to the middle. Fit each pair of legs to a pair of crosspieces to make the two supports.
Material untuk langkah ini:
 Kayu pinus1 2 x 4 in: legs, crosspieces
Alat yang dibutuhkan:
 Gergaji Tangan
 Pahat lubang pen
 Palu
2
2
Brace them together
Brace them together
Join the supports with two 2 x 4 in braces 24 in long, ends sawn square. Bore through each leg and 4 in into the centre of each brace end, bore an intersecting hole on the back of each brace for the nut, and draw each joint tight with a 3/8 x 6 in bolt (Fig. 2, J). A cross brace on the back stops rocking when planing.
Material untuk langkah ini:
Kayu pinus1 2 x 4 in: braces Baut kepala bulat leher persegi4 3/8 x 6 in
Alat yang dibutuhkan:
Gergaji Tangan Bor engkol dan mata bor
 Kunci Inggris
3
3
Build up the maple top
Build up the maple top
Make the main top M of 14 maple strips 7/8 in thick, 2 in wide and 3 1/2 ft long, set on edge, each glued and screwed to the next, all with the grain one way so it planes smooth. Rabbet its back edge 1/2 in to take a back board N of the same length, 8 1/2 in wide and 7/8 in thick. Screw the top to the top crosspieces with long screws.
Material untuk langkah ini:
 Bahan tidak diketahui14 maple strips 7/8 x 2 in x 3 1/2 ft
 Lem Kayu1 buah
 Papan pinus1 back board
 Sekrup kayu1 buah
Alat yang dibutuhkan:
Gergaji Tangan Ketam blok
 Obeng pipih
4
4
Add the tool rack
Add the tool rack
Nail a board E 10 in wide to the back of the bench and fasten a 2 1/2 in board F on top of it at right angles; both 7/8 in thick and 3 1/2 ft long. Bore holes or cut notches in F to hold tools.
Material untuk langkah ini:
Papan pinus2 7/8 in, 3 1/2 ft Paku1 buah
Alat yang dibutuhkan:
Bor engkol dan mata borGergaji TanganPalu5
5
Fit the vise
Fit the vise
Fasten an iron bench screw in a 2 x 6 in block 12 in long. Mortise two guide rails 7/8 x 1 1/2 in and 20 in long into the block; they slide in mortises in a 2 x 4 piece L bolted under the top, which holds the bench-screw nut between the two mortises. Nail L to a top crosspiece and to a 2 x 4 piece P bolted under the top at the end (Fig. 3).
Material untuk langkah ini:
Kayu pinus1 2 x 6 block, 2 x 4 pieces, guide rails Sekrup bangku untuk ukir kayu1 buahBaut kepala bulat leher persegi1 for L and PPaku1 buah
Alat yang dibutuhkan:
Gergaji TanganPahat lubang penBor engkol dan mata borKunci InggrisPaluBahan
8- 1 2 x 6 block, 2 x 4 pieces, guide railsPlaceholder
- 1 for L and PPlaceholder
- 14 maple strips 7/8 x 2 in x 3 1/2 ftPlaceholder
- 1 buahPlaceholder
- 2 7/8 in, 3 1/2 ftPlaceholder
- 1 buahPlaceholder
- 2 buahPlaceholder
- Placeholder
Cetak biru ini membuat

CC0 Domain Publik
Cetak biru ini dirilis di bawah CC0. Anda bebas untuk menyalin, memodifikasi, mendistribusikan, dan menggunakan karya ini untuk tujuan apa pun, termasuk komersial, tanpa meminta izin.
Dukung Maker dengan membeli produk melalui Cetak Biru mereka di mana mereka mendapatkan Komisi Pembuat yang ditetapkan oleh Penjual, atau buat iterasi baru dari Cetak Biru ini dan masukkan sebagai koneksi di milik Anda sendiri.