वुडवर्किंग के लिए दृढ़ लकड़ी का चयन और मसाला
उत्कृष्ट फर्नीचर का हर टुकड़ा, हर हाथ से नक्काशीदार कटोरा, हर लकड़ी से बना खलिहान एक साधारण कार्य से शुरू होता है: एक पेड़ का चयन करना और उसकी हरी, जीवित लकड़ी को स्थिर, काम करने योग्य लकड़ी में बदलना। यह परिवर्तन - सीज़निंग - लकड़ी के काम में सबसे महत्वपूर्ण और सबसे अधिक अनदेखा कदम है। खराब ढंग से पकाई गई लकड़ी मुड़ जाती है, टूट जाती है, फट जाती है और महीनों की सावधानी से की गई जोड़-जोड़ को नष्ट कर देती है। उचित रूप से पकाई गई लकड़ी सदियों तक स्थिर रहती है।
हरी लकड़ी (ताज़ी काटी गई) में प्रजातियों और मौसम के आधार पर वजन के हिसाब से 30-200% नमी होती है। मसाला इसे 6-12% तक कम कर देता है - अधिकांश जलवायु में इनडोर उपयोग के लिए संतुलन नमी की मात्रा। नमी की यह कमी लकड़ी को सिकुड़ने का कारण बनती है, और क्योंकि यह इसके साथ की तुलना में अनाज के आर-पार अधिक सिकुड़ती है, सुखाने की प्रक्रिया आंतरिक तनाव पैदा करती है जो लकड़ी को तोड़ सकती है या विकृत कर सकती है। नमी की हानि की दर को नियंत्रित करना मसाला बनाने की पूरी कला है।
हवा में सुखाना (प्राकृतिक मसाला) सबसे पुराना और सबसे विश्वसनीय तरीका है। इसके लिए धैर्य की आवश्यकता होती है - दृढ़ लकड़ी के लिए प्रति 25 मिमी बोर्ड मोटाई में लगभग एक वर्ष - लेकिन यह स्थिर, अच्छी तरह से वातानुकूलित लकड़ी का उत्पादन करता है जिसमें भट्ठी सुखाने के साथ होने वाली किसी भी प्रकार की सख्त समस्या नहीं होती है।
निर्देश
पेड़ को चुनकर गिरा दिया
पेड़ को चुनकर गिरा दिया
फर्नीचर और बढ़िया लकड़ी के काम के लिए, निचले तने पर न्यूनतम शाखाओं वाले सीधे दाने वाले पेड़ों का चयन करें। ऐसे पेड़ों से बचें जिनमें सर्पिल दाने दिखाई देते हैं (छाल का पैटर्न तने के चारों ओर मुड़ता है), भारी झुकाव (अप्रत्याशित सूखने वाले व्यवहार के साथ प्रतिक्रियाशील लकड़ी बनाता है), या बीमारी और सड़न के लक्षण।
लकड़ी के लिए पेड़ों को काटने का सबसे अच्छा समय देर से शरद ऋतु से शुरुआती वसंत तक है - जब रस की मात्रा सबसे कम होती है और लकड़ी तुरंत सूखना शुरू हो जाएगी। गर्मियों में काटी गई लकड़ी में नमी की मात्रा अधिक होती है और यह कीड़ों के हमले और फंगल दाग के प्रति अधिक संवेदनशील होती है। उचित चेनसॉ तकनीक या हाथ उपकरण का उपयोग करके पेड़ को सुरक्षित रूप से काटें, और ट्रंक को अपनी काटने की विधि के लिए उपयुक्त लॉग लंबाई में काटें।
लॉग को बोर्ड में बदलें
लॉग को बोर्ड में बदलें
लॉग को तुरंत बोर्ड में परिवर्तित किया जाना चाहिए - पूरे लॉग में कटाई के कुछ हफ्तों के भीतर गहन अंत-जांच और आंतरिक तनाव विकसित होता है। हाथ के औज़ारों के लिए, पारंपरिक विधि राइविंग है (अनाज को वेजेज और फ्रो के साथ विभाजित करना), जो सबसे मजबूत संभव बोर्ड तैयार करता है क्योंकि कोई भी अनाज नहीं काटा जाता है। बिजली उपकरणों के लिए, एक चेनसॉ मिल या पोर्टेबल बैंडसॉ मिल फ्लैट-सॉ बोर्ड का उत्पादन करती है।
बोर्डों को अंतिम मोटाई के साथ-साथ सिकुड़न और सफाई के लिए 3-5 मिमी की छूट के साथ काटें। मानक मोटाई: फर्नीचर के लिए 25 मिमी (1 इंच), कार्यक्षेत्र के शीर्ष और भारी निर्माण के लिए 50 मिमी (2 इंच)। आर-एंड-थ्रू (सादा-आरा) काटना सबसे सरल है - लॉग को एक तरफ से दूसरी तरफ काटें, जिससे फ्लैट-आरी और क्वार्टर-आरी बोर्ड का मिश्रण तैयार हो सके। क्वार्टर-सावन बोर्ड (चेहरे के लंबवत वार्षिक छल्ले) अधिक स्थिर होते हैं लेकिन अधिक अपशिष्ट की आवश्यकता होती है।
आवश्यक उपकरण:
 Wax Marker
 Precision Ruler
अंतिम अनाज को तुरंत सील कर दें
अंतिम अनाज को तुरंत सील कर दें
अंतिम अनाज अंतिम अनाज की तुलना में 10-15 गुना तेजी से सूखता है। यह असमान सुखाने से बोर्ड के सिरों पर गंभीर तनाव पैदा होता है, जिससे एंड-चेकिंग (सिरों से निकलने वाली गहरी दरारें) हो जाती है। काटने के तुरंत बाद अंतिम अनाज को सील करना सूखने के दोषों को रोकने के लिए सबसे प्रभावी कदम है।
काटने के कुछ घंटों के भीतर प्रत्येक बोर्ड के दोनों सिरों पर अंतिम अनाज सीलर का एक मोटा कोट लागू करें। पारंपरिक सीलर्स: पिघला हुआ मोम (पैराफिन या मोम), लेटेक्स पेंट (मोटा कोट), या वाणिज्यिक अंत-अनाज सीलर्स। कोटिंग को स्थायी होने की आवश्यकता नहीं है - इसे केवल सिरों से नमी के नुकसान को धीमा करने की आवश्यकता है जब तक कि बोर्ड संतुलन तक नहीं पहुंच जाता। अंतिम अनाज को पूरी तरह से ढक दें, जिसमें पहले से शुरू की गई कोई भी जांच भी शामिल है।
आवश्यक उपकरण:
Wax Markerबोर्डों को ढेर करें और चिपकाएँ
बोर्डों को ढेर करें और चिपकाएँ
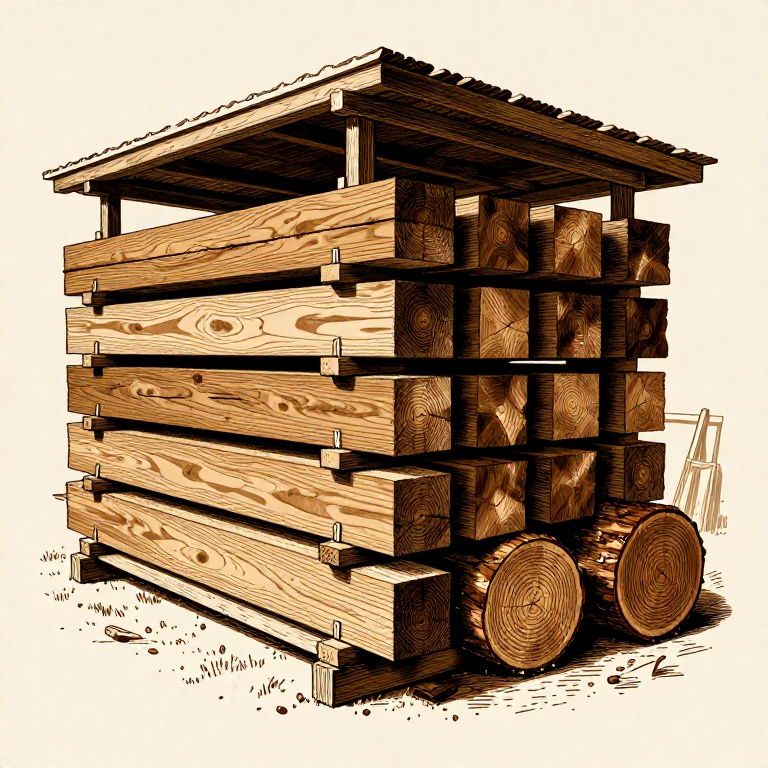
समान सुखाने के लिए उचित स्टैकिंग आवश्यक है। वायु संचार के लिए जमीन से कम से कम 30 सेमी ऊपर समतल नींव (कंक्रीट ब्लॉक, भारी लकड़ी) पर बोर्डों को क्षैतिज रूप से रखें। बोर्डों की प्रत्येक परत के बीच, स्टिकर लगाएं - लकड़ी की पतली, सूखी पट्टियां (लगभग 20x20 मिमी क्रॉस-सेक्शन) - नियमित अंतराल पर (45-60 सेमी अलग)।
महत्वपूर्ण नियम: सभी स्टिकर प्रत्येक परत में एक दूसरे के ठीक ऊपर होने चाहिए (वजन को समान रूप से प्रसारित करने और झुकने से रोकने के लिए)। स्टिकर की मोटाई एक समान होनी चाहिए (असमान स्टिकर मुड़ने का कारण बनते हैं)। ढेर को सीधी बारिश और धूप से बचाया जाना चाहिए - एक साधारण झुकी हुई छत आदर्श है। पूर्ण सूर्य सतह के सूखने में तेजी लाता है और जाँच का कारण बनता है; बारिश सतह को फिर से गीला कर देती है और फंगल दाग को बढ़ावा देती है। ढेर के चारों ओर अच्छा वायु संचार आवश्यक है।
आवश्यक उपकरण:
Precision Rulerढेर को तौलें और प्रतीक्षा करें
ढेर को तौलें और प्रतीक्षा करें
ढेर के ऊपर भारी वजन रखें - कंक्रीट ब्लॉक, बड़े पत्थर, या भारी लकड़ी। यह भार बोर्डों को सूखने पर कपिंग और मुड़ने से रोकता है। वजन का दबाव, बोर्ड को सपाट रखने वाले स्टिकर के साथ मिलकर, सबसे सीधी सूखी लकड़ी का उत्पादन करता है।
दृढ़ लकड़ी को हवा में सुखाने के लिए सामान्य नियम: बोर्ड की मोटाई के प्रति 25 मिमी (1 इंच) के लिए एक वर्ष। 50 मिमी ओक बोर्ड को संतुलन तक पहुंचने में लगभग दो साल लगते हैं। सॉफ्टवुड तेजी से सूखते हैं (लगभग आधे समय में)। समय-समय पर नमूना बोर्ड का वजन करके प्रगति की जांच करें - जब वजन लगातार दो मासिक जांचों पर स्थिर हो जाता है, तो लकड़ी संतुलन नमी सामग्री पर होती है।
नमी की मात्रा की जाँच करें और अनुकूलन करें
नमी की मात्रा की जाँच करें और अनुकूलन करें
हवा में सुखाई गई लकड़ी का उपयोग करने से पहले, नमी की मात्रा सत्यापित करें। एक पिन-प्रकार नमी मीटर (लकड़ी में दबाए गए दो धातु जांच) मानक उपकरण है - इनडोर फर्नीचर के लिए 8-12% नमी सामग्री, बाहरी उपयोग के लिए 12-16% का लक्ष्य है। मीटर के बिना, एक बोर्ड के बीच से एक छोटा सा परीक्षण टुकड़ा काटें, उसका वजन करें, वजन स्थिर होने तक उसे 105°C पर ओवन में सुखाएं, और गणना करें: MC% = (गीला वजन - सूखा वजन) / सूखा वजन × 100।
निर्माण से पहले, सूखी लकड़ी को वर्कशॉप या इमारत में लाएँ जहाँ तैयार टुकड़ा रहेगा। इसे 2-4 सप्ताह के लिए ढीला (बिना चिपकाया हुआ) जमा कर रखें। यह अनुकूलन अवधि लकड़ी को उस वातावरण की विशिष्ट संतुलन नमी सामग्री तक पहुंचने की अनुमति देती है। जो लकड़ी गर्म घर में रहेगी, उसे बिना गर्म की गई कार्यशाला के लिए लकड़ी की तुलना में कम एमसी की आवश्यकता होती है। तैयार फर्नीचर में जोड़ों के खुलने और पैनलों के टूटने का सबसे आम कारण अनुकूलन में चूक करना है।
आवश्यक उपकरण:
Precision RulerCC0 पब्लिक डोमेन
यह ब्लूप्रिंट CC0 के तहत जारी किया गया है। आप बिना अनुमति माँगे इस कार्य को किसी भी उद्देश्य के लिए कॉपी, संशोधित, वितरित और उपयोग करने के लिए स्वतंत्र हैं।
उनके ब्लूप्रिंट के माध्यम से उत्पाद खरीदकर मेकर का समर्थन करें जहाँ वे मेकर कमीशन कमाते हैं जो विक्रेताओं द्वारा निर्धारित होता है, या इस ब्लूप्रिंट का नया संस्करण बनाएँ और राजस्व साझा करने के लिए इसे अपने ब्लूप्रिंट में कनेक्शन के रूप में शामिल करें।