همکاری
هنر
زیبایی و سلامت
صنایع دستی
فرهنگ و تاریخ
سرگرمی
محیط زیست
غذا و نوشیدنی
مهندسی معکوس
علوم
ورزش
فناوری
پوشیدنیها
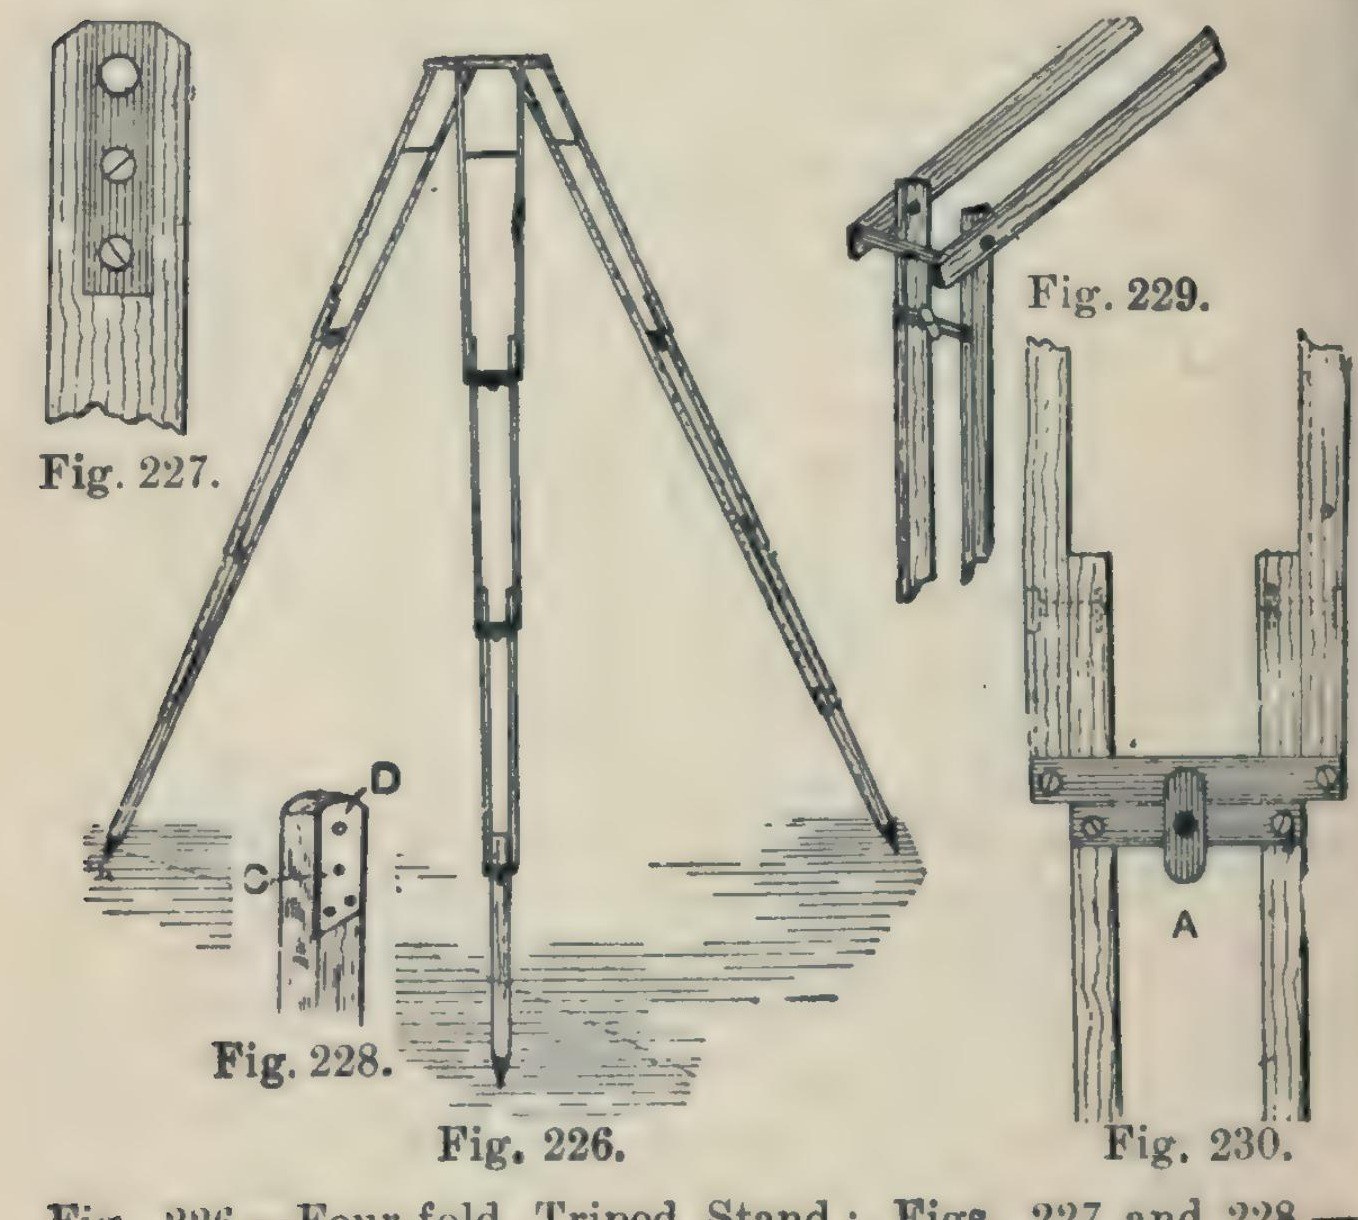


Camera Tripod: a Four-Fold Ash Tripod Stand (Hasluck, 1902)
A light, compact folding camera stand: three legs, each of seven ash laths riveted so it folds in four, locked open by brass buttons, on a triangular ash top with brass pins and a hole for the camera screw.
Hasluck says the same method makes stands that fold in three or two.
Source: Paul N. Hasluck, Photographic Cameras and Accessories (1902), pp. 153-157. Picture: Figs. 226-230 of the book.
متوسط
Unknown
دستورالعملها
1
1
Cut the ash laths
Cut the ash laths
Cut laths of good ash, true and square or the stand won't be rigid, and round the edges slightly: six 17 1/4 x 5/8 x 3/8 in, six 16 x 5/8 x 3/8 in, six 15 1/2 x 5/8 x 3/8 in, and three 14 x 5/8 x 5/8 in.
مواد مورد نیاز این مرحله:
 تختهٔ زبانگنجشک1 21 laths
ابزارهای مورد نیاز:
 اره پشتدار
 رندهٔ کفی
2
2
Fit the top ends and stretcher
Fit the top ends and stretcher
On each 17 1/4 in lath let in flush a 1/16 in brass plate, 1 1/4 in long, with a 3/16 in hole 1/4 in from the top, held by two countersunk brass screws; bore the wood to match and take off the top corners. On one lath of each pair cut a groove inside, about 3/16 in deep and 3 1/2 in long, starting 2 in from the top, and hinge a 1/8 in brass rod stretcher in it on a pin. On the other lath cut a curved groove 1 1/2 in long, 3/16 in wide, with a small hole at the bottom where the rod catches.
مواد مورد نیاز این مرحله:
 ورق برنج1 1/16 in plates
 پیچ چوب1 small brass screws
 میلگرد برنجی1 1/8 in stretcher
ابزارهای مورد نیاز:
 قاب ارهٔ آهنبر با تیغه
 سوهان فلز
 دریل دستی
 اسکنهها
 پیچگوشتی تخت
3
3
Bore and rivet the legs
Bore and rivet the legs
Bore the rivet holes: in the long laths 1 3/4 in from the lower end, counterbored so the copper rivet head sits flush, then 1/8 in through; in the 16 in and 15 1/2 in laths 1/2 in and 1 3/4 in from the ends; in each 14 in piece 1/2 in from one end, and taper its other end for a pointed iron shoe or a steel point and ferrule. Rivet the 21 laths into three legs with 1/8 in copper rivets and washers: a 16 in lath inside each 17 1/4 in one, a 15 1/2 in lath inside that, the 14 in foot between the last pair. Rivets flush, just tight enough to fold but not loose.
مواد مورد نیاز این مرحله:
 پرچ مسی1 1/8 in, with washers
 فلز نامعلوم3 iron shoes or steel points
ابزارهای مورد نیاز:
 دریل دستهٔ گردان با متهدریل دستی
 چکش پرچکاری
4
4
Add cross strips and lock buttons
Add cross strips and lock buttons
Screw 1/16 in brass strips across the bottom ends of each pair of laths (Fig. 229). Under them screw strips carrying a small brass button riveted at the centre; turned, the button hooks over the strip above and locks the joint open (Fig. 230).
مواد مورد نیاز این مرحله:
ورق برنج1 cross strips, buttonsپیچ چوب1 قطعهابزارهای مورد نیاز:
قاب ارهٔ آهنبر با تیغهسوهان فلزپیچگوشتی تختچکش پرچکاری5
5
Make the top
Make the top
Plane ash to 1/2 in and draw an equilateral triangle with 8 1/2 in sides. Bisect the angles; 2 in from each corner draw a line at right angles, go 1/2 in in along the sides, and mark three rectangles 2 7/8 x 3/4 in; cut the outline (Fig. 231). Fix a 3/16 in brass rod, one end tapered, across each rectangle, bored 3/8 in from the outer edge and projecting about 1/2 in, for the legs to hang on. Bore a 1/4 in hole in the centre for the camera screw and glue felt on top.
مواد مورد نیاز این مرحله:
تختهٔ زبانگنجشک1 topمیلگرد برنجی3 3/16 in pins نمد پشمی1 قطعه
 سریشم حیوانی1 قطعه
ابزارهای مورد نیاز:
رندهٔ کفیاره پشتداردریل دستهٔ گردان با متهدریل دستی6
6
Finish
Finish
Glasspaper and varnish the wood, and lacquer the brass.
مواد مورد نیاز این مرحله:
 ورنی شلاکی1 varnish
 ماده ناشناخته1 brass lacquer
ابزارهای مورد نیاز:
 کاغذ سنباده
مواد
10- 1 topجایگزین
- 1 cross strips, buttonsجایگزین
- 1 قطعهجایگزین
- 3 3/16 in pinsجایگزین
- 1 1/8 in, with washersجایگزین
- 3 iron shoes or steel pointsجایگزین
- 1 قطعهجایگزین
- 1 قطعهجایگزین
- 1 varnishجایگزین
- 1 brass lacquerجایگزین
این نقشه میسازد

CC0 مالکیت عمومی
این نقشه تحت مجوز CC0 منتشر شده است. شما آزاد هستید آن را کپی، ویرایش، توزیع و برای هر هدفی بدون نیاز به اجازه استفاده کنید.
با خرید محصولات از طریق نقشه از سازنده حمایت کنید و او کمیسیون سازنده تعیین شده توسط فروشندگان، دریافت میکند یا یک نسخه جدید از این نقشه ایجاد کنید و آن را به عنوان اتصال در نقشه خود قرار دهید تا درآمد به اشتراک گذاشته شود.