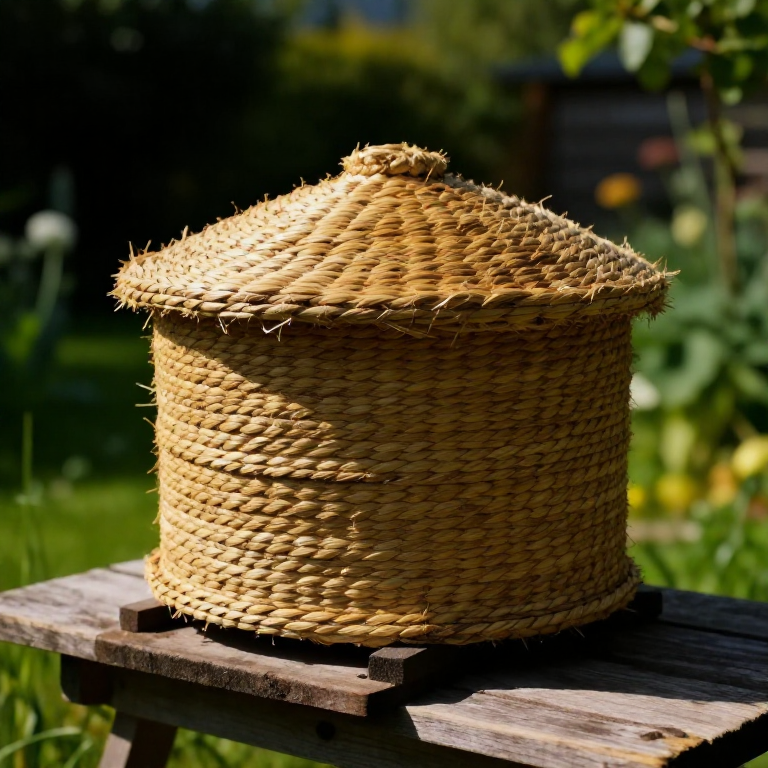
Making a Coiled-Straw Bee Skep — The Traditional Beehive Before Wooden Boxes
دستورالعملها
Harvest and clean long rye straw
Harvest and clean long rye straw
مواد مورد نیاز این مرحله:
 Rye Straw1 bundle
ابزارهای مورد نیاز:
 Knife
KnifeSplit and soak the binding cane
Split and soak the binding cane
مواد مورد نیاز این مرحله:
 Split Cane1 bundle
 Water3 liter
ابزارهای مورد نیاز:
KnifeMake the girth gauge
Make the girth gauge
ابزارهای مورد نیاز:
 Skep Girth Gauge
Bind the crown
Bind the crown
مواد مورد نیاز این مرحله:
Rye Straw1 bundleSplit Cane1 meterابزارهای مورد نیاز:
 Awl
AwlFeed straw into an even rope
Feed straw into an even rope
مواد مورد نیاز این مرحله:
Rye Straw1 bundleابزارهای مورد نیاز:
Skep Girth GaugeSew the first coils to the crown
Sew the first coils to the crown
مواد مورد نیاز این مرحله:
Split Cane1 meterابزارهای مورد نیاز:
AwlSpiral outward to start the dome
Spiral outward to start the dome
مواد مورد نیاز این مرحله:
Rye Straw1 bundleSplit Cane1 meterابزارهای مورد نیاز:
AwlBuild the domed wall downward
Build the domed wall downward
مواد مورد نیاز این مرحله:
Rye Straw1 bundleSplit Cane1 meterابزارهای مورد نیاز:
AwlSkep Girth GaugeKeep the courses even
Keep the courses even
مواد مورد نیاز این مرحله:
Rye Straw1 bundleابزارهای مورد نیاز:
AwlWiden to the finished base
Widen to the finished base
مواد مورد نیاز این مرحله:
Rye Straw1 bundleSplit Cane1 meterابزارهای مورد نیاز:
AwlCut the flight entrance
Cut the flight entrance
ابزارهای مورد نیاز:
KnifeFinish and lock the base coil
Finish and lock the base coil
مواد مورد نیاز این مرحله:
Split Cane1 meterابزارهای مورد نیاز:
AwlTrim the skep clean
Trim the skep clean
ابزارهای مورد نیاز:
KnifeClom the outside for weatherproofing
Clom the outside for weatherproofing
مواد مورد نیاز این مرحله:
 Cow Dung2 kg
 Ball Clay1 kg
Cure the finished skep
Cure the finished skep
مواد
6- 1 bundleجایگزین
- 6 meterجایگزین
مواد نقشههای متصل
نقشههای مرتبط
این نقشهها دانش مشترکی دارند — تکنیکها، مواد یا اصول
Related blueprints
Other builds that share materials, tools, or techniques with this one.


CC0 مالکیت عمومی
این نقشه تحت مجوز CC0 منتشر شده است. شما آزاد هستید آن را کپی، ویرایش، توزیع و برای هر هدفی بدون نیاز به اجازه استفاده کنید.
با خرید محصولات از طریق نقشه از سازنده حمایت کنید و او کمیسیون سازنده تعیین شده توسط فروشندگان، دریافت میکند یا یک نسخه جدید از این نقشه ایجاد کنید و آن را به عنوان اتصال در نقشه خود قرار دهید تا درآمد به اشتراک گذاشته شود.