
هنر
زیبایی و سلامت
صنایع دستی
فرهنگ و تاریخ
سرگرمی
محیط زیست
غذا و نوشیدنی
مهندسی معکوس
علوم
ورزش
فناوری
پوشیدنی‌ها
Metal Band Saw: Horizontal Saw on a Welded Steel Frame
Martin

ایجاد شده توسط

Martin

23. اکتبر 2026NO
۹
۰
۰
۰
۰

Metal Band Saw: Horizontal Saw on a Welded Steel Frame

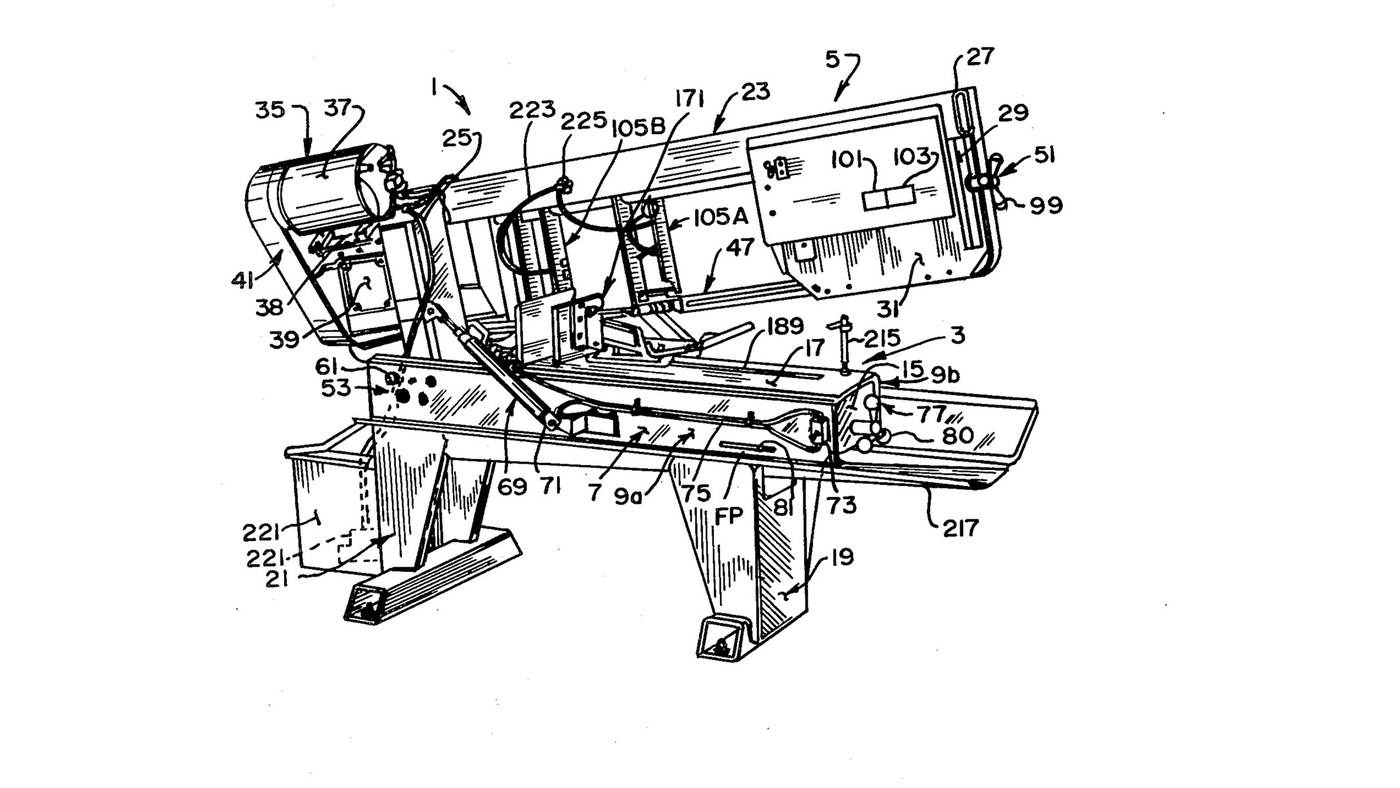
Curtis Eccardt's horizontal power band saw (Emerson Electric, US 4,364,294, 1982), built from welded steel channel and tube instead of iron castings to cut its cost. The saw head swings down on trunnions over the bed; a hydraulic cylinder with a valve sets how fast it feeds, a spring counterbalances it, and a spring tensioner shows the blade tension on a scale. Two guides with rollers twist the blade's lower run 90° so its teeth face down into the work, and carbide inserts hold it there. The patent gives no sizes, speeds or ratings; the welder and wrenches are ours. The picture: the patent's Fig. 1.
پیشرفته
4 days

دستورالعمل‌ها

1

Weld the bed

Stand two steel channels (9a, 9b) parallel, webs upright and flanges facing in, and weld gussets (15) between their webs. Bolt a bed plate (17) across the top flanges as the work surface. Ours: MIG welder, drill press for the bolt holes.

مواد مورد نیاز این مرحله:

ناودانی فولادیناودانی فولادی2 قطعه
ورق فولاد نرمورق فولاد نرم1 قطعه
پیچ سرشش‌گوش - ردهٔ 8.8پیچ سرشش‌گوش - ردهٔ 8.81 قطعه

ابزارهای مورد نیاز:

دستگاه جوش MIGدستگاه جوش MIG
دریل ستونیدریل ستونی
آچار فرانسهآچار فرانسه
2

Weld and bolt on the legs

Weld formed sheet-steel legs onto horizontal floor members to make front and rear leg weldments (19, 21), and bolt them under the bed.

مواد مورد نیاز این مرحله:

ورق فولادیورق فولادی1 قطعه
لوله فولادی سازه‌ایلوله فولادی سازه‌ای1 قطعه
پیچ سرشش‌گوش - ردهٔ 8.8پیچ سرشش‌گوش - ردهٔ 8.81 قطعه

ابزارهای مورد نیاز:

دستگاه جوش MIGدستگاه جوش MIG
آچار فرانسهآچار فرانسه
3

Weld the head

Weld a head post (25) of square or rectangular steel tube square to a head beam (27) of rectangular tube. Weld a bracket leg (29) down from the beam's outer end, and fix support plates at both ends (31, 33).

مواد مورد نیاز این مرحله:

لوله فولادی سازه‌ایلوله فولادی سازه‌ای1 قطعه
ورق فولاد نرمورق فولاد نرم1 قطعه

ابزارهای مورد نیاز:

دستگاه جوش MIGدستگاه جوش MIG
4

Fit the trunnions and align the pivot

Fix a shaft through the head post with its ends out as trunnions (55a, 55b), in bushings in two bearing blocks (59a, 59b) bolted inside the channel webs. Each block has one close-fit bolt hole and three oversize ones: shift the blocks until the pivot is parallel to the bed plate, then torque the bolts. A set screw (67) takes out end play.

مواد مورد نیاز این مرحله:

محور فولادیمحور فولادی1 قطعه
بوش فلزیبوش فلزی2 قطعه
یاتاقان‌گیریاتاقان‌گیر2 قطعه
پیچ سرشش‌گوش - ردهٔ 8.8پیچ سرشش‌گوش - ردهٔ 8.88 قطعه
پیچ خارِ سرگودپیچ خارِ سرگود1 قطعه

ابزارهای مورد نیاز:

دریل ستونیدریل ستونی
آچار گشتاورسنجآچار گشتاورسنج
5

Mount motor, belt drive and gearbox

Mount the electric motor (37) on a plate (38) pivoted on the head beam, and couple it by a multi-speed belt and pulleys (41) to a gearbox (39). Fit the drive wheel (43) on the gearbox output shaft.

مواد مورد نیاز این مرحله:

موتور برقیموتور برقی1 قطعه
ورق فولاد نرمورق فولاد نرم1 قطعه
تسمهٔ انتقال نیروتسمهٔ انتقال نیرو1 قطعه
قرقرهقرقره1 قطعه
گیربکسگیربکس1 قطعه
چرخ اره نواریچرخ اره نواری1 قطعه

ابزارهای مورد نیاز:

آچار فرانسهآچار فرانسه
6

Build the idler tensioner

Weld an idler yoke (87) of rolled steel plate, pivot it on the head beam with a pin (89), and cantilever the idler axle from it with the idler wheel (45) on bearings (85). A threaded rod (91) pulls the yoke through a coil spring (93) held between compression plates and a U-bolt (97); a knob (99) turns the rod. An indicator (101) on the spring reads the tension on a scale (103).

مواد مورد نیاز این مرحله:

ورق فولاد نرمورق فولاد نرم1 قطعه
پین فولادی پرسیپین فولادی پرسی1 قطعه
محور فولادیمحور فولادی1 قطعه
چرخ اره نواریچرخ اره نواری1 قطعه
بلبرینگبلبرینگ1 قطعه
میلهٔ رزوه‌شدهمیلهٔ رزوه‌شده1 قطعه
Coil SpringCoil Spring1 قطعه
پیچ U شکلپیچ U شکل1 قطعه
دستگیره کنترلدستگیره کنترل1 قطعه

ابزارهای مورد نیاز:

دستگاه جوش MIGدستگاه جوش MIG
آچار فرانسهآچار فرانسه
7

Build the two blade guides

In each guide channel (111) mount two guide rollers (115a, 115b) on ball bearings on eccentric bushings, one fixed and one adjusted to the blade thickness. Add a carbide thrust insert (133) on the blade's back edge and two carbide side inserts (137a fixed, 137b on a sprung swing bracket set by a bolt and knob). Clamp the guides on two bar tracks (107).

مواد مورد نیاز این مرحله:

غلتک راهنماغلتک راهنما4 قطعه
بلبرینگبلبرینگ4 قطعه
بوش خارج از مرکزبوش خارج از مرکز4 قطعه
الماسه کاربیدیالماسه کاربیدی6 قطعه
Coil SpringCoil Spring2 قطعه
دستگیره کنترلدستگیره کنترل2 قطعه
لوله فولادی سازه‌ایلوله فولادی سازه‌ای1 قطعه

ابزارهای مورد نیاز:

آچار فرانسهآچار فرانسه
8

Fit the blade and set the tension

By hand, run the endless blade (47) round the drive and idler wheels and through both guides; the rollers twist its lower run about 90° so the teeth face down. Turn the tension knob until the scale shows the tension you want.

مواد مورد نیاز این مرحله:

تیغه اره نواریتیغه اره نواری1 قطعه
9

Fit the feed cylinder and counterbalance

Connect a hydraulic cylinder (71) between bed channel and head post above the trunnions, filled with oil and piped through tubing (75) to a control valve (73): the valve sets the feed rate and, closed, holds the head. Fit a coil spring (78) on a threaded linkage (79) between an end gusset and the head post below the trunnions, adjusted by a knob (80), to counterbalance the head.

مواد مورد نیاز این مرحله:

سیلندر هیدرولیکسیلندر هیدرولیک1 قطعه
روغن هیدرولیکروغن هیدرولیک1 batch
لوله هیدرولیکلوله هیدرولیک1 قطعه
شیر کنترل جریانشیر کنترل جریان1 قطعه
Coil SpringCoil Spring1 قطعه
میلهٔ رزوه‌شدهمیلهٔ رزوه‌شده1 قطعه
دستگیره کنترلدستگیره کنترل1 قطعه

ابزارهای مورد نیاز:

آچار فرانسهآچار فرانسه
10

Bolt on the vice

Bolt the quick-acting vice to the bed plate to clamp the work square under the blade.

مواد مورد نیاز این مرحله:

گیرهٔ ماشینگیرهٔ ماشین1 قطعه
پیچ سرشش‌گوش - ردهٔ 8.8پیچ سرشش‌گوش - ردهٔ 8.81 قطعه

ابزارهای مورد نیاز:

آچار فرانسهآچار فرانسه

مواد

29

ابزارهای لازم

4

این نقشه می‌سازد

CC0 مالکیت عمومی

این نقشه تحت مجوز CC0 منتشر شده است. شما آزاد هستید آن را کپی، ویرایش، توزیع و برای هر هدفی بدون نیاز به اجازه استفاده کنید.

با خرید محصولات از طریق نقشه از سازنده حمایت کنید و او کمیسیون سازنده تعیین شده توسط فروشندگان، دریافت می‌کند یا یک نسخه جدید از این نقشه ایجاد کنید و آن را به عنوان اتصال در نقشه خود قرار دهید تا درآمد به اشتراک گذاشته شود.

بحث و گفتگو

(0)

ورود برای شرکت در بحث

در حال بارگذاری نظرات...