همکاری
هنر
زیبایی و سلامت
صنایع دستی
فرهنگ و تاریخ
سرگرمی
محیط زیست
غذا و نوشیدنی
مهندسی معکوس
علوم
ورزش
فناوری
پوشیدنیها
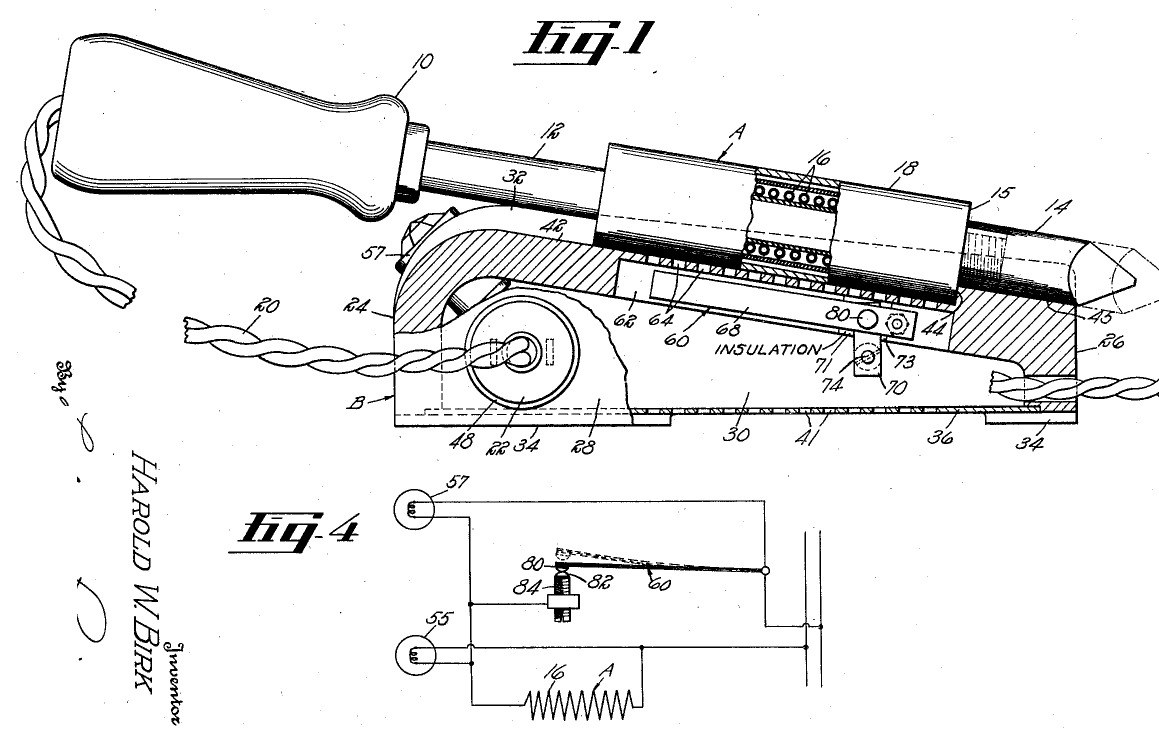


Soldering Station: a Stand Whose Bimetal Switch Reads the Iron's Heat (Birk, Hart Mfg., US 2,248,486, 1941)
A soldering station: an ordinary electric iron plugs into its stand, and the stand controls it. When the iron is laid in the stand's trough, its heater housing sits over a flue with a U-shaped bimetal switch inside; the heat it gives off opens the switch at the temperature you set with a screw, and closes it again as it cools. A red lamp shows the iron heating, a green lamp shows it hot and idling.
Result: a stand that keeps an electric iron at a set temperature between jobs and shows its state.
Source: H. W. Birk (Hart Manufacturing), US 2,248,486 (1941). Unknown: sizes, the bimetal, the lamps. Picture: the patent drawing.
متوسط
Unknown
دستورالعملها
1
1
Make the stand
Make the stand
Cast or form a box-shaped stand in one piece from a fire-resistant material such as porcelain: a high front wall, a low back wall, two side walls and a top sloping down about 10° toward the back, with feet at the corners so air can pass beneath. Close the bottom with a removable plate screwed to a flange and pierced with air holes. In the top, hollow a trough shaped to the iron's heater housing, ending at a shoulder, then a narrower groove for the tip. Cut a flue through the top along the trough, under a cover with holes. Ours: porcelain. Not given: sizes.
مواد مورد نیاز این مرحله:
 ماده ناشناخته1 porcelain stand
 فلز نامعلوم1 bottom plate, screws
ابزارهای مورد نیاز:
 ابعاد نامعلوم
2
2
Fit the bimetal switch
Fit the bimetal switch
Bend a strip of bimetal into a U whose legs spread apart when cool and close together when hot. Rivet one leg to a metal strip fixed beside the flue (on an insulating bracket if the stand conducts); put a contact on the free leg's end. Face it with a fixed contact on a screw stud threaded through a metal plate and out through the side wall in an insulating sleeve, slotted for a screwdriver: turning it sets the temperature, low for wax melting or high for electric branding irons. Not given: the bimetal, the contact metal.
مواد مورد نیاز این مرحله:
 نوار دوفلزی1 قطعهفلز نامعلوم1 strips, plate, contacts, stud
 مادهٔ عایق نامعلوم1 bracket, sleeve, plate
ابزارهای مورد نیاز:
 مجموعهٔ پرچ
 مجموعه قلاویز و حدیده
3
3
Wire the outlet and lamps
Wire the outlet and lamps
Set an outlet in a side wall for the iron's plug, held by a flange and a split ring, and wire it in series with the switch to the supply cord. At the top of the front wall, set two lamp sockets at about 45°, one with a red lens and one with a green: wire the red in parallel with the iron's heater, the green in parallel with the switch. Not given: the lamp ratings, the outlet type.
مواد مورد نیاز این مرحله:
 اتصالدهنده نامعلوم1 outlet
 سرپیچ لامپ2 قطعه
 لامپ2 قطعهماده ناشناخته2 red and green lenses
 سیم انعطافپذیر با دوشاخه1 قطعه
ابزارهای مورد نیاز:
 مجموعه پیچگوشتی
4
4
Use it
Use it
Set the temperature by turning the slotted stud with a screwdriver. Plug an electric soldering iron into the stand's outlet and lay it in the trough so its heater housing closes the flue. While the bimetal is cool the switch is closed and the red lamp lights: the iron heats. At the set temperature the switch opens; the green lamp glows, the red goes dark and the iron idles. Lift the iron off and air rushes up the flue, cooling the bimetal so the iron heats again. Because it senses the heater, not the tip, the heater cannot burn out even if the tip is loose.
مواد مورد نیاز این مرحله:
 هویه1 electric soldering iron
ابزارهای مورد نیاز:
مجموعه پیچگوشتیمواد
9- 2 red and green lensesجایگزین
- 1 strips, plate, contacts, studجایگزین
- 1 قطعهجایگزین
- 1 bracket, sleeve, plateجایگزین
- 1 outletجایگزین
- 2 قطعهجایگزین
- 2 قطعهجایگزین
- جایگزین
- جایگزین
ابزارهای لازم
4- جایگزین
- جایگزین
- جایگزین
- جایگزین
مواد نقشههای متصل



این نقشه میسازد

CC0 مالکیت عمومی
این نقشه تحت مجوز CC0 منتشر شده است. شما آزاد هستید آن را کپی، ویرایش، توزیع و برای هر هدفی بدون نیاز به اجازه استفاده کنید.
با خرید محصولات از طریق نقشه از سازنده حمایت کنید و او کمیسیون سازنده تعیین شده توسط فروشندگان، دریافت میکند یا یک نسخه جدید از این نقشه ایجاد کنید و آن را به عنوان اتصال در نقشه خود قرار دهید تا درآمد به اشتراک گذاشته شود.