هنر
زیبایی و سلامت
صنایع دستی
فرهنگ و تاریخ
سرگرمی
محیط زیست
غذا و نوشیدنی
مهندسی معکوس
علوم
ورزش
فناوری
پوشیدنیها
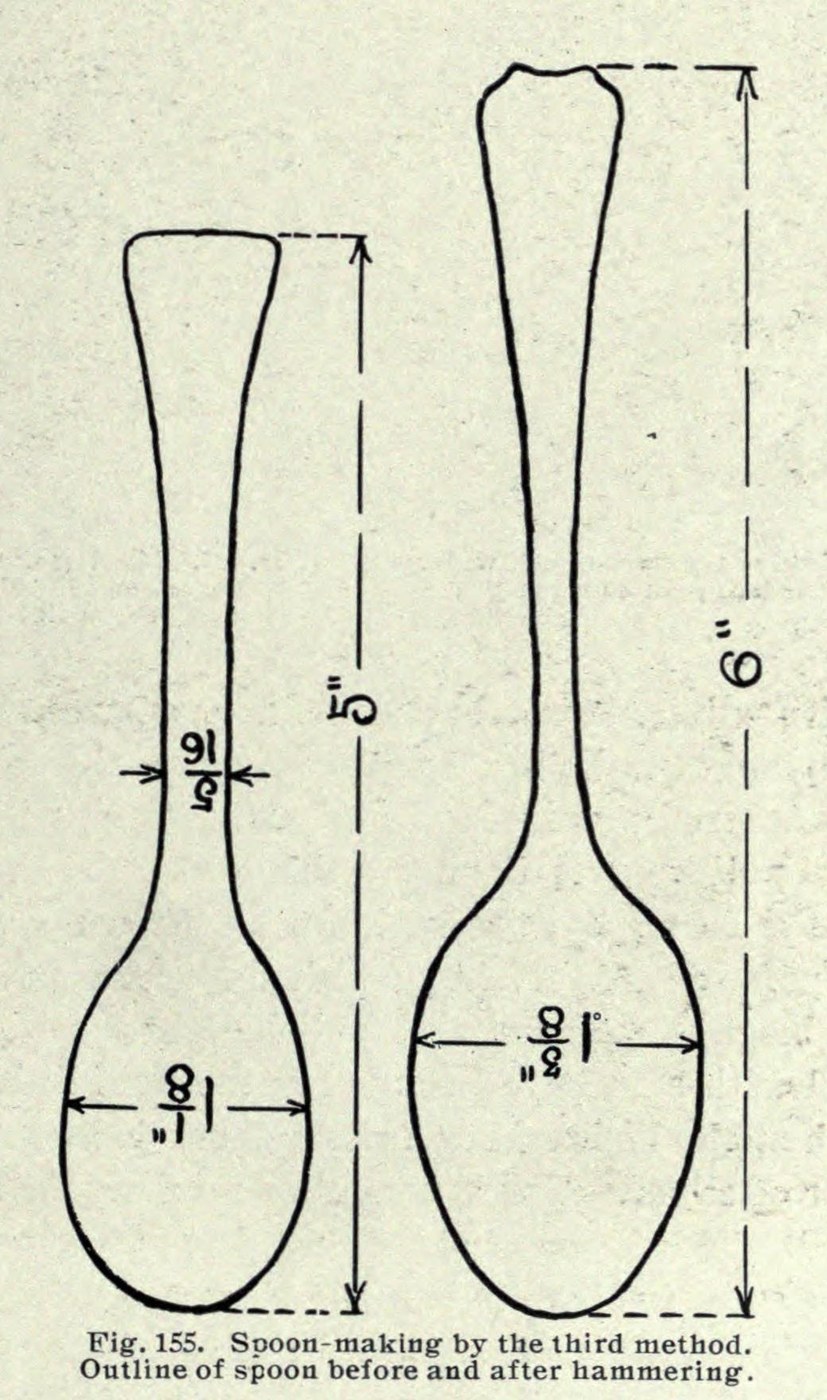
Arthur F. Payne · Public domain (1914)


Teaspoon Sawn Short from Silver Sheet, Then Hammered Out (Payne 1914)
Saw the spoon out of flat silver smaller than it will end up: shorter, narrower in the bowl and thicker in the shank. Hammering then stretches it to full size. Arthur Payne said this method was used largely for silver teaspoons.
Source: A. F. Payne, Art Metalwork with Inexpensive Equipment (1914), pp. 180–184; annealing from his chapter XI. The millimetre figure is ours. Picture: Payne's Fig. 155, the blank and the finished spoon.
متوسط
1 day
دستورالعملها
1
1
Saw out the short blank
Saw out the short blank
Mark out and saw the blank from 15-gauge sterling silver (about 1.45 mm; our conversion): 5 in long, the bowl 1⅛ in wide and the shank 5⁄16 in wide. The finished spoon will be 6 in long with a bowl 1⅝ in wide.
مواد مورد نیاز این مرحله:
 ورق نقره استرلینگ1 piece 15 gauge, enough for the 5 in blank
ابزارهای مورد نیاز:
 سوزن خطانداز
 اره جواهرسازی
2
2
Stretch the bowl wider
Stretch the bowl wider
Hammer the bowl on a flat anvil with the ball-pein hammer, held at a slight angle towards the side you want it to grow. This makes the bowl thinner and wider.
ابزارهای مورد نیاز:
 سندان
 چکش گِردسر
3
3
Narrow the shank with the neck hammer
Narrow the shank with the neck hammer
Hold the spoon on edge on a rounded convex stake and hammer the shank narrower with the neck hammer. This lengthens the spoon and makes the shank narrower and thicker. Widen the tip of the handle the same way as the bowl.
ابزارهای مورد نیاز:
 میخ چوبی
 چکش گردنکشیچکش گِردسر
4
4
Anneal and repeat
Anneal and repeat
When the silver gets hard, heat it to a dull red and plunge it into water, or let it cool. Repeat the hammering and annealing until the spoon is roughly to shape.
مواد مورد نیاز این مرحله:
 آب1 as required
ابزارهای مورد نیاز:
 چراغ بونزن
 انبر
 ظرف شیشهای
5
5
File and planish
File and planish
File the rough edges smooth, then planish the whole spoon carefully.
ابزارهای مورد نیاز:
 سوهان (سوهان دستی)
 چکش پرداختمیخ چوبی
6
6
Polish out the file marks
Polish out the file marks
Rub out all the scratches and file marks with emery cloth.
ابزارهای مورد نیاز:
 پارچهٔ سنباده
7
7
Anneal to even the fire scale
Anneal to even the fire scale
Anneal the spoon thoroughly once more. Heated silver grows a thin white skin, the fire scale, and this brings it back over the spots where filing and polishing took it off, so the colour is even.
مواد مورد نیاز این مرحله:
آب1 as requiredابزارهای مورد نیاز:
چراغ بونزنانبرظرف شیشهای8
8
Planish with smooth hammers
Planish with smooth hammers
Planish the spoon on smooth tools with smooth, bright hammers. This makes it stiff again after the annealing.
ابزارهای مورد نیاز:
چکش پرداختسندانمیخ چوبی9
9
Final polish with rouge
Final polish with rouge
Polish it lightly with a soft cotton flannel and a little red rouge.
ابزارهای مورد نیاز:
 پارچهٔ جلادهی جواهر
 سرخاب زرگری
مواد
2- 1 piece 15 gauge, enough for the 5 in blankجایگزین
- 2 as requiredجایگزین
ابزارهای لازم
14- جایگزین
- جایگزین
- جایگزین
- جایگزین
- جایگزین
- جایگزین
- جایگزین
- جایگزین
- جایگزین
- جایگزین
- جایگزین
- جایگزین
- جایگزین
- جایگزین
این نقشه میسازد
نقشههای مرتبط
این نقشهها دانش مشترکی دارند — تکنیکها، مواد یا اصول
CC0 مالکیت عمومی
این نقشه تحت مجوز CC0 منتشر شده است. شما آزاد هستید آن را کپی، ویرایش، توزیع و برای هر هدفی بدون نیاز به اجازه استفاده کنید.
با خرید محصولات از طریق نقشه از سازنده حمایت کنید و او کمیسیون سازنده تعیین شده توسط فروشندگان، دریافت میکند یا یک نسخه جدید از این نقشه ایجاد کنید و آن را به عنوان اتصال در نقشه خود قرار دهید تا درآمد به اشتراک گذاشته شود.