Samvinna
LIST
FEGURÐ OG VELLÍÐAN
HANDVERK
MENNING OG SAGA
SKEMMTUN
UMHVERFI
MATUR OG DRYKKUR
ÖFUGVERKFRÆÐI
VÍSINDI
ÍÞRÓTTIR
TÆKNI
KLÆÐANLEG TÆKNI
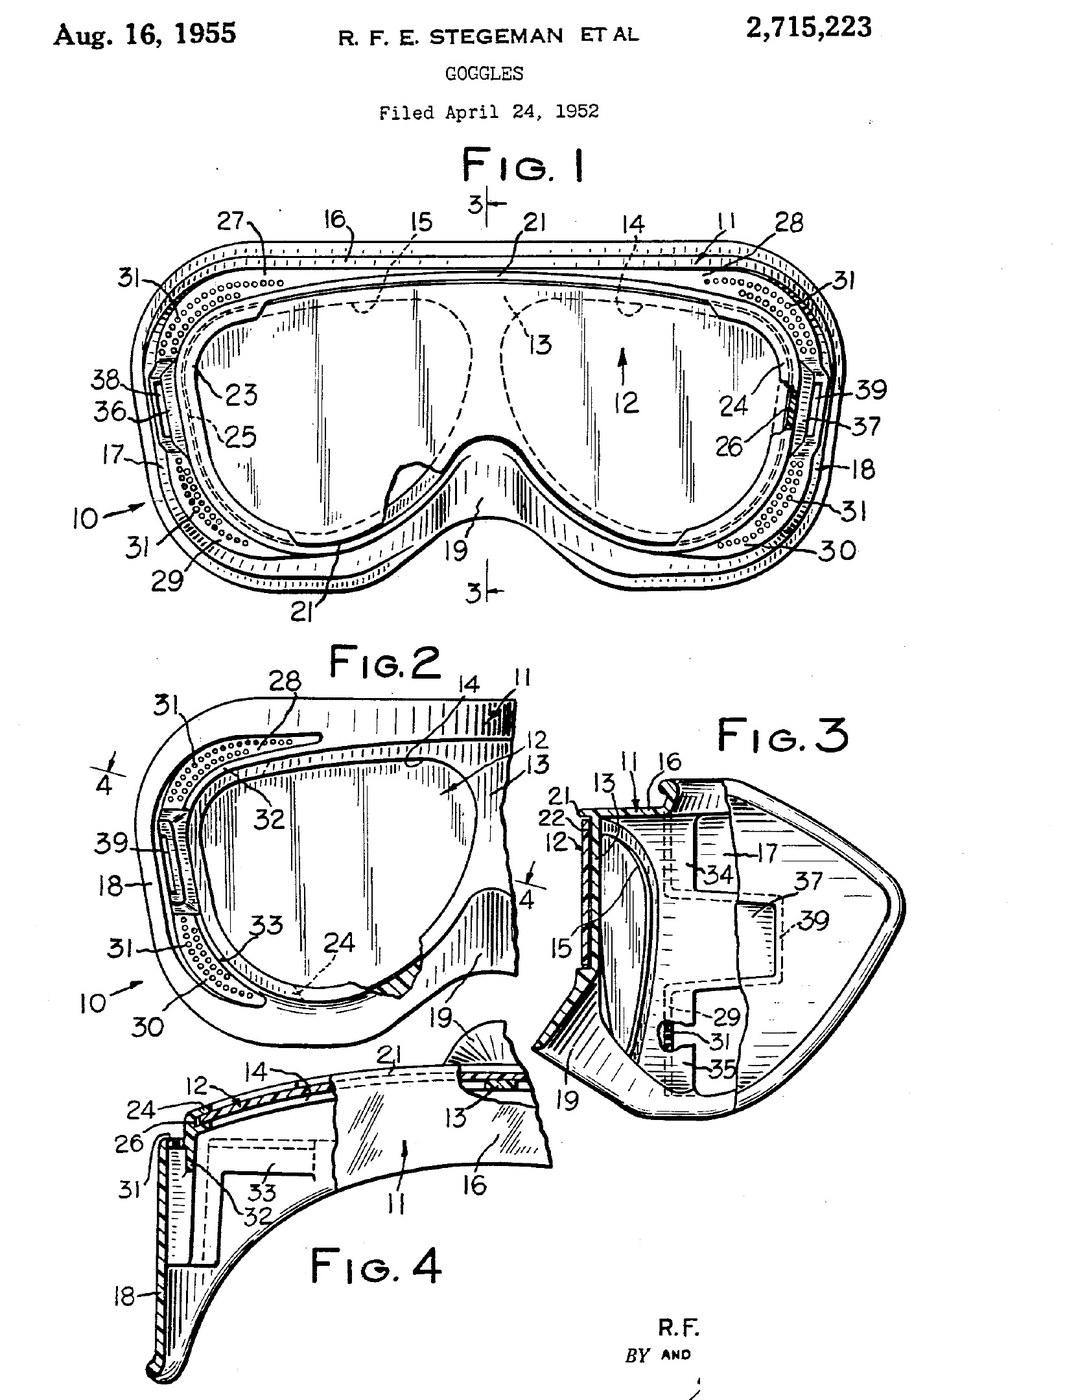


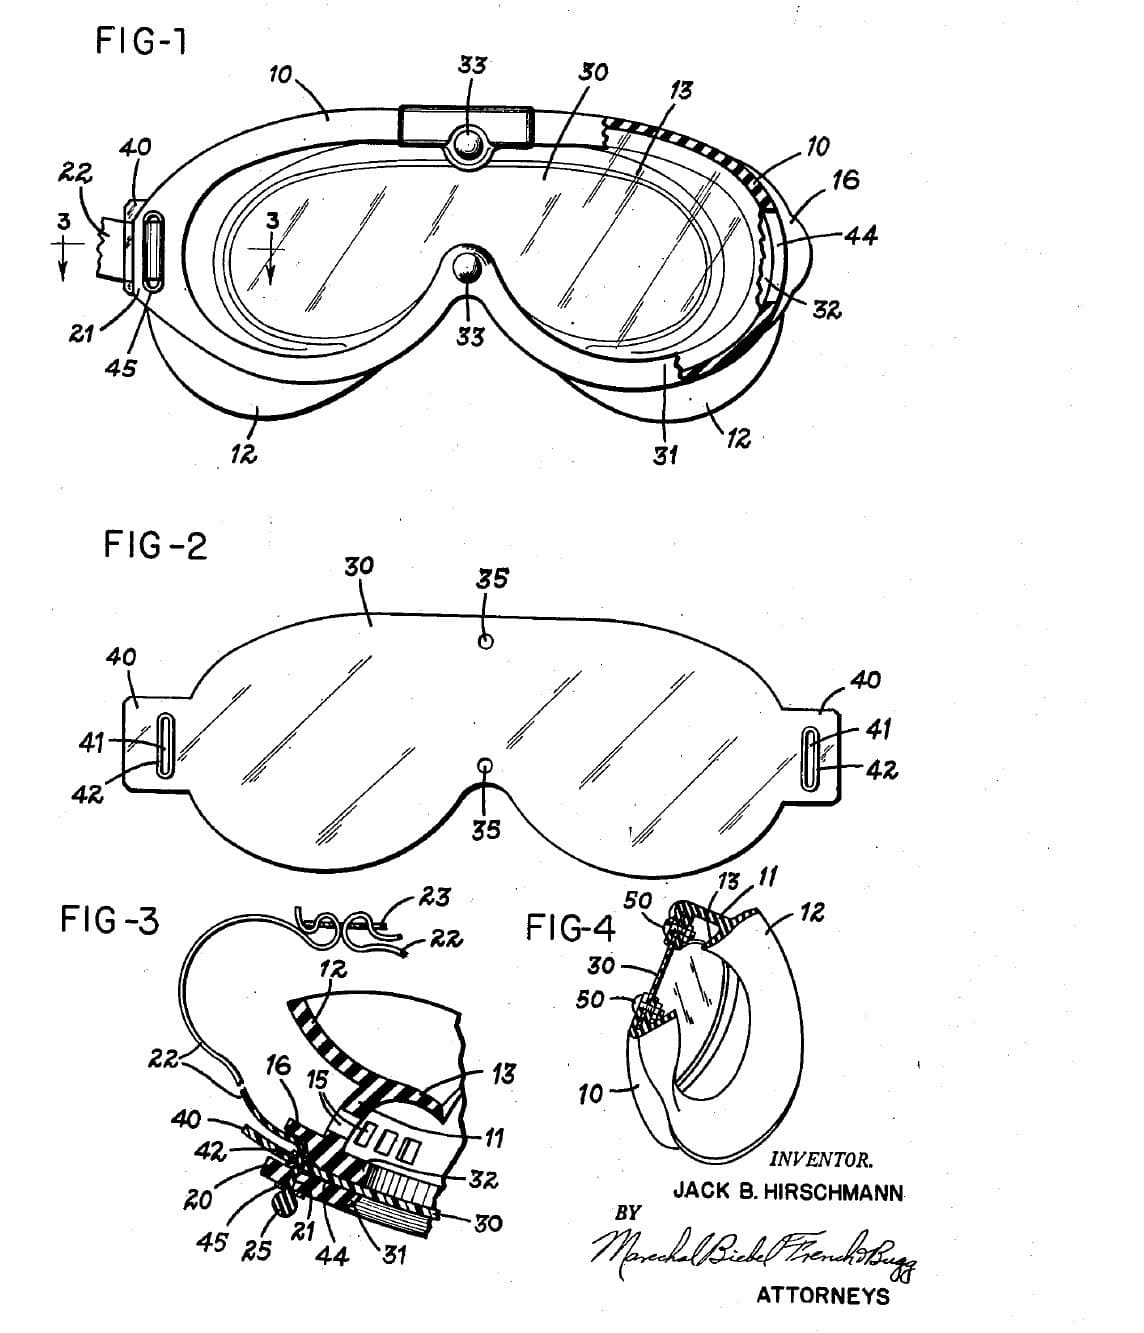
Lab Safety Goggles: Cover-All Body with Baffled Side Vents and a Snap-In Lens (Bausch & Lomb, US 2,715,223, 1955)
Cover-all goggles in two moulded plastic parts: a one-piece body that wraps the eyes and nose, and a flat clear lens panel sprung into a curve across its front. A raised rib round the front hides the lens edge so no particles can get in. The vents sit in set-back panels at the sides, and baffles inside turn the incoming air away from the eyes.
Result: ventilated goggles that keep out flying particles and splash, with a lens that snaps out for replacement.
Source: R. F. E. Stegeman and F. G. Gay (Bausch & Lomb), US 2,715,223 (1955). Unknown: sizes, the moulding and the strap. Picture: the patent drawing.
Miðlungs
Unknown
Leiðbeiningar
1
1
Mould the body
Mould the body
Mould the body in one piece of plastic such as polystyrene or vinyl acetate. Give it a front wall curved from side to side with two sight openings, and a top wall and side walls running round to a projecting nose piece. Add a continuous rib round the front edge that stands forward of the lens, with overhanging flanges at the two temple ends forming grooves for the lens. Ours: polystyrene, injection moulded. Not given: sizes, the moulding.
Efni fyrir þetta skref:
 Pólýstýren1 body
Nauðsynleg verkfæri:
 Sprautusteypuvél
 Óþekkt mál
2
2
Form the vents, baffles and strap anchors
Form the vents, baffles and strap anchors
In the same moulding, set back panels on the temple and side parts behind the lens plane and pierce them with many small vent holes. Inside, put baffle walls behind the holes so the incoming air is turned away from the eyes. Form an anchor recess with an opening in each side wall for the head strap.
Nauðsynleg verkfæri:
Sprautusteypuvél3
3
Cut and fit the lens, add the strap
Cut and fit the lens, add the strap
Cut a flat, transparent lens panel to cover the whole front wall. Put one end in one temple groove, flex the panel and put its other end in the other groove; its own stiffness holds it curved against the front wall, with the rib covering its edge. Fasten a head strap in the two anchor recesses. Ours: clear plastic sheet, elastic cord. Not given: the lens thickness, the strap.
Efni fyrir þetta skref:
 Glær plastplata1 lens panel
 Teygjusnúra1 head strap
Nauðsynleg verkfæri:
 PlötuklippurÓþekkt mál
Efni
3- 1 bodyStaðgengill
- 1 lens panelStaðgengill
- 1 head strapStaðgengill
Nauðsynleg verkfæri
3- Staðgengill
- Staðgengill
- Staðgengill
Efni úr tengdum teikningum


Þessi teikning býr til

Tengd Blueprint
Þessi blueprint deila þekkingu — tækni, efni eða meginreglur
CC0 opinbert ríki
Þessi teikning er gefin út undir CC0. Þér er frjálst að afrita, breyta, dreifa og nota þetta verk í hvaða tilgangi sem er, án þess að biðja um leyfi.
Studdu smiðinn með því að kaupa vörur í gegnum teikningu hans þar sem hann fær þóknun smiða sem seljendur ákvarða, eða búðu til nýja endurskoðun á þessari teikningu og tengdu hana sem tengingu í þinni eigin teikningu til að deila tekjum.