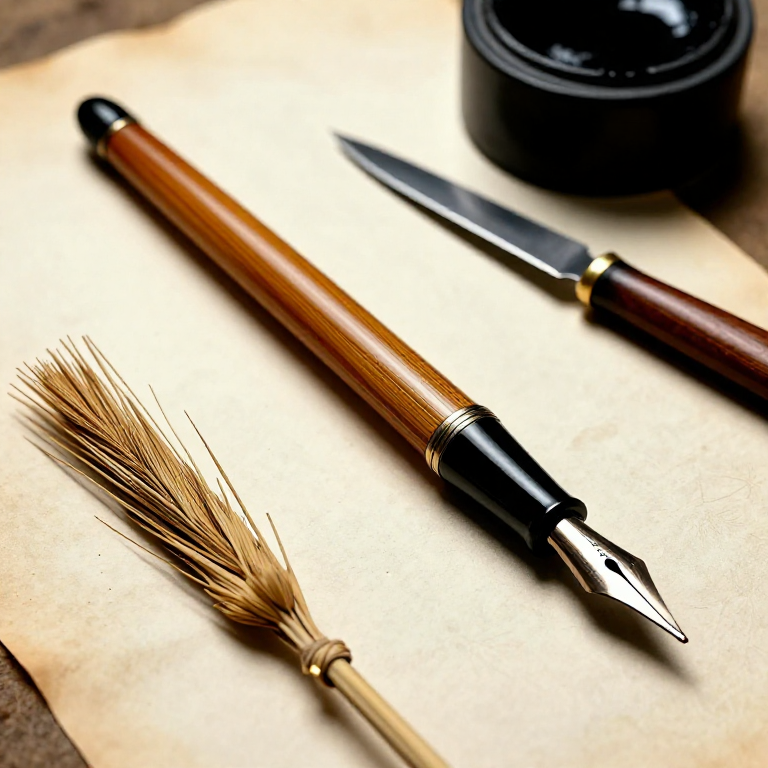
Að búa til kalligrafikpenna úr köllum (Qalam) — elsta ritfæri heimsins
Búðu til qalam (köllupenni), elsta kalligrafikritfæri sem notað var í yfir 4.000 ár. Skorið úr þurrkaðum Arundo donax köllum eða bambusum.
Leiðbeiningar
Veldu og undirbúðu kollinn
Veldu og undirbúðu kollinn
Veldu beran hluta af þurrkaðum köllum (Arundo donax) eða bambusum með ytri þvermáli á milli 8 mm og 12 mm — þetta ákvarðar hámarksbreidd pennaflóans. Kollinn verður að vera alveg þurrkað (minnst 6 mánuðir eftir skurð, helst 1 ár) — grænn eða hálfþurrkað koll er of mjúkt og mun hrynjast frekar en að sneiðast hreinlega. Arundo donax vex villt í miðjarðarhafsloftslagi, við ár og votu landi; það er sami kollinn sem var notaður sögulega frá Egyptalandi til Íslamska gullaldarinnar. Bambús er frábær valkostur sem er aðgengilegur um alla heiminn. Skurðu beran hluta sem er um 20-25 cm langur — þetta er þægilegur pennalengd. Ef kollinn hefur hnúta (hörðu samskeyti), settu einn hnút 5-8 cm frá rithluta — hann virkar sem náttúrulegur blekgeymir.
Efni fyrir þetta skref:
 Dried Reed2 piece
Nauðsynleg verkfæri:
 Utility Knife
Gerðu skáhalda skurði
Gerðu skáhalda skurði
Með því að nota skarpa hníf á skurðborði, skurðu rithluta kollsins á skáhaldan horn um 45-60 gráður frá miðásnum. Þetta skapar stekilmyndaða opnun sem kemur í ljós hinn hollaða innri hluta. Skurðurinn ætti að vera hreinn og sléttur — daufur hníf mun mylja trefjir kollsins. Lengd þessa skáhalda skurðar ákvarðar sveigjanleika flóans: lengri skurður (fleiri skáhallinn) framleiðir sveigjanlegri flóa, en styttri skurður framleiðir stíflari, stjórnanlega flóa. Fyrir fyrstu pennann þinn, miðaðu á skurð um 2-3 cm langan. Ef notað er bambús, eru veggir þykkari og harðari en Arundo donax, svo skurðurinn krefst meiri afl — skaltu alltaf skera í burtu frá líkamanum þínum.
Nauðsynleg verkfæri:
Utility Knife Self-Healing Cutting Mat
Skraptu úthlýtinguna
Skraptu úthlýtinguna
Köller og bambús hafa mjúka úthlýtingu (svamplíkt vef) innan hins hollua hluta. Notaðu oddinn á hnífnum til að skrapa úthlýtingu út úr innri hluta skurðarins, sem skapar hreina, hollaða rás um 3-5 cm dýpa. Þessi hollúnn virkar sem blekgeymir — blekið fyllir þetta svæði og nærir flóann með þyngdarkrafti og flóastuðlingi. Láttu veggina á kollnum óskertir og skraptu þá ekki þunna. Ef kollahluti þinn inniheldur hnút, virkar hnúturinn sem náttúrulegur hindrun sem kemur í veg fyrir að blek spiladist alla kollinn — þetta er tilvalið. Ef enginn hnútur er til staðar, takmarkast blekgeymirinn við það hversu mikið blekið þet vatnsyfirborði heldur innan rásarinnar.
Nauðsynleg verkfæri:
Utility KnifeLögun flóann
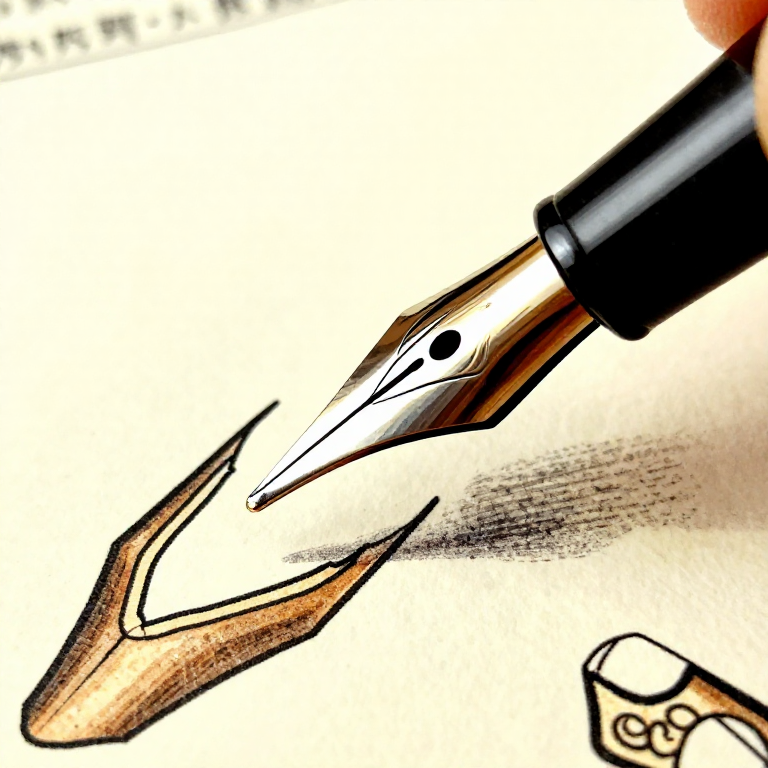
Lögun flóann
Rithlutinn (flóinn) er flati framhluti kollsins þar sem hann mætir pappírnum. Settu kollinn á skurðborðið með opnuninni snúa upp. Gerðu hreina, hornrétta skurði beint yfir oddinn á skáhalda skurðinum til að búa til flatan rithlutu. Breidd þessa flata hluta er breidd flóans — venjulega 2-5 mm fyrir víðan kalligrafi. Fyrir arabíska kalligrafi (sem notar jöfnuðu qalam), er flóinn oft skorinn í lítillega horn frá vinstri til hægri frekar en fullkomlega hornrétt — þetta auðveldar þá stærstu-litlu högg sem einkennandi arabísk stafir. Fyrir vestræna kalligrafi, hornréttur skurður virkar vel. Skurðurinn verður að vera fullkomlega hreinn og skarpur — öll gróf götuflatur á rithlutanum mun valda því að blek dreifist óreglulegra og búi til kropp merki.
Nauðsynleg verkfæri:
Utility KnifeSelf-Healing Cutting MatGerðu miðjuskrun
Gerðu miðjuskrun
Þetta er mest gagnrýnin skrefið. Settu flóann á skurðborðið með flatri rithlutanum snúa niður. Settu hnífnum á miðjan flóa, rétt framboðinn að lengd pennasinns. Ýttu niður með krafti og klifraðu flóanum um 8-15 mm upp frá rithlutanum. Þessi skrun er nauðsynleg — hún skapar tvær tengildir sem beygðast lítillega undir rithraða og mikilvæg, hún skapar flóstuðling sem dragar blekið frá geyminum til pappírns. Án skrunarinnar mun blekið ekki flæða. Skrunarinn verður að vera rétt miðjaður — misheppnaður skrun gerir aðra tengilu breiðari en hina, sem framleiðir óbreytt högg. Skrunarinn ætti að vera hreinn án hliðarskruna — ef kollinn skrenist til hliðar, byrjaðu með nýjum hlutum.
Nauðsynleg verkfæri:
Utility KnifeSelf-Healing Cutting MatBæta og sléttu flóann
Bæta og sléttu flóann
Skoðaðu flóann vandlega. Tvær tengildir ættu að vera jöfn, og rithlutinn ætti að vera fullkomlega flatr og sléttur. Ef engar gror trefjar eru til staðar, sléttu rithlutann varlega á fínu sleggupappír (400-600 korn), lagt flatt á harðan flöt — draga flóann yfir sleggupappír í ritrunu (frá þér) nokkrum sinnum. Þú getur einnig fínstillt horn flóans með því að klippa litla flipa frá öðru hlutanum með hnífnum. Sumir kalligrafar rúnma skarpu hornahorn flóans mjög lítillega til að koma í veg fyrir að þeir dragist á pappírinn. Prófaðu flóann með því að skoða hann frá hlið — tvær tengildir ættu að vera flatar (ein ætti ekki að vera hærri en hin), og frá framantúr, rithlutinn ætti að vera hreinn beinn lína.
Nauðsynleg verkfæri:
 Sandpaper
Prófaðu pennann með bleki
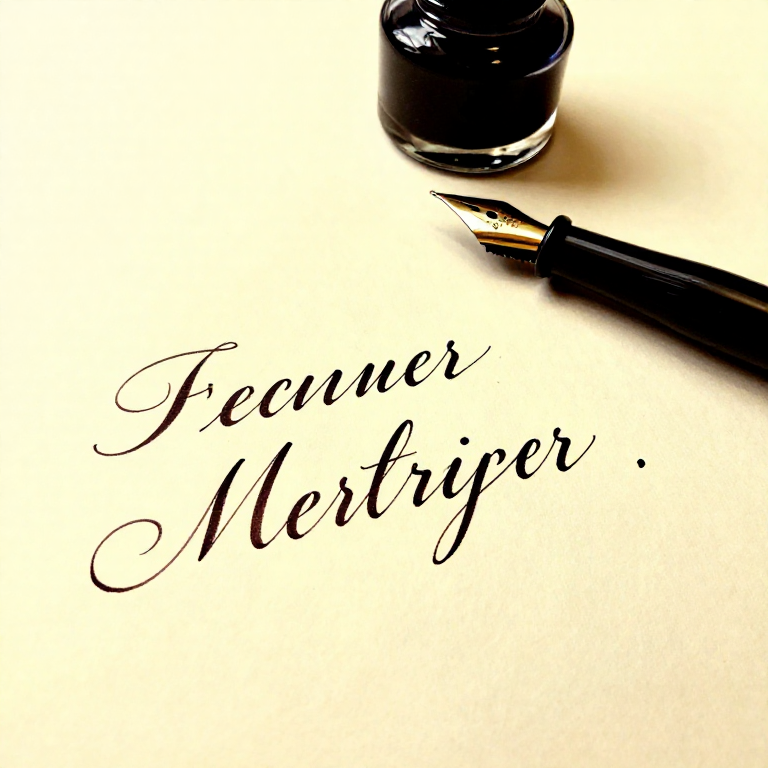
Prófaðu pennann með bleki
Kafaðu flóann í blekið svo geymirinn fyllst að hluta — blekið ætti að fara inn í hollaða rásina og bleyta skrunina. Snerttu flóann við pappírinn og draga högg. Blekið ætti að flæða slétt frá skrunanum til pappírns í stjórnaðri línu breidd flóans. Ef blekið flæðir ekki: skrunarinn gæti verið of þétt (framlengi hann nokkur mm lengri) eða flóinn gæti verið of grófl (sléttu hann. Ef blekið flæðir út í klut: skrunarinn gæti verið of breiður eða of langur — búðu til nýjan penna með styttri skrunanum. Ef penninn brýtur og sleppir á pappírinn: flóinn hefur grofan stað eða skarpt horn — sléttu hann. Vel gerðir köllupenni framleiðir einkennandi mjúka, lítillega fjallaða línugæði sem er frábrugðin málmflóa — kollurinn þjappast lítillega á pappírinn, sem gefur hlýju, líffræðilegu einkenni ritningarinnar. Þessi gæði eru af því margar kalligrafar kjósa köllapenna fyrir ákveðna stafi.
Efni fyrir þetta skref:
 India Ink30 ml
 Calligraphy Practice Paper5 sheet
Viðhald og endurklifra flóann
Viðhald og endurklifra flóann
Köllupennar slitna með notkun — mjúka gróðurefnið slitna smám saman gegn pappírnum. Þetta er eðlilegt og vænst. Þegar flóinn verður slétt og línurnar missa skörpu (venjulega eftir 30-60 mínútur af ritningu), endurklifraðu flóann: klipptu þunna sneið af rithlutanum til að afhjúpa nýja, skarpa brún. Hver endurklifri styttir flóa um 0,5-1 mm, og þú getur endurklifrað mörg sinnum áður en skáhalda skurðurinn er uppurinn. Á endanum þarftu að endurteikna skáhalda skurðinn og skrunina frá grunni, sem styttir pennann um 2-3 cm. 20 cm pennur getur varað í marga lotir af notkun og endurklifri. Geymdu köllapenna á þurru stað — raki veldur því að kollurinn mjúknar og þenst. Ef pennur þornar og verður skjör eftir langa geymslu, slekktu oddinn á pennanum í vatni í nokkrar mínútur áður en notkun til að endurvinna sveigjanleika.
Nauðsynleg verkfæri:
Utility KnifeEfni
3- 2 pieceStaðgengill
- 5 sheetStaðgengill
Efni úr tengdum teikningum
Tengd Blueprint
Þessi blueprint deila þekkingu — tækni, efni eða meginreglur
Related blueprints
Other builds that share materials, tools, or techniques with this one.
CC0 opinbert ríki
Þessi teikning er gefin út undir CC0. Þér er frjálst að afrita, breyta, dreifa og nota þetta verk í hvaða tilgangi sem er, án þess að biðja um leyfi.
Studdu smiðinn með því að kaupa vörur í gegnum teikningu hans þar sem hann fær þóknun smiða sem seljendur ákvarða, eða búðu til nýja endurskoðun á þessari teikningu og tengdu hana sem tengingu í þinni eigin teikningu til að deila tekjum.