
LIST
FEGURÐ OG VELLÍÐAN
HANDVERK
MENNING OG SAGA
SKEMMTUN
UMHVERFI
MATUR OG DRYKKUR
ÖFUGVERKFRÆÐI
VÍSINDI
ÍÞRÓTTIR
TÆKNI
KLÆÐANLEG TÆKNI
Metal Band Saw: Horizontal Saw on a Welded Steel Frame
Martin

Búin til af

Martin

23. október 2026NO
2
0
0
0
0

Metal Band Saw: Horizontal Saw on a Welded Steel Frame

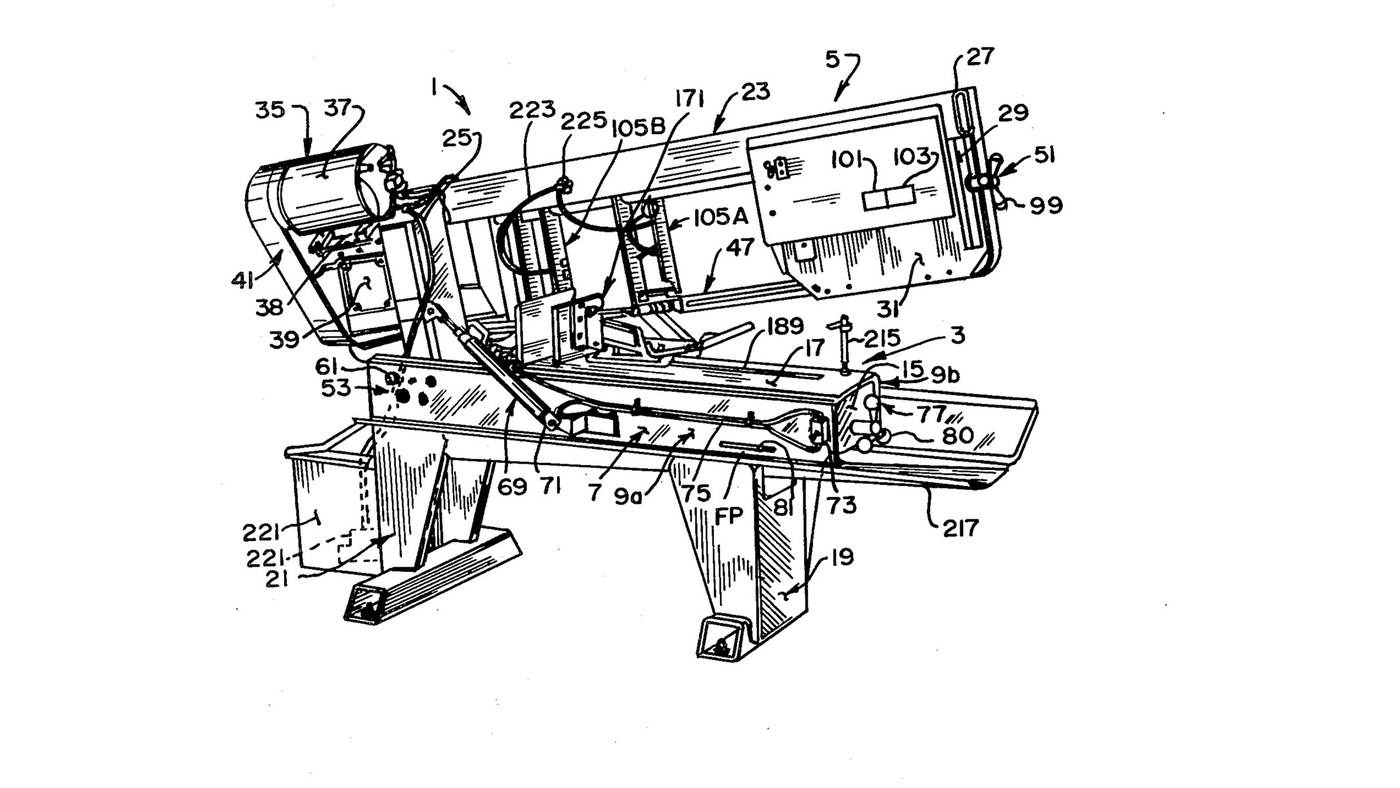
Curtis Eccardt's horizontal power band saw (Emerson Electric, US 4,364,294, 1982), built from welded steel channel and tube instead of iron castings to cut its cost. The saw head swings down on trunnions over the bed; a hydraulic cylinder with a valve sets how fast it feeds, a spring counterbalances it, and a spring tensioner shows the blade tension on a scale. Two guides with rollers twist the blade's lower run 90° so its teeth face down into the work, and carbide inserts hold it there. The patent gives no sizes, speeds or ratings; the welder and wrenches are ours. The picture: the patent's Fig. 1.
Lengra kominn
4 days

Leiðbeiningar

1

Weld the bed

Stand two steel channels (9a, 9b) parallel, webs upright and flanges facing in, and weld gussets (15) between their webs. Bolt a bed plate (17) across the top flanges as the work surface. Ours: MIG welder, drill press for the bolt holes.

Efni fyrir þetta skref:

U-prófíll úr stáliU-prófíll úr stáli2 stykki
Plata úr mjúku stáliPlata úr mjúku stáli1 stykki
Sexkantbolti - flokkur 8.8Sexkantbolti - flokkur 8.81 stykki

Nauðsynleg verkfæri:

MIG-suðuvélMIG-suðuvél
SúluborSúlubor
SkiptilykillSkiptilykill
2

Weld and bolt on the legs

Weld formed sheet-steel legs onto horizontal floor members to make front and rear leg weldments (19, 21), and bolt them under the bed.

Efni fyrir þetta skref:

StálplataStálplata1 stykki
StálrörStálrör1 stykki
Sexkantbolti - flokkur 8.8Sexkantbolti - flokkur 8.81 stykki

Nauðsynleg verkfæri:

MIG-suðuvélMIG-suðuvél
SkiptilykillSkiptilykill
3

Weld the head

Weld a head post (25) of square or rectangular steel tube square to a head beam (27) of rectangular tube. Weld a bracket leg (29) down from the beam's outer end, and fix support plates at both ends (31, 33).

Efni fyrir þetta skref:

StálrörStálrör1 stykki
Plata úr mjúku stáliPlata úr mjúku stáli1 stykki

Nauðsynleg verkfæri:

MIG-suðuvélMIG-suðuvél
4

Fit the trunnions and align the pivot

Fix a shaft through the head post with its ends out as trunnions (55a, 55b), in bushings in two bearing blocks (59a, 59b) bolted inside the channel webs. Each block has one close-fit bolt hole and three oversize ones: shift the blocks until the pivot is parallel to the bed plate, then torque the bolts. A set screw (67) takes out end play.

Efni fyrir þetta skref:

StálöxullStálöxull1 stykki
MálmbussMálmbuss2 stykki
LeguhúsLeguhús2 stykki
Sexkantbolti - flokkur 8.8Sexkantbolti - flokkur 8.88 stykki
Skrúfa með skálaroddaSkrúfa með skálarodda1 stykki

Nauðsynleg verkfæri:

SúluborSúlubor
ÁtakslykillÁtakslykill
5

Mount motor, belt drive and gearbox

Mount the electric motor (37) on a plate (38) pivoted on the head beam, and couple it by a multi-speed belt and pulleys (41) to a gearbox (39). Fit the drive wheel (43) on the gearbox output shaft.

Efni fyrir þetta skref:

RafmótorRafmótor1 stykki
Plata úr mjúku stáliPlata úr mjúku stáli1 stykki
DrifreimDrifreim1 stykki
TrissaTrissa1 stykki
GírkassiGírkassi1 stykki
BandsagarhjólBandsagarhjól1 stykki

Nauðsynleg verkfæri:

SkiptilykillSkiptilykill
6

Build the idler tensioner

Weld an idler yoke (87) of rolled steel plate, pivot it on the head beam with a pin (89), and cantilever the idler axle from it with the idler wheel (45) on bearings (85). A threaded rod (91) pulls the yoke through a coil spring (93) held between compression plates and a U-bolt (97); a knob (99) turns the rod. An indicator (101) on the spring reads the tension on a scale (103).

Efni fyrir þetta skref:

Plata úr mjúku stáliPlata úr mjúku stáli1 stykki
Pressaður stálpinniPressaður stálpinni1 stykki
StálöxullStálöxull1 stykki
BandsagarhjólBandsagarhjól1 stykki
KúlulegaKúlulega1 stykki
GengjustöngGengjustöng1 stykki
Coil SpringCoil Spring1 stykki
U-boltiU-bolti1 stykki
StjórnhnappurStjórnhnappur1 stykki

Nauðsynleg verkfæri:

MIG-suðuvélMIG-suðuvél
SkiptilykillSkiptilykill
7

Build the two blade guides

In each guide channel (111) mount two guide rollers (115a, 115b) on ball bearings on eccentric bushings, one fixed and one adjusted to the blade thickness. Add a carbide thrust insert (133) on the blade's back edge and two carbide side inserts (137a fixed, 137b on a sprung swing bracket set by a bolt and knob). Clamp the guides on two bar tracks (107).

Efni fyrir þetta skref:

StýrikefliStýrikefli4 stykki
KúlulegaKúlulega4 stykki
Miðskökk fóðringMiðskökk fóðring4 stykki
KarbíðinnleggKarbíðinnlegg6 stykki
Coil SpringCoil Spring2 stykki
StjórnhnappurStjórnhnappur2 stykki
StálrörStálrör1 stykki

Nauðsynleg verkfæri:

SkiptilykillSkiptilykill
8

Fit the blade and set the tension

By hand, run the endless blade (47) round the drive and idler wheels and through both guides; the rollers twist its lower run about 90° so the teeth face down. Turn the tension knob until the scale shows the tension you want.

Efni fyrir þetta skref:

BandsagarblaðBandsagarblað1 stykki
9

Fit the feed cylinder and counterbalance

Connect a hydraulic cylinder (71) between bed channel and head post above the trunnions, filled with oil and piped through tubing (75) to a control valve (73): the valve sets the feed rate and, closed, holds the head. Fit a coil spring (78) on a threaded linkage (79) between an end gusset and the head post below the trunnions, adjusted by a knob (80), to counterbalance the head.

Efni fyrir þetta skref:

VökvaþrýstistrokkurVökvaþrýstistrokkur1 stykki
VökvaolíaVökvaolía1 batch
VökvarörVökvarör1 stykki
FlæðisstýrilokiFlæðisstýriloki1 stykki
Coil SpringCoil Spring1 stykki
GengjustöngGengjustöng1 stykki
StjórnhnappurStjórnhnappur1 stykki

Nauðsynleg verkfæri:

SkiptilykillSkiptilykill
10

Bolt on the vice

Bolt the quick-acting vice to the bed plate to clamp the work square under the blade.

Efni fyrir þetta skref:

VélskrúfstykkiVélskrúfstykki1 stykki
Sexkantbolti - flokkur 8.8Sexkantbolti - flokkur 8.81 stykki

Nauðsynleg verkfæri:

SkiptilykillSkiptilykill

Efni

29

Nauðsynleg verkfæri

4

CC0 opinbert ríki

Þessi teikning er gefin út undir CC0. Þér er frjálst að afrita, breyta, dreifa og nota þetta verk í hvaða tilgangi sem er, án þess að biðja um leyfi.

Studdu smiðinn með því að kaupa vörur í gegnum teikningu hans þar sem hann fær þóknun smiða sem seljendur ákvarða, eða búðu til nýja endurskoðun á þessari teikningu og tengdu hana sem tengingu í þinni eigin teikningu til að deila tekjum.

Umræða

(0)

Skrá inn til að taka þátt í umræðunni

Hleður athugasemdum...