Samvinna
LIST
FEGURÐ OG VELLÍÐAN
HANDVERK
MENNING OG SAGA
SKEMMTUN
UMHVERFI
MATUR OG DRYKKUR
ÖFUGVERKFRÆÐI
VÍSINDI
ÍÞRÓTTIR
TÆKNI
KLÆÐANLEG TÆKNI
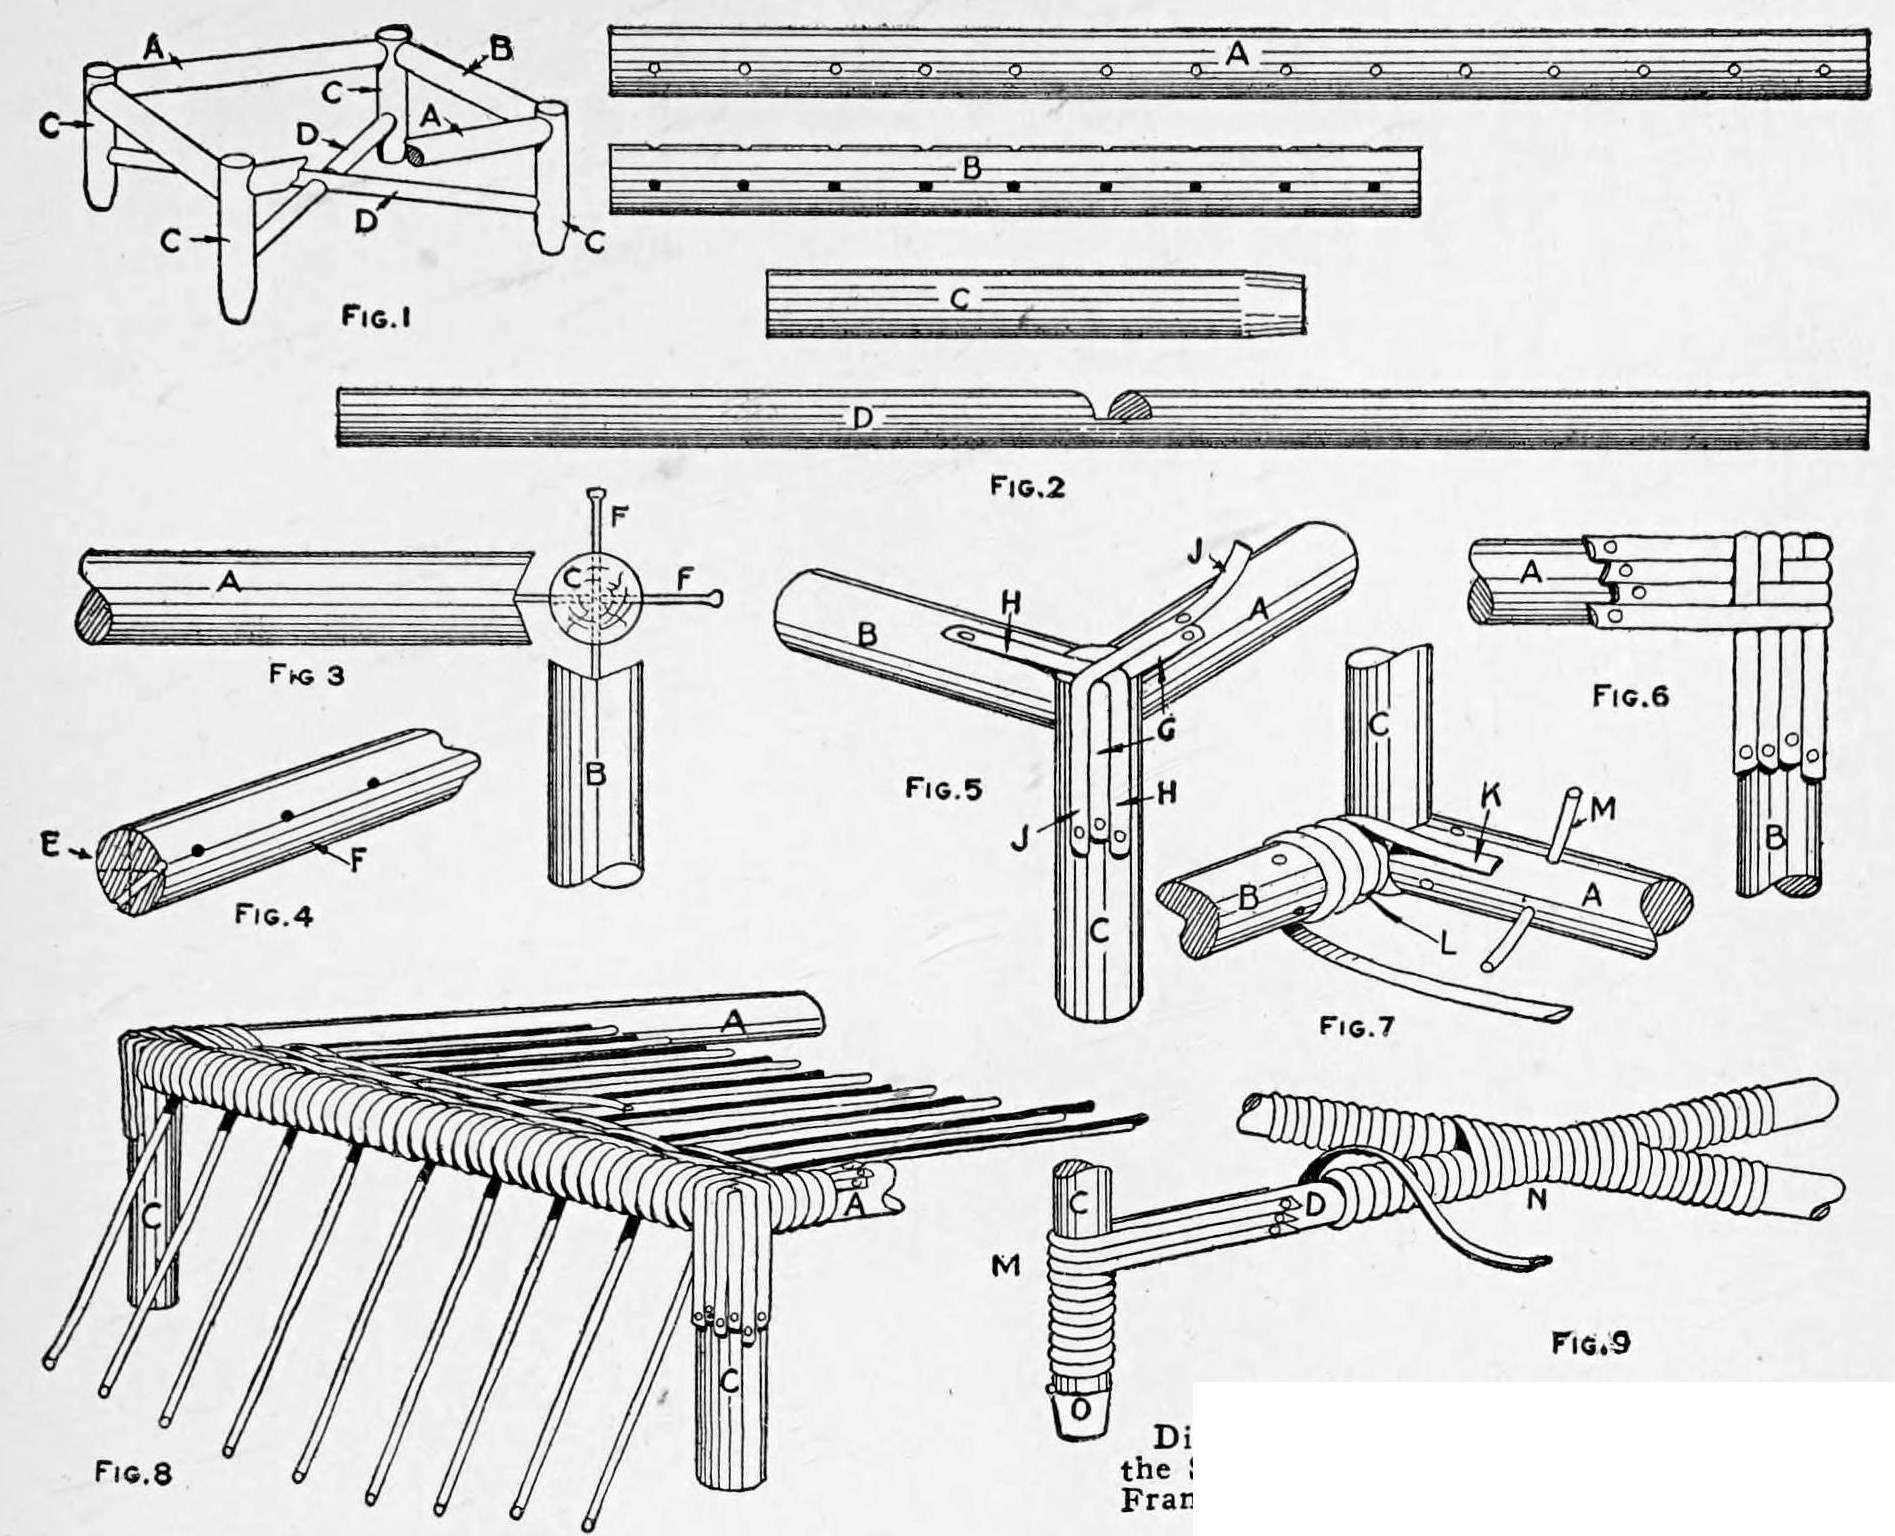


Woven-Reed Footstool: Nailed Dowel Frame, Wound Posts, Woven Top and Pairing-Weave Apron (Boy Mechanic, 1919)
Charles M. Miller's reed footstool from The Boy Mechanic, Book 3 (1919): a frame of 3/4 in dowel rails and posts with crossed 5/8 in braces, nailed through drilled holes, the posts and rails wound with flat reed, the top woven over No. 4 spokes and the apron in pairing weave, finished with a broken-down roll.
Miðlungs
About 2 days
Leiðbeiningar
1
1
Cut list
Cut list
Hleð Jupyter-vinnubók…
2
2
Read The Boy Mechanic, Book 3
Read The Boy Mechanic, Book 3
"Each piece of reed furniture has a framework, usually of dowels." The reed sizes are those of his reed basket (Boy Mechanic, Book 2).
3
3
Cut and drill the frame
Cut and drill the frame
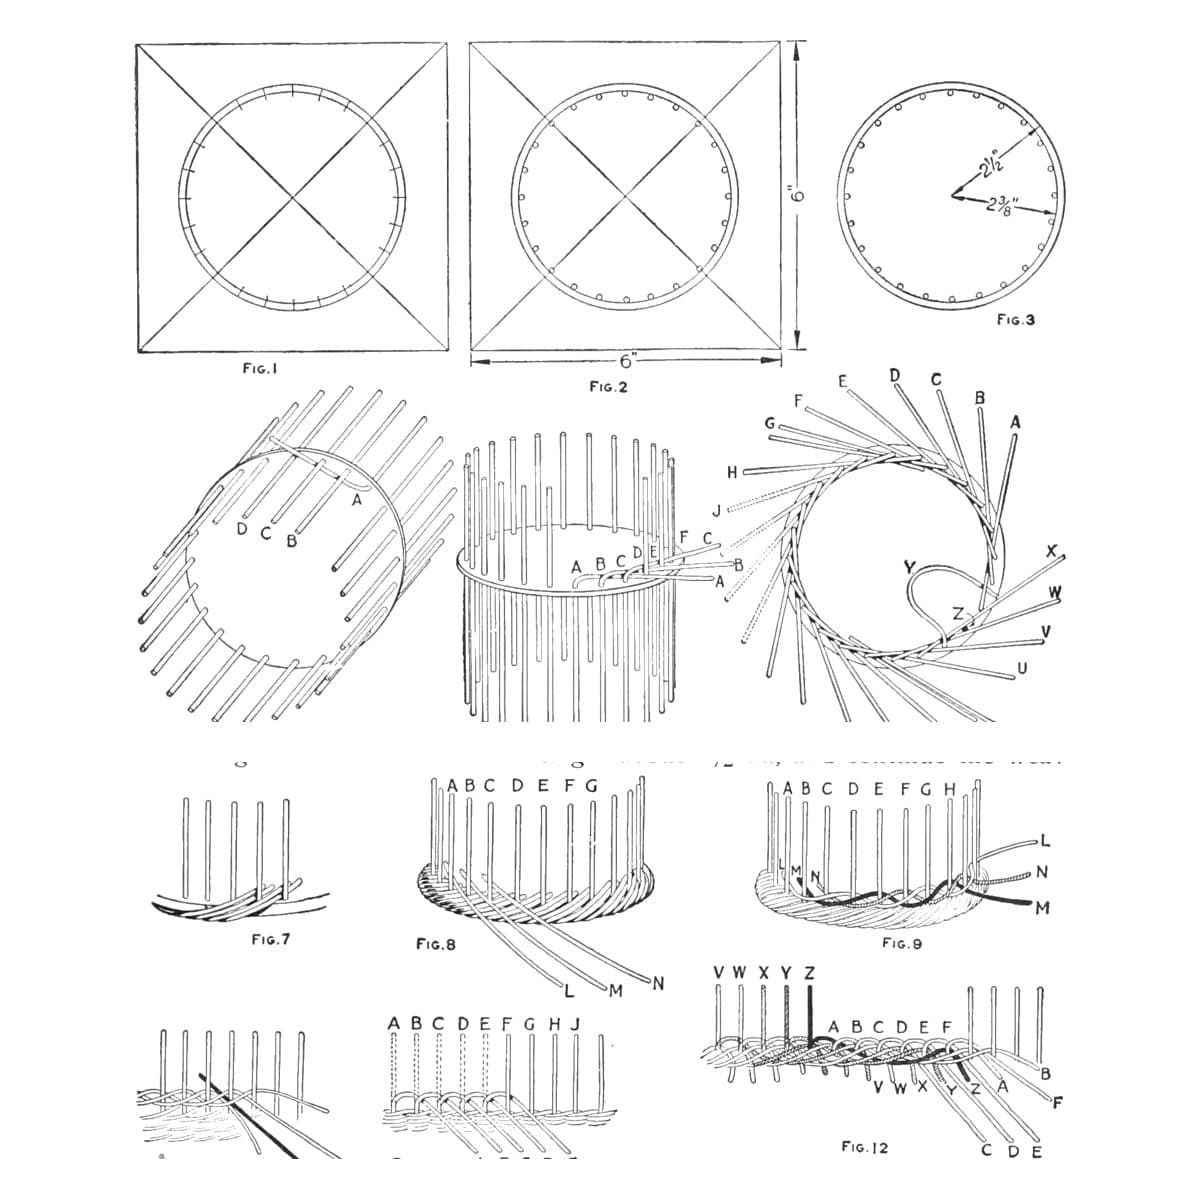
Cut two side rails 3/4 by 14 in, two end rails 3/4 by 9 in, four posts 3/4 by 7 in and two braces 5/8 by 17 in (trimmed to fit later). Notch the rail and brace ends with a coping saw to seat on the posts. Before assembly drill the spoke holes, 1/8 in for No. 4 reed, combining the top and end-side spoke holes as in Fig. 4 and drilling the side-rail holes straight (Fig. 2).
Efni fyrir þetta skref:
 Tréteinar4 stykki
Nauðsynleg verkfæri:
 Laufsög
 Handbor
 Blýantur
 Málband
4
4
Nail the frame
Nail the frame
Run the posts to the top of the frame and nail through them into the rail ends with ordinary 4-penny nails, drilling 1/16 in holes first. Set the side rails about 1/16 in below the post tops. Halve the braces at the centre on a slant so their tops lie level, try them, and nail them without pulling the frame out of square (Fig. 1).
Efni fyrir þetta skref:
 Naglar1 stykki
Nauðsynleg verkfæri:
Handbor HamarLaufsög
5
5
Wind the posts and end rails
Wind the posts and end rails
Cover the post tops with short pieces of winding reed tacked on with shoemaker's tacks, crossing in turn (Figs. 5, 6). Wind the end rails, marking each hole with pencil as the winding passes it; then open each hole through the winding with a bodkin (Fig. 7).
Efni fyrir þetta skref:
 Klofinn reyr1 stykki
 Strekkisaumur1 stykki
Nauðsynleg verkfæri:
Hamar SýllBlýantur
6
6
Weave the top
Weave the top
Put the 32 in No. 4 spokes through one end rail, down and out at the ends. Weave with a single No. 3 weaver, and after 3/4 in add a short extra spoke beside each spoke, weaving the pair as one; wind the weaver twice round the side rail each time. Insert the spokes in the other end rail before the weaving is within 2 or 3 in of it (Fig. 8).
Efni fyrir þetta skref:
 Rattan1 stykki
Nauðsynleg verkfæri:
 Skæri
 20 lítra fata
 Svampur
7
7
Wind braces and posts, weave the apron
Wind braces and posts, weave the apron
Wind the braces and posts, three strips round the post and tacked where each brace meets it, and both braces together where they cross (Fig. 9); finish the posts with brass caps or wind to within 1/8 in of the bottom. With the stool upside down, insert short spokes in the under side of the side rails and weave the apron in pairing weave, always passing one weaver twice round each post (Figs. 10-12). Cut the extra spokes even and break down the spokes into a roll, tucking the ends inside (Figs. 13-15). Singe off stray fibres carefully with a gas flame or blowtorch.
Efni fyrir þetta skref:
Klofinn reyr1 stykkiRattan1 stykkiStrekkisaumur1 stykkiNauðsynleg verkfæri:
Skæri PrópanbrennariSvampur20 lítra fata
8
8
Troubleshooting
Troubleshooting
Reed weaving troubleshooting.
Flow
Loading...
9
9
History and honest limits
History and honest limits
From "A Woven-Reed Footstool" by Charles M. Miller, in **The Boy Mechanic, Book 3**, Popular Mechanics, 1919 (Project Gutenberg 71856; checked on the archive.org scan boymechanic0003unse, pp. 255-258). Fig. 2 shows the hole positions without figures, and he mentions an optional chloride-of-lime bleach that we leave out. The tools and metric figures are ours.
Efni
5- 4 stykkiStaðgengill
- 1 stykkiStaðgengill
- 1 stykkiStaðgengill
- 1 stykkiStaðgengill
- 1 stykkiStaðgengill
Nauðsynleg verkfæri
10- Staðgengill
- Staðgengill
- Staðgengill
- Staðgengill
- Staðgengill
- Staðgengill
- Staðgengill
- Staðgengill
Þessi teikning býr til
Tengd Blueprint
Þessi blueprint deila þekkingu — tækni, efni eða meginreglur

CC0 opinbert ríki
Þessi teikning er gefin út undir CC0. Þér er frjálst að afrita, breyta, dreifa og nota þetta verk í hvaða tilgangi sem er, án þess að biðja um leyfi.
Studdu smiðinn með því að kaupa vörur í gegnum teikningu hans þar sem hann fær þóknun smiða sem seljendur ákvarða, eða búðu til nýja endurskoðun á þessari teikningu og tengdu hana sem tengingu í þinni eigin teikningu til að deila tekjum.