Samvinna
LIST
FEGURÐ OG VELLÍÐAN
HANDVERK
MENNING OG SAGA
SKEMMTUN
UMHVERFI
MATUR OG DRYKKUR
ÖFUGVERKFRÆÐI
VÍSINDI
ÍÞRÓTTIR
TÆKNI
KLÆÐANLEG TÆKNI
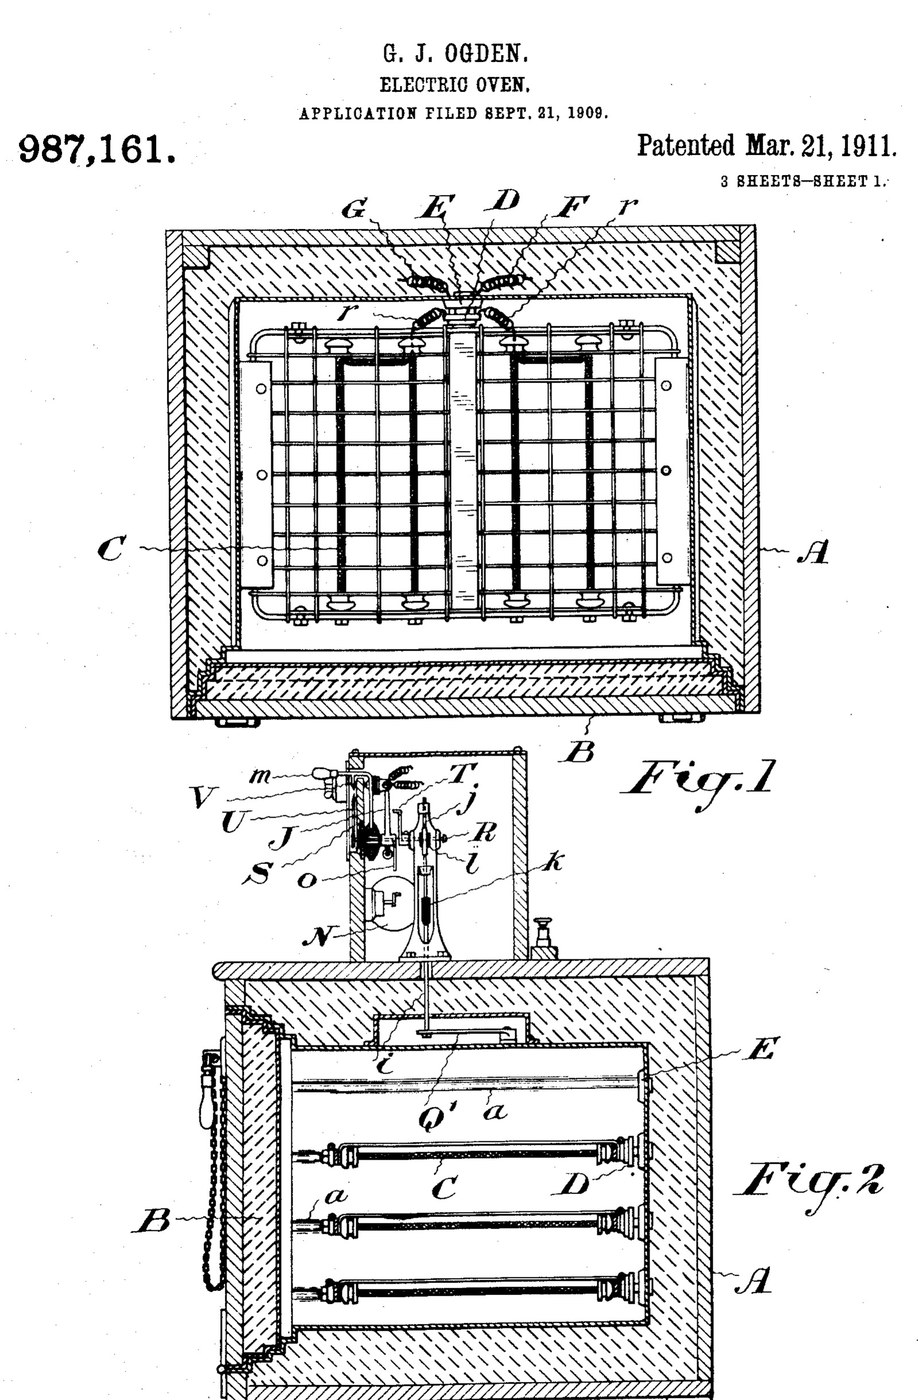


Oven: Insulated Electric Oven with Plug-In Grid Heaters and a Thermostat (Ogden, US 987,161, 1911)
An electric oven built to waste as little heat as possible: a double-walled, packed box with a packed door that seals like a strong-room door. Grid-shaped heating elements slide into grooves in the walls and plug into sockets at the back, and the food rests on them. A thermostat cuts the current when the set temperature is reached and switches it on again as the oven cools.
Result: an oven that bakes, roasts or dries at a set temperature with any number of heating grids.
Source: G. J. Ogden, US 987,161 (1911). Unknown: sizes, metals, packing and temperatures. Picture: the patent drawing.
Lengra kominn
Unknown
Leiðbeiningar
1
1
Build the insulated casing and door
Build the insulated casing and door
Make the oven chamber as a double-walled casing with packing between the walls, and grooves on the inner side walls to take the heating grids. Fit a door that closes like a fire-proof vault door, also packed, so the casing seals closely. Ours: mild steel sheet. Not given: sizes, the packing.
Efni fyrir þetta skref:
 Plata úr mjúku stáli1 inner and outer walls, door
 Óþekkt einangrunarefni1 packing
Nauðsynleg verkfæri:
 Plötuklippur
 Súlubor
 Óþekkt mál
2
2
Make the plug-in heating grids
Make the plug-in heating grids
Make heating elements in the form of grids that slide into the grooves and on which the food can rest. Fix a porcelain plug to each, carrying spring fingers that push into a socket with matching spring fingers in the back wall. Wire the sockets so all the elements are in parallel; use as many as the temperature and amount of food need. Ours: nichrome wire. Not given: the element type.
Efni fyrir þetta skref:
 Nikrómvír1 heating grids
 Óþekktur efniviður1 porcelain plugs and sockets
 Fjaðurstálsvír1 spring fingers
 Tengivír1 circuit wiring
Nauðsynleg verkfæri:
 Lóðbolti
3
3
Fit the thermostat control
Fit the thermostat control
Put a thermostat that bends with heat inside the oven, working a contact finger that plays between two contacts a few degrees above and below the set temperature. A switch-changing device, a small rotary motor, throws the main switch off and on as the finger touches one contact or the other. Mount a setting arm with a pointer over a scale marked in degrees, and a second pointer driven by the thermostat. Add a hand switch to turn the current on or off independently, and a lamp with its own switch to light the oven. Ours: a bimetal strip, toggle switches. Not given: temperatures.
Efni fyrir þetta skref:
 Tvímálmsræma1 thermostat
 Rafmótor1 switch-changing motor
 Stangarrofi3 main, hand and lamp switches
 Óþekktur málmur1 contacts, arm, scaleÓþekktur efniviður1 incandescent oven lamp
Nauðsynleg verkfæri:
Lóðbolti Hitamælir
Efni
10- 1 inner and outer walls, doorStaðgengill
- 1 packingStaðgengill
- 1 heating gridsStaðgengill
- 1 incandescent oven lampStaðgengill
- 1 spring fingersStaðgengill
- 1 thermostatStaðgengill
- 1 switch-changing motorStaðgengill
- frá$3.53
- 1 contacts, arm, scaleStaðgengill
Efni úr tengdum teikningum

Þessi teikning býr til

CC0 opinbert ríki
Þessi teikning er gefin út undir CC0. Þér er frjálst að afrita, breyta, dreifa og nota þetta verk í hvaða tilgangi sem er, án þess að biðja um leyfi.
Studdu smiðinn með því að kaupa vörur í gegnum teikningu hans þar sem hann fær þóknun smiða sem seljendur ákvarða, eða búðu til nýja endurskoðun á þessari teikningu og tengdu hana sem tengingu í þinni eigin teikningu til að deila tekjum.