LIST
FEGURÐ OG VELLÍÐAN
HANDVERK
MENNING OG SAGA
SKEMMTUN
UMHVERFI
MATUR OG DRYKKUR
ÖFUGVERKFRÆÐI
VÍSINDI
ÍÞRÓTTIR
TÆKNI
KLÆÐANLEG TÆKNI
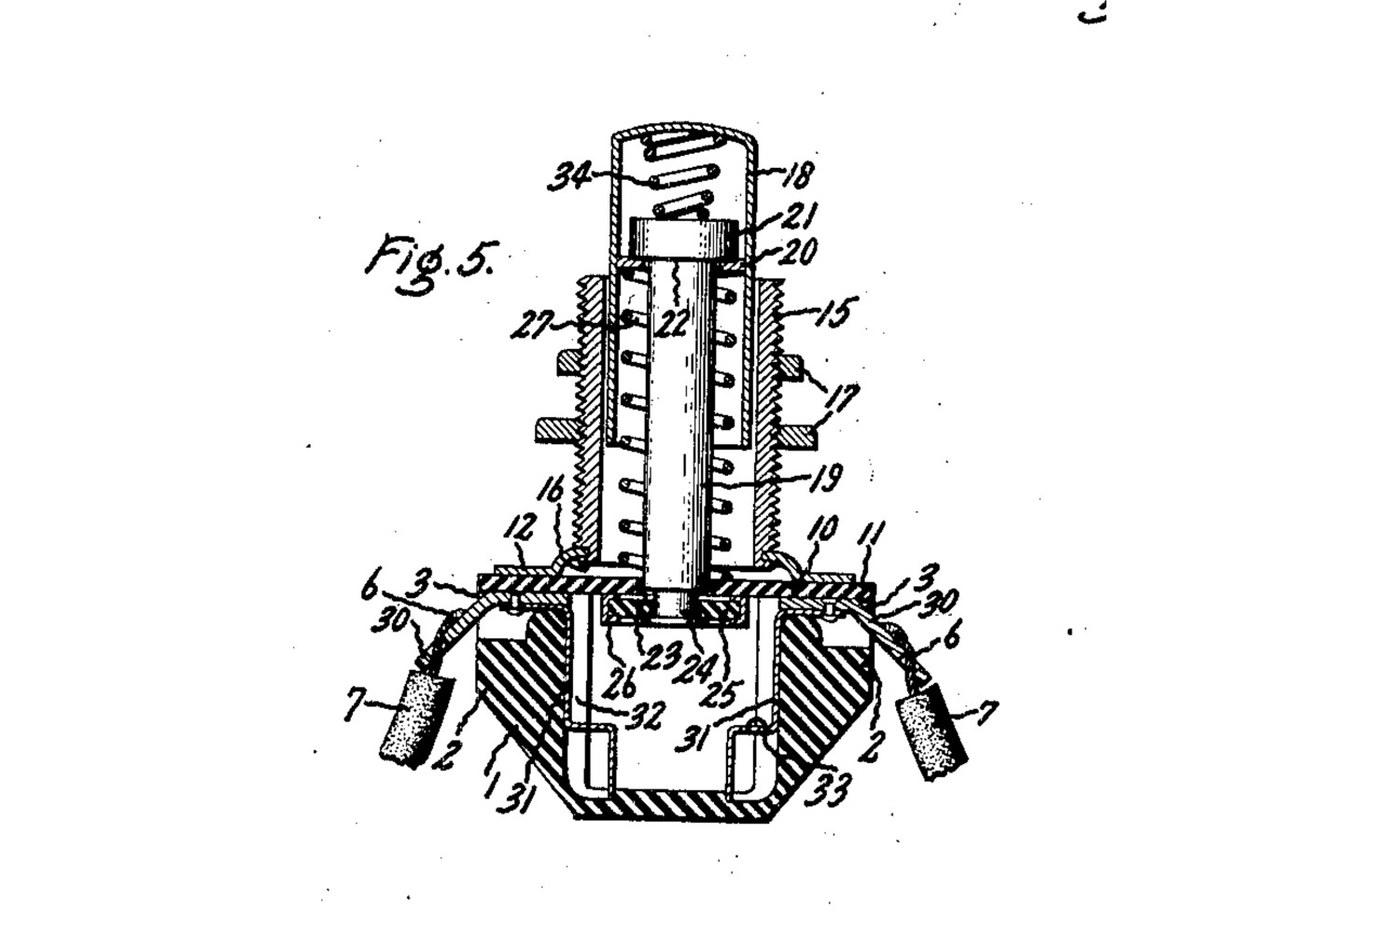


Push Button: Normally Open Momentary Switch with a Cushioned Contact (De Reamer, GE 1939)
A panel push button that closes a circuit only while you press it. A spring holds the button out, and a metal rim on the end of its rod sits clear of two contacts. Press it and the rim bridges both contacts. A second spring inside the button lets the rod give, so the contacts never take more than that spring's force.
Source: Frank C. De Reamer, US 2,166,803 (General Electric, 1939), Fig. 5. Unknown: the insulating material, the metals and every size. De Reamer gives none of them, so they are linked to unknown heads. The tools are ours. Picture: the patent's Fig. 5.
Lengra kominn
2 days
Leiðbeiningar
1
1
Mould the housing
Mould the housing
Mould a cup-shaped housing of insulating material, with a boss on each of two opposite sides, a recess in the top of each boss, a groove inside below each boss, and a bead round the top. Unknown: the material, the sizes and the moulding.
Efni fyrir þetta skref:
 Óþekkt einangrunarefni1 as required
Nauðsynleg verkfæri:
 Pressumót
 Óþekkt mál
2
2
Make the terminals and contacts
Make the terminals and contacts
Bend two angled metal strips. The upper end of each sits in a boss recess, and the lower end is a solder lug. Fix each upper end to a contact that fits the groove inside the housing, stepped at its bottom end. Unknown: the metal.
Efni fyrir þetta skref:
 Óþekktur málmur1 as required
Nauðsynleg verkfæri:
 Plötuklippur
 FlatkjaftatöngÓþekkt mál
3
3
Make the sleeve, plate and cover
Make the sleeve, plate and cover
Turn a threaded sleeve and cut its thread. Spin its lower end over onto a metal plate with tangs. Cut a cover of insulating sheet with ears that reach over the bosses and a hole in the middle to guide the rod.
Efni fyrir þetta skref:
Óþekktur málmur1 as requiredÓþekkt einangrunarefni1 as requiredNauðsynleg verkfæri:
 Málmrennibekkur
 Rennijárnasett (HSS)
 SnittbakkahaldariPlötuklippur
 SkífmælirÓþekkt mál
4
4
Make the push button
Make the push button
Make a drawn metal tube closed at the top, and a rod with a head. Put a small coil spring in the top of the tube, then the rod's head. Wedge a washer into the tube under the head. Leave clearance so the rod can swivel a little. Turn the rod's lower end down to a smaller diameter. Unknown: the metal.
Efni fyrir þetta skref:
Óþekktur málmur1 as required Þrýstigormasett1 spring
Nauðsynleg verkfæri:
MálmrennibekkurRennijárnasett (HSS)SkífmælirÓþekkt mál5
5
Assemble
Assemble
Set the terminals in their recesses and the contacts in their grooves. Slide the button into the sleeve, with a coil spring round the rod between the cover and the wedged washer. Pass the rod's end through the cover's hole. Put on it a loose insulating washer with a metal rim round its edge. Hammer the rod's end over into a flange. Lay the cover on the housing, so its ears clamp the terminals, and bend the plate's tangs over the bead.
Efni fyrir þetta skref:
Óþekkt einangrunarefni1 as requiredÓþekktur málmur1 as requiredÞrýstigormasett1 springNauðsynleg verkfæri:
 Skrúfstykki
 KúluhamarFlatkjaftatöng
 Öryggisgleraugu
6
6
Mount and wire it
Mount and wire it
Put the sleeve through a hole in the panel and clamp the panel between two nuts on the thread. Solder the bared wire ends to the two lugs.
Efni fyrir þetta skref:
 Sexkantró2 pcs
 Lóðtinsvír1 as required
Nauðsynleg verkfæri:
 LóðboltiFlatkjaftatöng
7
7
Check it
Check it
At rest, the rim sits against the underside of the cover and the circuit is open. Pressed, the rim meets the stepped ends of both contacts and closes it. The checking is ours: the meter reads open, then closed while pressed.
Nauðsynleg verkfæri:
 Fjölsviðsmælir
Efni
5- 1 as requiredStaðgengill
- 1 as requiredStaðgengill
- 1 springStaðgengill
- 2 pcsStaðgengill
- 1 as requiredStaðgengill
Nauðsynleg verkfæri
13- Staðgengill
- Staðgengill
- Staðgengill
- Staðgengill
- Staðgengill
- Staðgengill
- Staðgengill
- Staðgengill
- Staðgengill
- Staðgengill
- Staðgengill
- Staðgengill
Þessi teikning býr til

Tengd Blueprint
Þessi blueprint deila þekkingu — tækni, efni eða meginreglur

CC0 opinbert ríki
Þessi teikning er gefin út undir CC0. Þér er frjálst að afrita, breyta, dreifa og nota þetta verk í hvaða tilgangi sem er, án þess að biðja um leyfi.
Studdu smiðinn með því að kaupa vörur í gegnum teikningu hans þar sem hann fær þóknun smiða sem seljendur ákvarða, eða búðu til nýja endurskoðun á þessari teikningu og tengdu hana sem tengingu í þinni eigin teikningu til að deila tekjum.