Samvinna
LIST
FEGURÐ OG VELLÍÐAN
HANDVERK
MENNING OG SAGA
SKEMMTUN
UMHVERFI
MATUR OG DRYKKUR
ÖFUGVERKFRÆÐI
VÍSINDI
ÍÞRÓTTIR
TÆKNI
KLÆÐANLEG TÆKNI
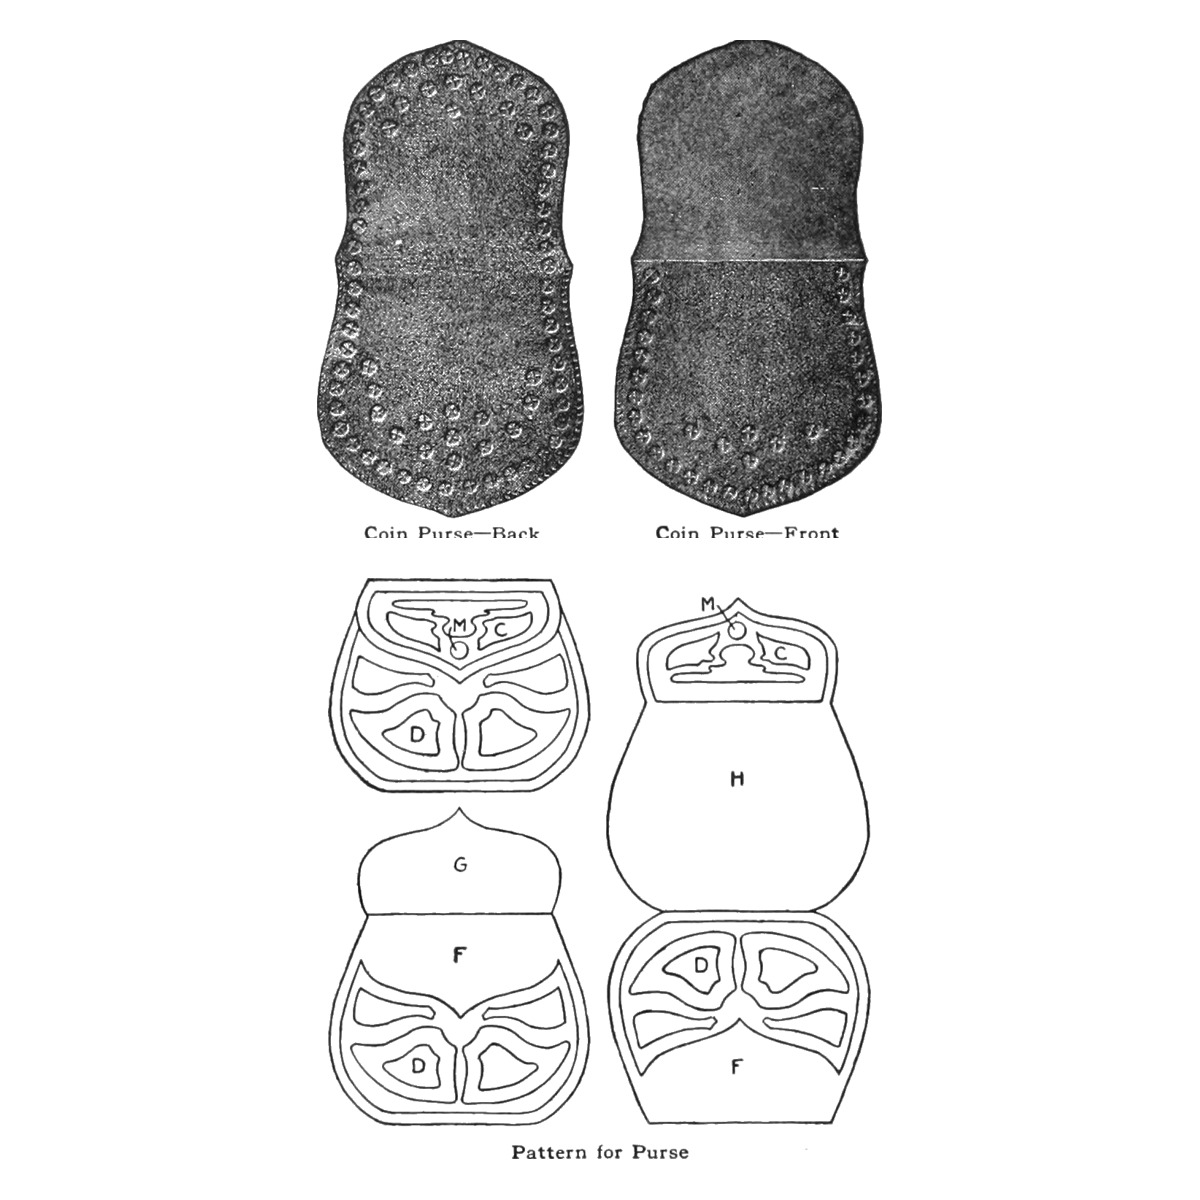


Tooled Calfskin Coin Purse: Lined, Flap Over Front, Design Split Between Flap and Front (Boy Mechanic, 1915)
The first piece in Mary C. Scovel's leather course (The Boy Mechanic, Book 2, 1915): a coin purse of Russian calfskin from a 4 by 8 in piece, its design traced, lined and tooled or stamped, split so half sits on the flap and half on the front below it, then lined with silk and stitched.
Byrjandi
About 3 hours
Leiðbeiningar
1
1
Her sizes in centimetres
Her sizes in centimetres
Hleð Jupyter-vinnubók…
2
2
Read The Boy Mechanic, Book 2
Read The Boy Mechanic, Book 2
Her outfit: "two special tools costing 50 cents each, one with a narrow edge for lining patterns, and one with broad ends for tooling; and a piece of tin, plate glass, or very smooth hard wood, which should not be smaller than 9 by 12 in. A soft sponge, a triangle, a rule, tracing paper and a hard pencil are also needed." Russian calfskin is best for tooling and stamping.
3
3
Make the paper pattern
Make the paper pattern
The purse has three parts: front, back and flap. Fold paper to the proportions you want, with the design for the front D on the same side of the paper as the flap C; the space F under the flap has no design. Fold F behind H, then C behind H and F, and turn the pattern over to see the purse. Cut a piece of leather 4 by 8 in, which leaves 1/4 in outside the pattern for pinning.
Efni fyrir þetta skref:
 Kálfsleður1 stykki
Nauðsynleg verkfæri:
 Gegnsær teiknipappír
 Blýantur
 Skæri
 Reglustika
4
4
Damp the leather and transfer the design
Damp the leather and transfer the design
Draw the whole design for the purse on tracing paper. Wet the leather on the wrong (unfinished) side with a soft sponge: pat it to moisten, not soak, it; too wet and the tool sticks and leaves an uneven background. Pin the design firmly on the leather, tack the leather down on its outer margin to the glass or board, and go over every line with a hard pencil, with firm, even pressure. Lift the paper and go over the lines with the narrow lining tool, with a strong, firm stroke. A line design can stop here.
Efni fyrir þetta skref:
Kálfsleður1 stykkiNauðsynleg verkfæri:
 SvampurGegnsær teiknipappírBlýantur
 Teiknibólur (kassi með 50)
 Glerplata
 Leðurmótunaráhald
5
5
Tool or stamp the background
Tool or stamp the background
Leave at least 1/8 in between the edge of the pattern and the design. To tool, press the background down with the broad end in even, long strokes; if it will not go down, the leather is too dry, so take it off and damp the back again. Keep the edges sharp between pressed and raised parts. To stamp instead, strike a small carpenter's nail set lightly with a wooden mallet in rows of circles; too hard a blow cuts the leather.
Nauðsynleg verkfæri:
Leðurmótunaráhald Naglasökkvari
 TrésleggjaSvampur
6
6
Line and stitch
Line and stitch
Fold the parts together, line with silk to match the leather, and stitch the front and back parts close to the edge. Stitch on a sewing machine with a long stitch, a large needle and silk as heavy as the needle takes; try it on a scrap first, and put tissue paper over the leather if the foot marks it. Without a machine, prick holes with an awl and sew with needle and silk, running or over-and-over; going over-and-over to the end and back gives an X stitch. She has the catch M put on by a shoemaker or trunk store; a snap fastener is used here.
Efni fyrir þetta skref:
 Silkiefni1 stykki
 Silkiþráður1 stykki
 Hveitilím1 stykki
 Smella1 stykki
Nauðsynleg verkfæri:
Skæri Saumavél
 Sýll
 Tvær söðlasmíðanálar
7
7
Troubleshooting
Troubleshooting
Tooled leather troubleshooting.
Flow
Loading...
8
8
History and honest limits
History and honest limits
From Mary C. Scovel, "Arts-Crafts Leather Work", in **The Boy Mechanic, Book 2**, Popular Mechanics, 1915 (Project Gutenberg 44585; checked on the archive.org scan boymechanicbook200chic2, pp. 432-441), Part I. She gives the piece size but no finished purse size; the shape comes from her pattern. The snap fastener, tools and metric figures are ours.
Efni
5- 2 stykkiStaðgengill
- 1 stykkiStaðgengill
- 1 stykkiStaðgengill
- 1 stykkiStaðgengill
- 1 stykkiStaðgengill
Nauðsynleg verkfæri
13- Staðgengill
- Staðgengill
- Staðgengill
- Staðgengill
- Staðgengill
- Staðgengill
- Staðgengill
- Staðgengill
- Staðgengill
- Staðgengill
- Staðgengill
- Staðgengill
Þessi teikning býr til
Tengd Blueprint
Þessi blueprint deila þekkingu — tækni, efni eða meginreglur
CC0 opinbert ríki
Þessi teikning er gefin út undir CC0. Þér er frjálst að afrita, breyta, dreifa og nota þetta verk í hvaða tilgangi sem er, án þess að biðja um leyfi.
Studdu smiðinn með því að kaupa vörur í gegnum teikningu hans þar sem hann fær þóknun smiða sem seljendur ákvarða, eða búðu til nýja endurskoðun á þessari teikningu og tengdu hana sem tengingu í þinni eigin teikningu til að deila tekjum.