Samvinna
LIST
FEGURÐ OG VELLÍÐAN
HANDVERK
MENNING OG SAGA
SKEMMTUN
UMHVERFI
MATUR OG DRYKKUR
ÖFUGVERKFRÆÐI
VÍSINDI
ÍÞRÓTTIR
TÆKNI
KLÆÐANLEG TÆKNI
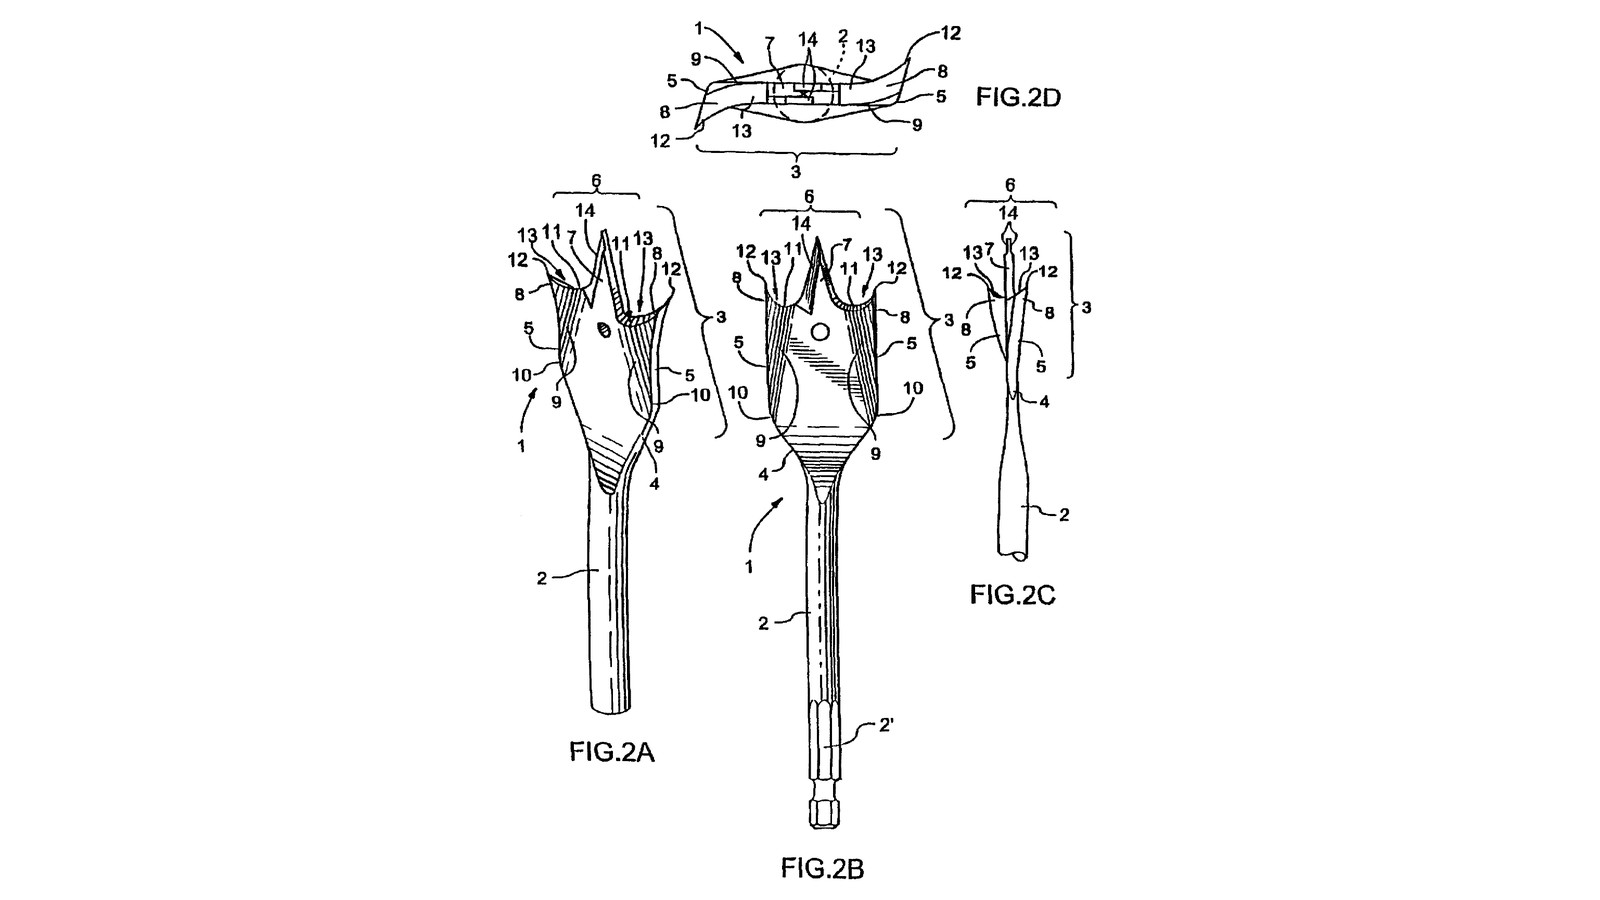


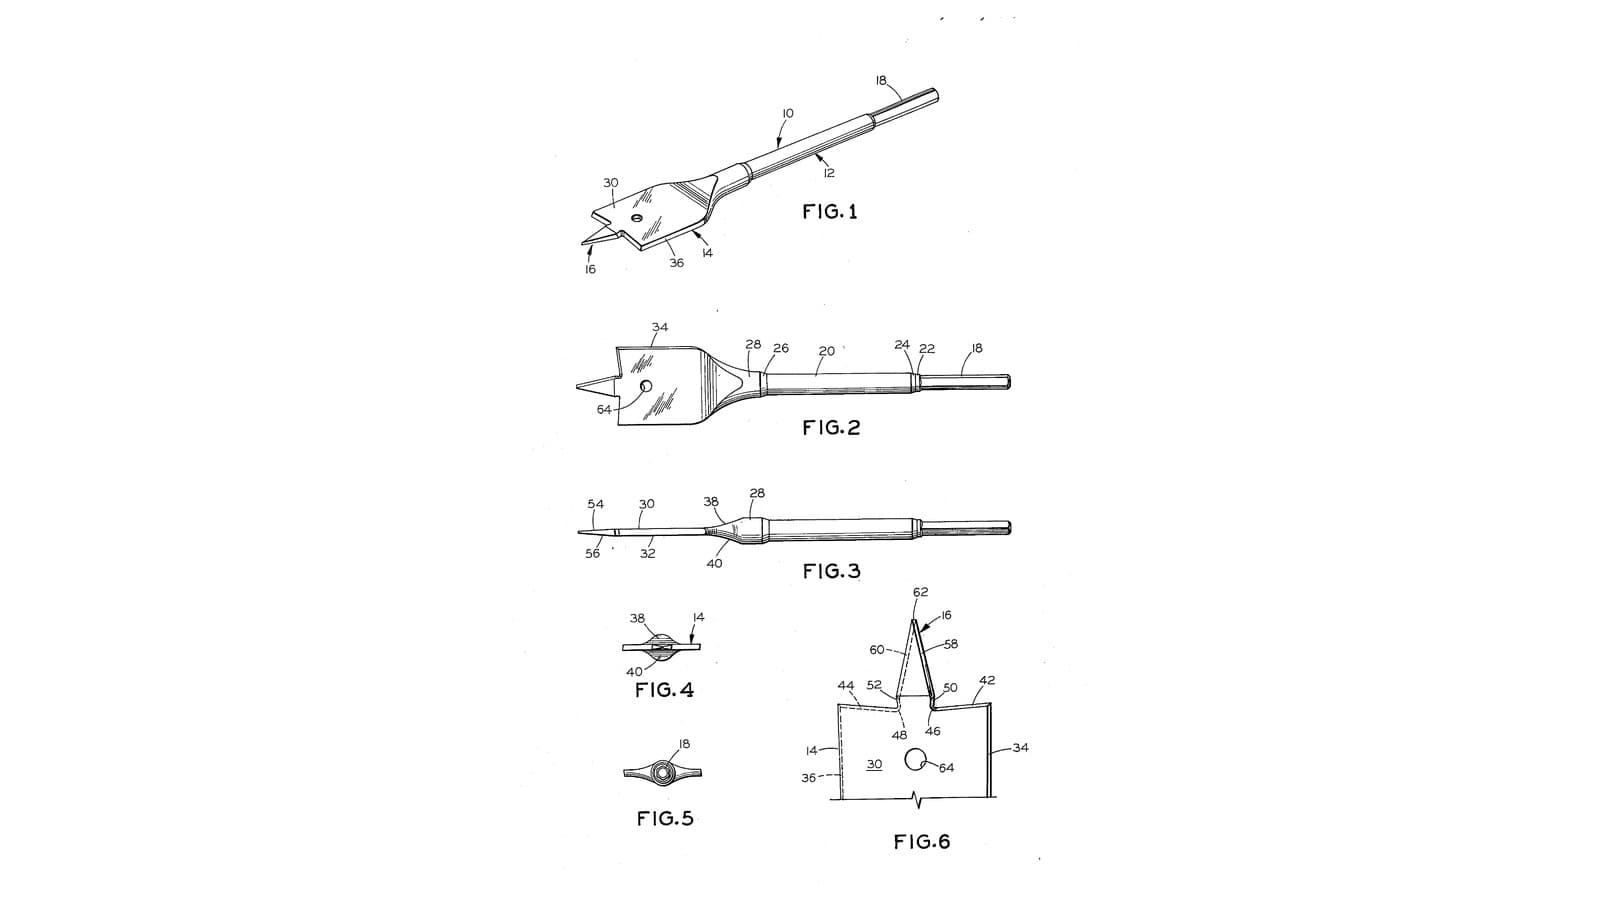
Angled-Side Spade Bits: Each Wing Bent Forwards Along a Diagonal Line, the Way the Bit Turns (Vasudeva, 2005)
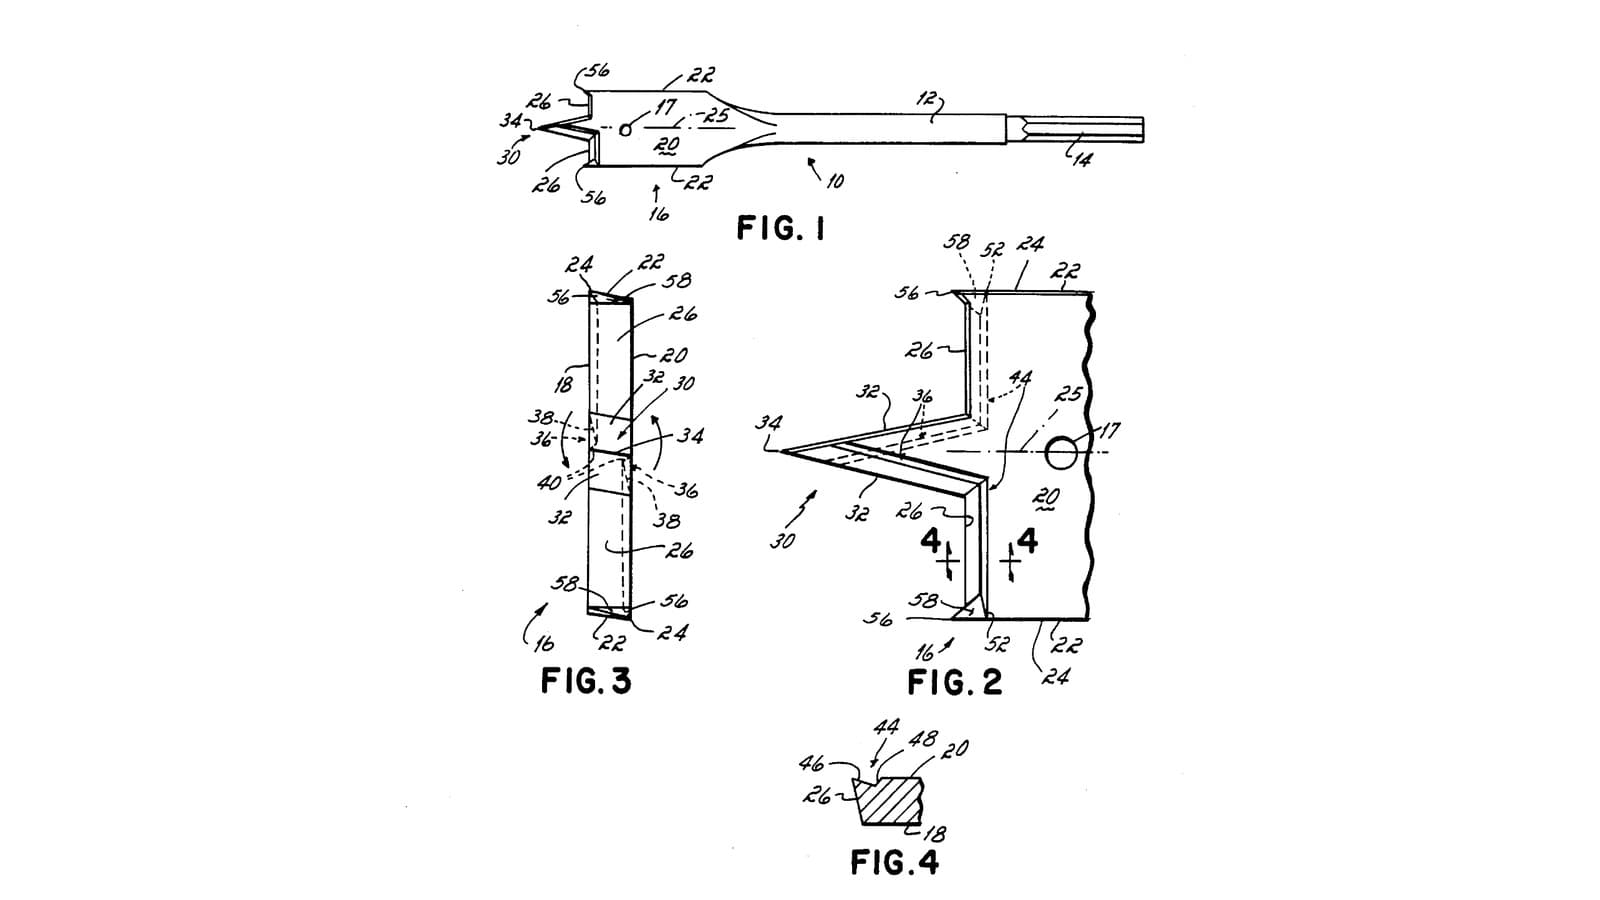
Kailash C. Vasudeva of Waterloo, Canada, received US 6,957,937, dated 25 October 2005, for Maxtech Manufacturing. Both outer wings of the blade are bent forwards, the way the bit turns. Each bends along a line from low on the side to a point on the cutting edge a little over halfway out. The outer ends of the cutting edge then lead, with a spur at each. The chips change direction where they cross the bend and break up, and come out of the hole more easily.
We forge 16, 20 and 25 mm bits and bend the wings hot. The patent gives no bend angle or sizes; ours are 10 degrees and the sizes shown.
Lengra kominn
About 1 day
Leiðbeiningar
1
1
How far the bend brings the corners forward
How far the bend brings the corners forward
Hleð Jupyter-vinnubók…
2
2
Read US 6,957,937
Read US 6,957,937
"The longitudinal sides of the head portion are bent along a bend 9, in the direction of rotation of the spade drill bit during operation, so that the outer ends of the cutting edge are bent forwards in the rotating direction."
"The shorter the bend 9, the larger the angle with the longitudinal direction is going to be, and the more abrupt is the chip break-up. Larger angles require more power for drilling."
3
3
Forge the blades
Forge the blades
Cut three 170 mm lengths of 10 mm octagonal tool steel. Heat 50 mm of one end to a bright orange in the forge and flatten it on the anvil to about 3 mm thick, centred on the bar. Hammer across it with the peen to spread it wider than the bit, about 2 mm over its size: 18, 22 and 27 mm. Draw the neck down smoothly where the blade meets the bar and keep the blade in line with it. Reheat as soon as the colour fades to red. Finally heat each one to a cherry red and let it cool slowly in the air, to soften it for filing.
Efni fyrir þetta skref:
 Áttstrent verkfærastál3 stykki
Nauðsynleg verkfæri:
 Járnsög
 Skrúfstykki
 Aflinn
 Steðji
 Smíðahamar
 Smiðjutöng
 Suðuhanskar
 Öryggisgleraugu
4
4
Print the template
Print the template
Full-size A4 template: the outlines of the 16, 20 and 25 mm bits with straight cutting edges and spurs, the two bend lines and the hanging hole. Print at 100 %; its 50 mm bar must measure 50 mm.
5
5
Grind the outline
Grind the outline
Glue each bit's outline from the template on its blade, centred on the bar. Grind to the lines on the bench grinder, dipping the steel in water often: the two sides parallel, the shoulders square across, the point in the middle. Grind the blade's two faces flat and parallel to 2.5 mm. Grind three flats on the end of the shank, a third of the way round from each other, 20 mm long, for the chuck's jaws. Leave a spur 2 mm wide and 2 mm high at each outer end of the cutting edges. Scribe the two bend lines through the paper onto both faces. Drill a 3 mm hole at the template's circle.
Nauðsynleg verkfæri:
 Bleksprautuprentari
 Lím
 Bekkslípivél
 Herslufata
 Vatn
 ÞjalasettSkrúfstykki
 Stafrænn skífmælir 6 tommurÖryggisgleraugu
6
6
Bend the wings
Bend the wings
Heat the blade to a bright red. Grip it in the vice with one bend line exactly along the top of the jaws and the wing standing above them. With the face towards you and the point up, push the left wing towards you about 10 degrees with the flat-nose pliers or light hammer blows close to the jaws, so it bends on the line. Reheat, grip along the other line and push the right wing away from you the same amount. Look down the bit from the point: the two wings should lean opposite ways, like a shallow S, as in his Fig. 2D. Let it cool slowly in the air.
Nauðsynleg verkfæri:
AflinnSmiðjutöngSkrúfstykkiSmíðahamar FlatkjaftatöngSuðuhanskarÖryggisgleraugu
7
7
Grind the cutting edges
Grind the cutting edges
Bevel each cutting edge and each side of the blade so the edge that leads as the bit turns is sharp and the face behind it clears the wood. Sharpen the spurs' outer edges and the point's two leading edges the same way.
Nauðsynleg verkfæri:
BekkslípivélHerslufataVatnÞjalasettSkrúfstykki8
8
Harden and temper
Harden and temper
Heat the blade and the neck evenly to a cherry red, until a magnet no longer sticks to it, and quench it straight down in water, moving it up and down. Rub the faces bright with a stone. Heat the shank gently 30 mm behind the blade and watch the colours run down; quench again as soon as a dark straw colour reaches the shoulders and the point. Do the other two.
Nauðsynleg verkfæri:
AflinnSmiðjutöng Lítill segullHerslufataVatn
 BrýniSuðuhanskarÖryggisgleraugu
9
9
Sharpen and test
Sharpen and test
Hone the cutting edges on the shoulders and the point with the stone, keeping their angles, and take the burr off. Chuck a bit by its flats and bore a scrap of hardwood: it should start on the point without wandering, cut two clean shavings from the shoulders and leave a round hole of its own size; check it with the caliper.
Nauðsynleg verkfæri:
Brýni Hleðslubor
 HarðviðarborðStafrænn skífmælir 6 tommurÖryggisgleraugu
10
10
Troubleshooting
Troubleshooting
Spade bit troubleshooting.
Flow
Loading...
11
11
History and honest limits
History and honest limits
**Kailash C. Vasudeva** of Waterloo, Canada, assignor to Maxtech Manufacturing Inc., US 6,957,937 B2, dated 25 October 2005, filed 20 February 2002. His head's sides are "bent along a bend 9, in the direction of rotation", the bend running from a position on the side nearer the bottom of the head to a position on the cutting edge between its outer end and the tip. He shows arced and straight cutting edges, serrated sides, chip-breaking reliefs on the tip, and a head made separately by powder metallurgy. We build the straight-edged form of his Figs. 2E to 2G with spurs, forged in one piece, without the reliefs. He gives no bend angle or sizes; 10 degrees and our sizes are ours, the bend line placed as measured off his Fig. 2B.
Efni
1- 3 stykkiStaðgengill
Nauðsynleg verkfæri
20- Staðgengill
- Staðgengill
- Staðgengill
- Staðgengill
- Staðgengill
- Staðgengill
- Staðgengill
- Staðgengill
- Staðgengill
- Staðgengill
- Staðgengill
- Staðgengill
- Staðgengill
- Staðgengill
- Staðgengill
- Staðgengill
- Staðgengill
- Staðgengill
- Hleðslubor3% þóknunMagento Legacy Storeships internationallyStaðgengill
- Staðgengill
Hönnunarskrár
1Þessi teikning býr til

Tengd Blueprint
Þessi blueprint deila þekkingu — tækni, efni eða meginreglur
CC0 opinbert ríki
Þessi teikning er gefin út undir CC0. Þér er frjálst að afrita, breyta, dreifa og nota þetta verk í hvaða tilgangi sem er, án þess að biðja um leyfi.
Studdu smiðinn með því að kaupa vörur í gegnum teikningu hans þar sem hann fær þóknun smiða sem seljendur ákvarða, eða búðu til nýja endurskoðun á þessari teikningu og tengdu hana sem tengingu í þinni eigin teikningu til að deila tekjum.