Collaborazione
ARTE
BELLEZZA E BENESSERE
MESTIERE
CULTURA E STORIA
DIVERTIMENTO
AMBIENTE
CIBO E BEVANDE
INGEGNERIA INVERSA
SCIENZE
SPORT
TECNOLOGIA
INDOSSABILI
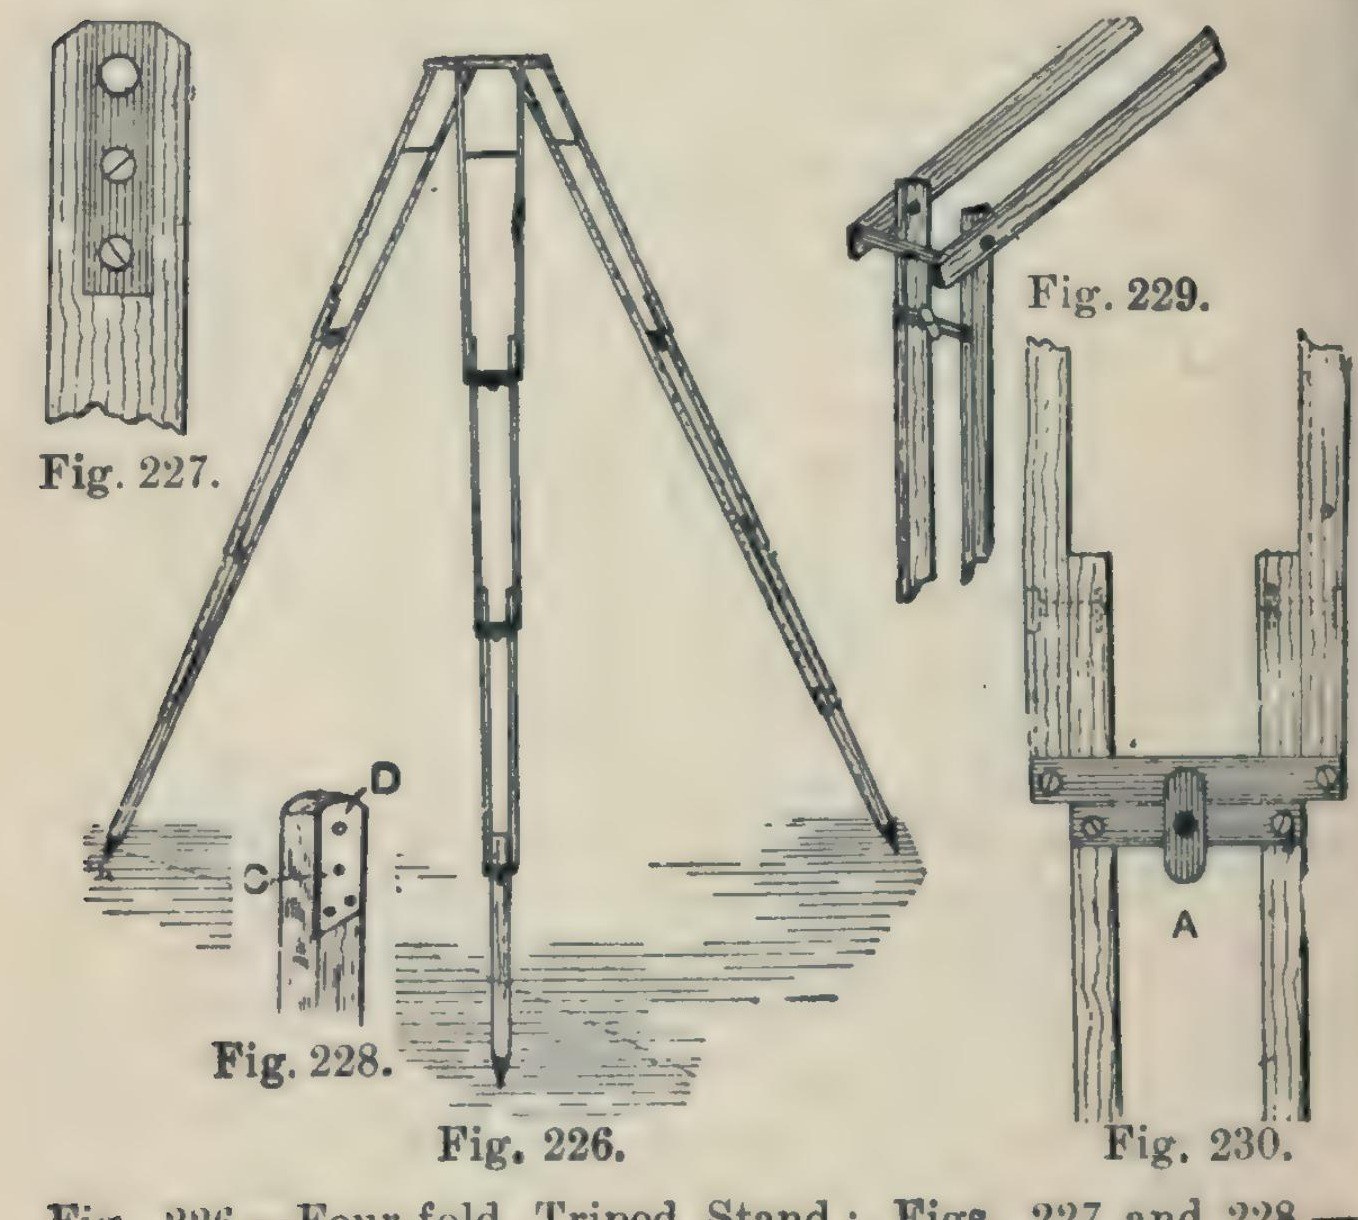


Camera Tripod: a Four-Fold Ash Tripod Stand (Hasluck, 1902)
A light, compact folding camera stand: three legs, each of seven ash laths riveted so it folds in four, locked open by brass buttons, on a triangular ash top with brass pins and a hole for the camera screw.
Hasluck says the same method makes stands that fold in three or two.
Source: Paul N. Hasluck, Photographic Cameras and Accessories (1902), pp. 153-157. Picture: Figs. 226-230 of the book.
Intermedio
Unknown
Istruzioni
1
1
Cut the ash laths
Cut the ash laths
Cut laths of good ash, true and square or the stand won't be rigid, and round the edges slightly: six 17 1/4 x 5/8 x 3/8 in, six 16 x 5/8 x 3/8 in, six 15 1/2 x 5/8 x 3/8 in, and three 14 x 5/8 x 5/8 in.
Materiali per questo passaggio:
 Tavola di frassino1 21 laths
Strumenti necessari:
 Saracco a costola
 Pialletto
2
2
Fit the top ends and stretcher
Fit the top ends and stretcher
On each 17 1/4 in lath let in flush a 1/16 in brass plate, 1 1/4 in long, with a 3/16 in hole 1/4 in from the top, held by two countersunk brass screws; bore the wood to match and take off the top corners. On one lath of each pair cut a groove inside, about 3/16 in deep and 3 1/2 in long, starting 2 in from the top, and hinge a 1/8 in brass rod stretcher in it on a pin. On the other lath cut a curved groove 1 1/2 in long, 3/16 in wide, with a small hole at the bottom where the rod catches.
Materiali per questo passaggio:
 Lamiera di ottone1 1/16 in plates
 Viti da legno1 small brass screws
 Barra di ottone1 1/8 in stretcher
Strumenti necessari:
 Archetto per seghetto con lame
 Lima per metalli
 Trapano a mano
 Scalpelli
 Cacciavite a taglio
3
3
Bore and rivet the legs
Bore and rivet the legs
Bore the rivet holes: in the long laths 1 3/4 in from the lower end, counterbored so the copper rivet head sits flush, then 1/8 in through; in the 16 in and 15 1/2 in laths 1/2 in and 1 3/4 in from the ends; in each 14 in piece 1/2 in from one end, and taper its other end for a pointed iron shoe or a steel point and ferrule. Rivet the 21 laths into three legs with 1/8 in copper rivets and washers: a 16 in lath inside each 17 1/4 in one, a 15 1/2 in lath inside that, the 14 in foot between the last pair. Rivets flush, just tight enough to fold but not loose.
Materiali per questo passaggio:
 Rivetti di rame1 1/8 in, with washers
 Metallo sconosciuto3 iron shoes or steel points
Strumenti necessari:
 Trapano a manovella con puntaTrapano a mano
 Martello da ribattere
4
4
Add cross strips and lock buttons
Add cross strips and lock buttons
Screw 1/16 in brass strips across the bottom ends of each pair of laths (Fig. 229). Under them screw strips carrying a small brass button riveted at the centre; turned, the button hooks over the strip above and locks the joint open (Fig. 230).
Materiali per questo passaggio:
Lamiera di ottone1 cross strips, buttonsViti da legno1 pezzoStrumenti necessari:
Archetto per seghetto con lameLima per metalliCacciavite a taglioMartello da ribattere5
5
Make the top
Make the top
Plane ash to 1/2 in and draw an equilateral triangle with 8 1/2 in sides. Bisect the angles; 2 in from each corner draw a line at right angles, go 1/2 in in along the sides, and mark three rectangles 2 7/8 x 3/4 in; cut the outline (Fig. 231). Fix a 3/16 in brass rod, one end tapered, across each rectangle, bored 3/8 in from the outer edge and projecting about 1/2 in, for the legs to hang on. Bore a 1/4 in hole in the centre for the camera screw and glue felt on top.
Materiali per questo passaggio:
Tavola di frassino1 topBarra di ottone3 3/16 in pins Feltro di lana1 pezzo
 Colla di origine animale1 pezzo
Strumenti necessari:
PiallettoSaracco a costolaTrapano a manovella con puntaTrapano a mano6
6
Finish
Finish
Glasspaper and varnish the wood, and lacquer the brass.
Materiali per questo passaggio:
 Vernice alla gommalacca1 varnish
 Materiale sconosciuto1 brass lacquer
Strumenti necessari:
 Carta abrasiva
Materiali
10- 1 topSegnaposto
- 1 cross strips, buttonsSegnaposto
- 1 pezzoSegnaposto
- 3 3/16 in pinsSegnaposto
- 1 1/8 in, with washersSegnaposto
- 3 iron shoes or steel pointsSegnaposto
- 1 pezzoSegnaposto
- 1 pezzoSegnaposto
- 1 varnishSegnaposto
- 1 brass lacquerSegnaposto
Strumenti richiesti
10- Segnaposto
- Segnaposto
- Segnaposto
- Segnaposto
- Segnaposto
- Segnaposto
- Segnaposto
- Segnaposto
- Segnaposto
- Segnaposto
Questo progetto realizza

CC0 Pubblico dominio
Questo progetto è rilasciato sotto CC0. Sei libero di copiare, modificare, distribuire e utilizzare quest'opera per qualsiasi scopo, senza chiedere permesso.
Supporta il Maker acquistando prodotti tramite il suo progetto dove guadagna una Commissione Maker stabilita dai venditori, oppure crea una nuova iterazione di questo progetto e includilo come collegamento nel tuo progetto per condividere i ricavi.