ARTE
BELLEZZA E BENESSERE
MESTIERE
CULTURA E STORIA
DIVERTIMENTO
AMBIENTE
CIBO E BEVANDE
INGEGNERIA INVERSA
SCIENZE
SPORT
TECNOLOGIA
INDOSSABILI
Youblob · CC0


Telephoto Lens
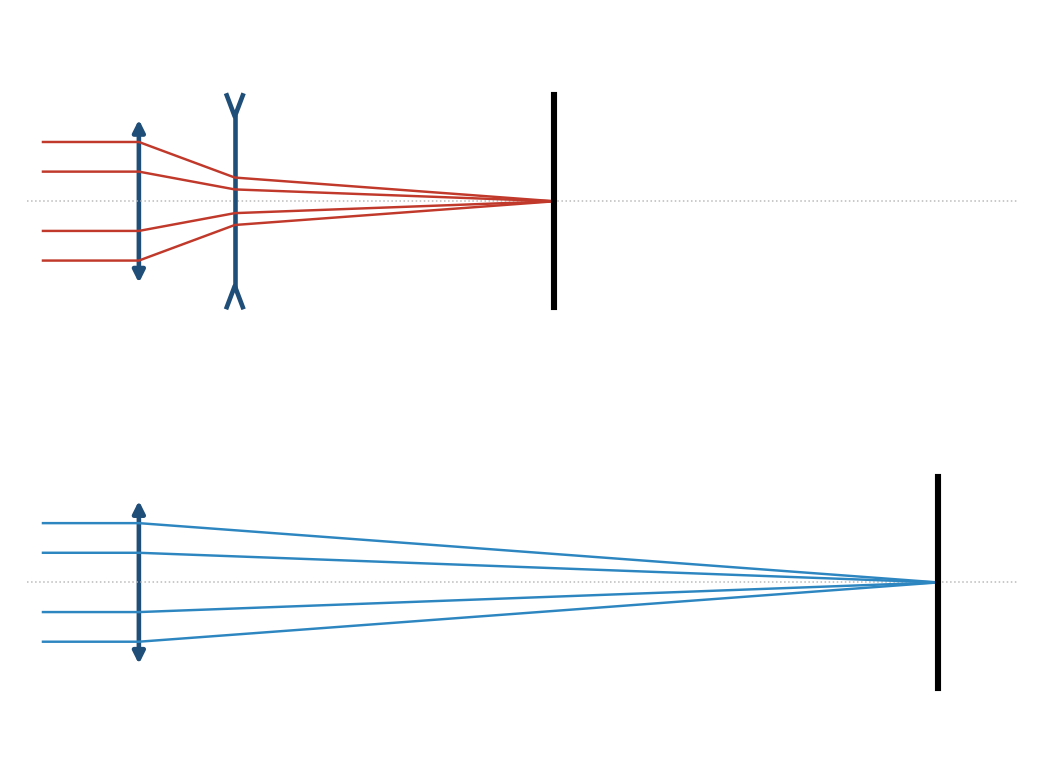
To photograph a distant subject large, you need a long focal length - and a long lens means a long camera. In 1891 Thomas Rudolphus Dallmeyer in London, and Adolf Miethe in Germany, independently put a negative lens behind a positive one. The pair acts like a single lens of much longer focal length, yet it is physically shorter than that focal length. That is what 'telephoto' means, and nearly every long camera lens since uses it.
**No patent number is cited here**: Dallmeyer patented it in Britain, and no US patent for his design was verified, so none is claimed.
**You build one on an optical bench**, measure its focal length from the size of a distant image, and let a ray-trace notebook redesign it.
Principiante
90 minutes
Istruzioni
1
1
Know your lenses
Know your lenses
Focus a distant window onto paper with each convex lens; the lens-to-paper distance is its focal length. Pick one about 100 mm. Take a concave lens about half that (its label gives it; it will not focus alone).
Materiali per questo passaggio:
 Set di lenti convesse1 set
 Lente concava1 pezzo
Strumenti necessari:
 Righello
2
2
Set up the bench
Set up the bench
Mount the convex lens in a holder at one end of the bench, pointing out of a window at something far away. Tape tracing paper to a holder as the screen.
Materiali per questo passaggio:
 Rotolo di carta da lucido per cartamodelli1 foglio
Strumenti necessari:
 Banco e guida ottica
 Set di portalenti
 Nastro di carta per mascherature
3
3
Image with one lens
Image with one lens
Slide the screen until the far scene is sharp. Measure the height of one chosen feature on the screen - a window, a chimney.
Strumenti necessari:
Righello4
4
Add the negative lens
Add the negative lens
Put the concave lens 60 mm behind the convex one. The image is now far behind; move the screen back until it is sharp again and measure the same feature. Try 55 and 65 mm spacing too.
Strumenti necessari:
 Metro a nastro
5
5
Design it on paper
Design it on paper
Caricamento del notebook Jupyter…
6
6
History & Context
History & Context
**What the 1891 designs did:** a positive front group and a negative rear group, spaced so the system focal length exceeds its length. **Modern build (derived):** two stock lenses on a bench.
Early telephoto attachments screwed behind ordinary lenses; modern long lenses build the idea in. Its limits: spacing is critical, the negative group adds distortion (pincushion), and the image is dimmer at the same aperture diameter because the focal length grew.
Materiali
3- Segnaposto
- 1 pezzoSegnaposto
- Segnaposto
Strumenti richiesti
5- Segnaposto
- Segnaposto
- Segnaposto
- Segnaposto
- 1 vendor sell this, none ship to you yetSegnaposto
Blueprint correlati
Questi blueprint condividono conoscenze — tecniche, materiali o principi
CC0 Pubblico dominio
Questo progetto è rilasciato sotto CC0. Sei libero di copiare, modificare, distribuire e utilizzare quest'opera per qualsiasi scopo, senza chiedere permesso.
Supporta il Maker acquistando prodotti tramite il suo progetto dove guadagna una Commissione Maker stabilita dai venditori, oppure crea una nuova iterazione di questo progetto e includilo come collegamento nel tuo progetto per condividere i ricavi.