Collaborazione
ARTE
BELLEZZA E BENESSERE
MESTIERE
CULTURA E STORIA
DIVERTIMENTO
AMBIENTE
CIBO E BEVANDE
INGEGNERIA INVERSA
SCIENZE
SPORT
TECNOLOGIA
INDOSSABILI
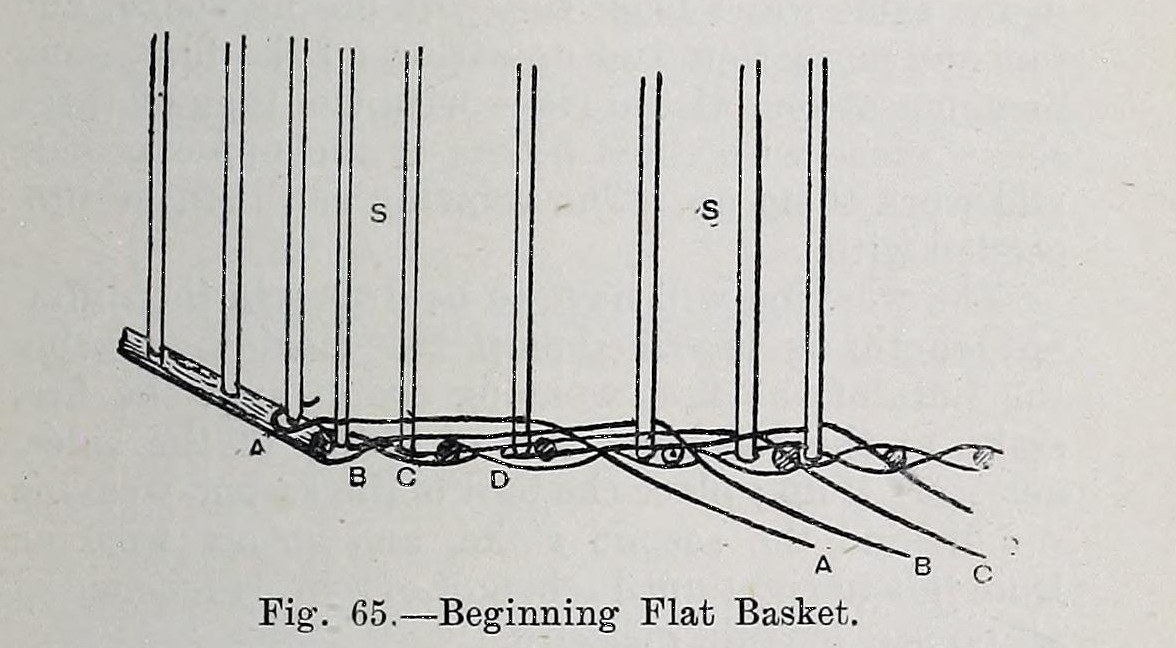


Flat Harvesting Basket: the Willow 3-Peck Fruit Flat (Hasluck, 1903)
The basket-maker's 'flat' for the fruit season: an oblong willow basket with a woven stick bottom about 19 1/2 in wide, straight sides 8 in high, a rope handle at each end and its own flat lid on a bent bow.
Rough brown osiers do for the bottom; eight white ones start the sides.
Source: Paul N. Hasluck, Basket Work of All Kinds (1903), pp. 64-69. Picture: Fig. 65 of the book.
Avanzato
Unknown
Istruzioni
1
1
Soak the osiers and weave the bottom
Soak the osiers and weave the bottom
Soak the osiers until pliable. Cut eight sticks about 17 in long; set the two thickest in the screw-block 19 1/2 in apart outside, the rest between, and weave the bottom with the roughest osiers as for Hasluck's square basket. Take it out and trim it with the picking knife.
Materiali per questo passaggio:
 Vimini più grossi8 17 in
 Vimine di salice1 weavers
Strumenti necessari:
 Acqua
 Forbici da potatura a una mano
 Tavola di legno piatta
2
2
Stake up
Stake up
Drive nine stakes into the weaving beside the sticks along each side, and seven through the sticks at each end after opening holes with the bodkin, the eight thickest at the corners. Prick them up and gather them in a hoop.
Materiali per questo passaggio:
 Pali di salice32 9 per side, 7 per end
Strumenti necessari:
 PassanastroForbici da potatura a una mano
3
3
Upset the sides
Upset the sides
Point eight white osiers. With no foot rim, start by driving four in beside the first stakes at the left of one 19 1/2 in side. Sitting high with the work between your knees, upset with four rods pulled tight into the bend of each stake, each in front of three stakes, behind the fourth and out (Fig. 65). Start the other four at the opposite corner, finish the tops round the corners, then add one more round with three rods.
Materiali per questo passaggio:
Vimine di salice8 white, upsettingStrumenti necessari:
Forbici da potatura a una manoPassanastro Martello
4
4
Weave and add handles
Weave and add handles
Weave with rods in their lengths, each butt behind the next stake, left to right, until the sides are 8 in high all round outside. For each end handle push a stiff rod down beside the third stake, twist it rope-like, push its top through about 1 1/2 in below the top by the fifth stake, leave a bow, and twist it over the bow three times (Fig. 66).
Materiali per questo passaggio:
Vimine di salice1 weavingVimine di salice2 handlesStrumenti necessari:
MartelloPassanastro5
5
Pair off and border
Pair off and border
Pair off a round with two rods from the back. Make the border by laying down stakes and working them round the corners (Fig. 67), finish by cramming, and trim inside and out.
Materiali per questo passaggio:
Vimine di salice2 pairingStrumenti necessari:
 CesoieForbici da potatura a una mano
6
6
Make the lid
Make the lid
Notch a bow stick at the corners, bend it to the basket's shape and tie a strainer across to hold the width. Bind in two thick split sticks a little longer than the flat, flat side inward, on four scallom rods lapped round the bow (Figs. 68-69), and weave the lid between them.
Materiali per questo passaggio:
Vimini più grossi3 bow, two lid sticksVimine di salice1 scalloms, weaversStrumenti necessari:
Forbici da potatura a una manoMartelloMateriali
3- 3 bow, two lid sticksSegnaposto
- 1 scalloms, weaversSegnaposto
- 32 9 per side, 7 per endSegnaposto
Materiali dei progetti collegati

Questo progetto realizza

CC0 Pubblico dominio
Questo progetto è rilasciato sotto CC0. Sei libero di copiare, modificare, distribuire e utilizzare quest'opera per qualsiasi scopo, senza chiedere permesso.
Supporta il Maker acquistando prodotti tramite il suo progetto dove guadagna una Commissione Maker stabilita dai venditori, oppure crea una nuova iterazione di questo progetto e includilo come collegamento nel tuo progetto per condividere i ricavi.