Collaborazione
ARTE
BELLEZZA E BENESSERE
MESTIERE
CULTURA E STORIA
DIVERTIMENTO
AMBIENTE
CIBO E BEVANDE
INGEGNERIA INVERSA
SCIENZE
SPORT
TECNOLOGIA
INDOSSABILI
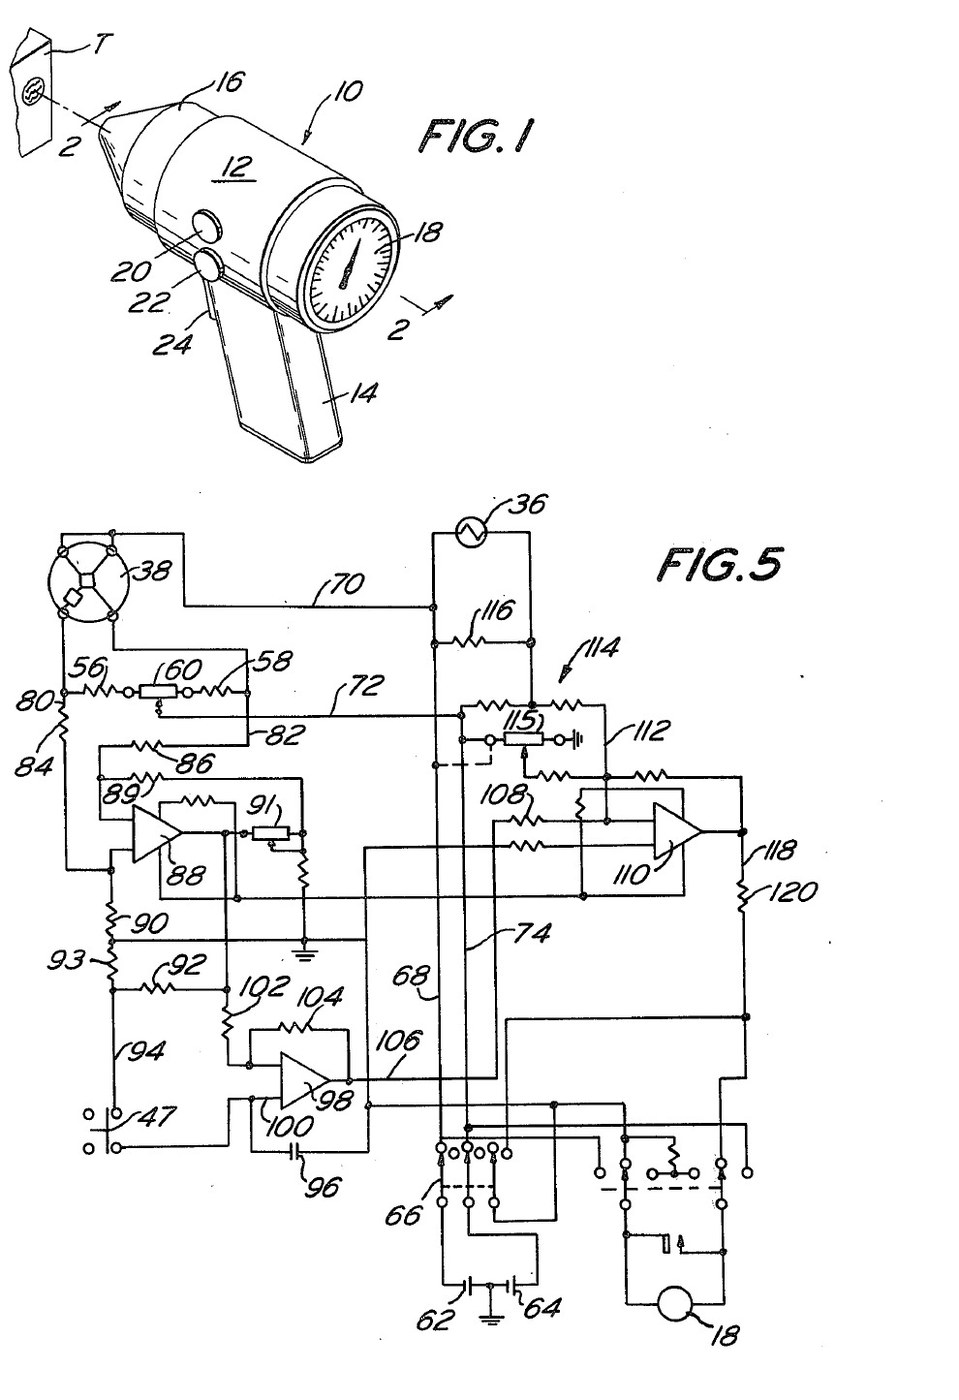


Infrared Thermometer: Pistol Grip with a Trigger-Swung Mirror That Zeroes on the Cavity (Michael, US 4,005,605, 1977)
A pistol-grip thermometer that reads a surface's temperature from its infrared radiation, without touching it. Inside, a concave mirror on a pivot first looks at the instrument's own cavity and a thermistor there, so the circuit stores a zero; pulling the trigger swings the mirror to the nose opening and focuses the target's radiation on a thermistor bolometer. The meter shows the difference, corrected for the cavity's temperature.
Result: a non-contact thermometer reading -20 to 60 °C, built for veterinary use.
Source: D. S. Michael (Mikron Instrument), US 4,005,605 (1977). Unknown: sizes, component values and most materials. Picture: the patent drawing.
Avanzato
Unknown
Istruzioni
1
1
Build the housing and nose
Build the housing and nose
Make a housing with a pistol handle, in three pieces for easy assembly. Fix a cone-shaped nose to its front, cut off at the tip to leave a round opening about one tenth of the cavity's inside diameter, so little stray radiation gets in or out. Paint the inside of the nose and cavity flat black. An infrared-transparent sheet may close the nose to keep out dirt and draughts. Not given: sizes, the materials.
Materiali per questo passaggio:
 Materiale sconosciuto1 housing, nose, window
 Vernice nera opaca1 as needed
Strumenti necessari:
 Pennellessa
 Dimensioni sconosciute
2
2
Fit the detector, mirror and ambient thermistor
Fit the detector, mirror and ambient thermistor
Hold the thermistor bolometer on the housing's axis with a spider. Mount a concave mirror in a gimbal ring on two trunnions in bearings in the housing wall, with the detector at its focus when it faces the nose. Put a bead thermistor inside the cone. A leaf spring holds the ring tilted so the mirror faces the thermistor. Not given: the mirror's focal length, the metals.
Materiali per questo passaggio:
 Bolometro a termistore1 pezzo
 Specchio concavo1 pezzo
 Metallo sconosciuto1 gimbal ring, trunnions, spider
 Kit di termistori NTC1 bead thermistor
 Molla a balestra1 pezzo
Strumenti necessari:
 Set di cacciavitiDimensioni sconosciute
3
3
Fit the trigger
Fit the trigger
Pivot a trigger in the handle. A finger on it pushes the gimbal ring against the spring, so the mirror turns to face the nose opening, and at the same moment opens a small switch beside the trigger. Fit the off-on switch and two control knobs on the housing, and the meter in its back. Ours: a microswitch and a moving-coil meter.
Materiali per questo passaggio:
Metallo sconosciuto1 trigger, finger, pivot Microinterruttore1 pezzo
 Interruttore a levetta1 multipole off-on
 Strumento da pannello a bobina mobile1 pezzo
Strumenti necessari:
Set di cacciaviti4
4
Wire the circuit and measure
Wire the circuit and measure
Wire the bolometer's active and passive elements as two arms of a Wheatstone bridge, with two resistors and a balancing potentiometer as the others; batteries in the handle feed it through the off-on switch. The bridge feeds a differential preamplifier with a gain potentiometer. Through the trigger switch its output charges a capacitor on the + input of a FET-input op-amp whose input bias current is under 1 pA; match the divider resistors to the op-amp's resistors within 0.1 %. Feed that op-amp's output into a summing amplifier together with an ambient correction from the bead thermistor (a fixed resistor across it, and a potentiometer to set the starting reading), and drive the meter from the sum. To use, switch on and balance the bridge; with the trigger released the mirror faces the cavity and the capacitor stores that reading. Aim at the target and pull the trigger: the meter shows the target minus the stored cavity reading, plus the ambient correction, so detector and preamplifier drift cancel. Not given: the component values.
Materiali per questo passaggio:
 Circuito stampato1 pezzo
 Circuito integrato amplificatore operazionale3 preamplifier, FET-input store, summing
 Resistenza1 set, incl. 0.1 % matched pairs
 Potenziometro4 pezzi
 Kit di condensatori1 storage capacitor
 Batteria2 pezzi
 Filo per saldatura1 as needed
Strumenti necessari:
 Saldatore a stagno
Materiali
17- 1 housing, nose, windowSegnaposto
- 1 as neededSegnaposto
- 1 pezzoSegnaposto
- 1 pezzoSegnaposto
- 1 trigger, finger, pivotSegnaposto
- 1 bead thermistorSegnaposto
- 1 pezzoSegnaposto
- Segnaposto
- Segnaposto
- Segnaposto
- 1 pezzoSegnaposto
- 3 preamplifier, FET-input store, summingSegnaposto
- 1 set, incl. 0.1 % matched pairsSegnaposto
- Segnaposto
- 1 storage capacitorSegnaposto
- 2 pezziSegnaposto
- 1 as neededSegnaposto
Strumenti richiesti
4- Segnaposto
- Segnaposto
- Segnaposto
- 2 vendors sell this, none ship to you yetSegnaposto
Materiali dei progetti collegati

Questo progetto realizza

CC0 Pubblico dominio
Questo progetto è rilasciato sotto CC0. Sei libero di copiare, modificare, distribuire e utilizzare quest'opera per qualsiasi scopo, senza chiedere permesso.
Supporta il Maker acquistando prodotti tramite il suo progetto dove guadagna una Commissione Maker stabilita dai venditori, oppure crea una nuova iterazione di questo progetto e includilo come collegamento nel tuo progetto per condividere i ricavi.