Collaborazione
ARTE
BELLEZZA E BENESSERE
MESTIERE
CULTURA E STORIA
DIVERTIMENTO
AMBIENTE
CIBO E BEVANDE
INGEGNERIA INVERSA
SCIENZE
SPORT
TECNOLOGIA
INDOSSABILI
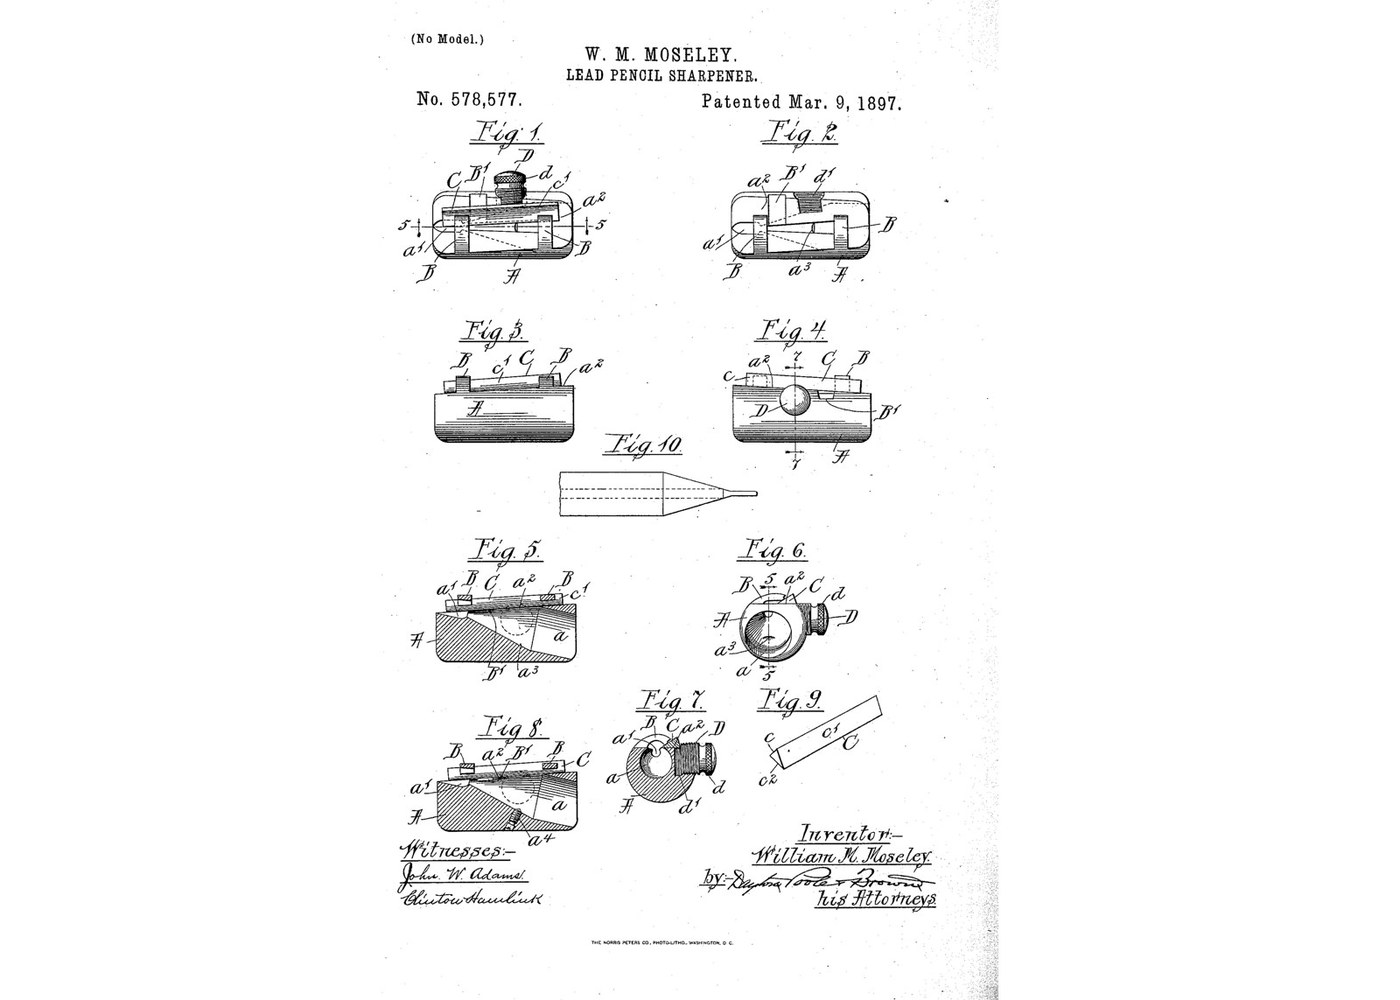


Pencil Sharpener: Conical Bore and a Reversible Triangular Blade (Moseley 1897)
The pocket pencil sharpener: twist the pencil in a conical hole and a blade along its side shaves the wood and lead to a point. Moseley made the body from plain round rod by drilling the cone at a slant, so the flat seat for the blade could be cut close to the rod's surface. His blade is longer than it needs to be: when the part that meets the lead wears, slide it along or turn it end for end.
Source: William M. Moseley, US 578,577 (1897). Unknown: the metals and the sizes. Moseley gives the body as metal, hard rubber or the like, and no sizes or angles, so these are linked to unknown heads. Lathe and mill are ours. Picture: the patent's drawing.
Intermedio
1 day
Istruzioni
1
1
Turn the body from rod
Turn the body from rod
Cut a length of round rod and round its ends. In one end, bore a cone tapering inwards, its axis set at an angle to the rod's axis. Unknown: the metal, the sizes and the angle.
Materiali per questo passaggio:
 Metallo sconosciuto1 as required
Strumenti necessari:
 Tornio per metalli
 Set di utensili da tornio (HSS)
 Calibro a corsoio
 Dimensioni sconosciute
2
2
Cut the blade seat and the stop arms
Cut the blade seat and the stop arms
Mill one side of the rod flat to make the blade seat, roughly parallel with the side of the cone, so it breaks into the bore. Leave two ribs standing across it as stop arms, and undercut them so the blade's edge slips under. Give their free ends oblique faces matching the blade. Cut away a clearance space in front of the blade so shavings do not clog. Drill and tap a hole for the clamping stud.
Strumenti necessari:
 Fresatrice
 Serie di lime
 Serie di maschi e filiereDimensioni sconosciute
3
3
Make the blade and the clamping stud
Make the blade and the clamping stud
Make a triangular blade: a back, and two converging faces meeting in the cutting edge, longer than the cone. Turn a threaded stud with a knurled head for the finger.
Materiali per questo passaggio:
Metallo sconosciuto1 as requiredStrumenti necessari:
Serie di limeTornio per metalliSerie di maschi e filiereDimensioni sconosciute4
4
Clamp the blade and sharpen
Clamp the blade and sharpen
Lay the blade with one face on the seat and the other against the arms, edge projecting into the bore, and screw the stud down. Twist a pencil in the cone. When the part of the edge that meets the lead wears, slide the blade along; when that is used up, turn it end for end.
Strumenti necessari:
 Occhiali di sicurezza
Materiali
1- 1 as requiredSegnaposto
Strumenti richiesti
8- Segnaposto
- Segnaposto
- Segnaposto
- Segnaposto
- Segnaposto
- Segnaposto
- Segnaposto
- Segnaposto
Questo progetto realizza
Blueprint correlati
Questi blueprint condividono conoscenze — tecniche, materiali o principi
CC0 Pubblico dominio
Questo progetto è rilasciato sotto CC0. Sei libero di copiare, modificare, distribuire e utilizzare quest'opera per qualsiasi scopo, senza chiedere permesso.
Supporta il Maker acquistando prodotti tramite il suo progetto dove guadagna una Commissione Maker stabilita dai venditori, oppure crea una nuova iterazione di questo progetto e includilo come collegamento nel tuo progetto per condividere i ricavi.