Casting a Brass Candlestick — Medieval Foundry Work
Istruzioni
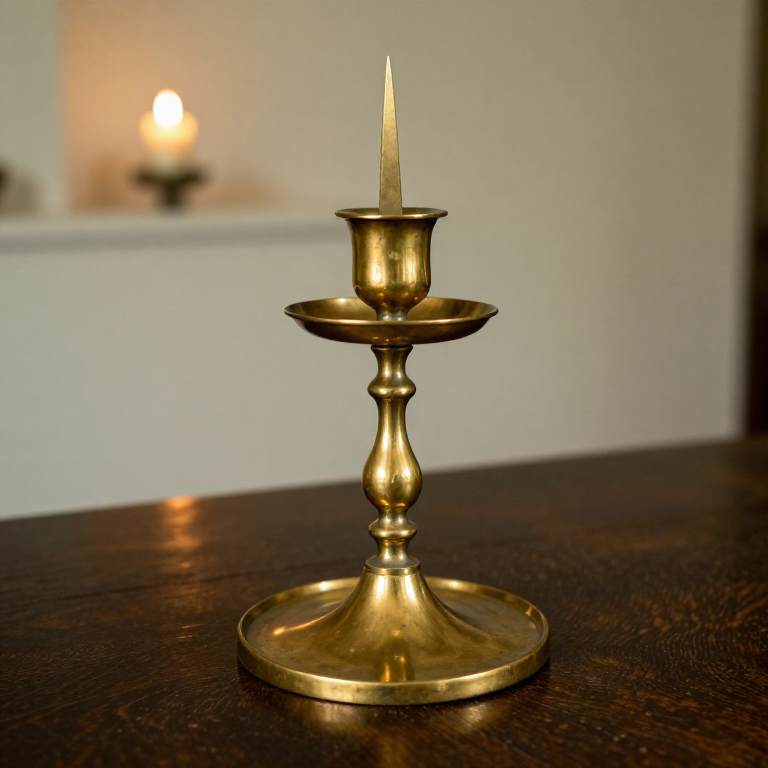
Model the Candlestick in Wax
Model the Candlestick in Wax
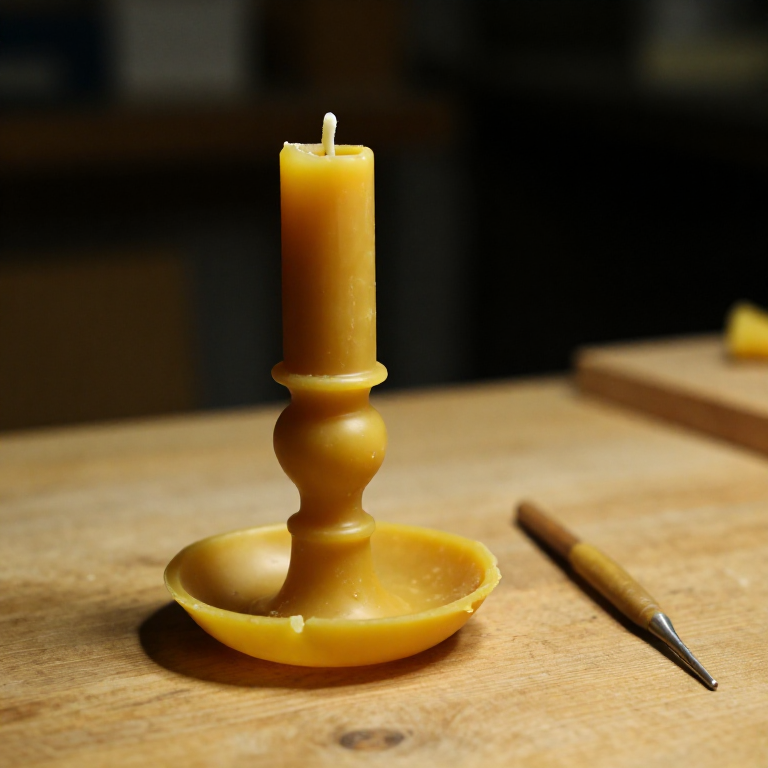
Build the candlestick form in beeswax. Start with the base — roll a flat disc of wax approximately 10 to 12 cm in diameter and 5 mm thick, with a slightly raised rim to catch candle drippings. Build the stem upward from the centre of the base, approximately 15 to 20 cm tall and 2 to 3 cm in diameter. Add a decorative knop (a rounded bulge) at the midpoint of the stem by wrapping additional wax around the shaft and shaping it smooth. At the top, form a wide drip tray (a shallow disc approximately 6 to 8 cm in diameter) and from its centre, a sharp pricket spike approximately 3 to 4 cm tall that the candle will impale upon. Smooth all surfaces with warm tools and ensure the walls of the stem are at least 3 mm thick throughout — thinner areas may not fill during casting. Attach wax sprues (3 to 4 mm diameter rods) for the pouring channel and vents.
Materiali per questo passaggio:
 Beeswax (Optional)200-300 grams pezzo
 Clay2 kg kg
Strumenti necessari:
 Wax modelling tools
 Crucible TongsCrucible Tongs
 Wood Lathe
Invest and Burn Out
Invest and Burn Out
Coat the wax model with successive layers of fine clay-sand investment, building up a mould approximately 15 to 20 mm thick. Allow each layer to dry before adding the next. Once the mould is complete and fully dry (48 hours minimum), place it upside down in a kiln and heat slowly to 300-400 degrees Celsius to melt and drain the wax, then raise the temperature to 600-700 degrees Celsius to burn out all wax residue and fire the clay to a hard ceramic. The interior of the mould now contains an exact negative impression of the candlestick. Keep the mould hot (at least 400 degrees Celsius) for pouring — casting brass into a cold mould results in premature freezing and incomplete filling of thin sections.
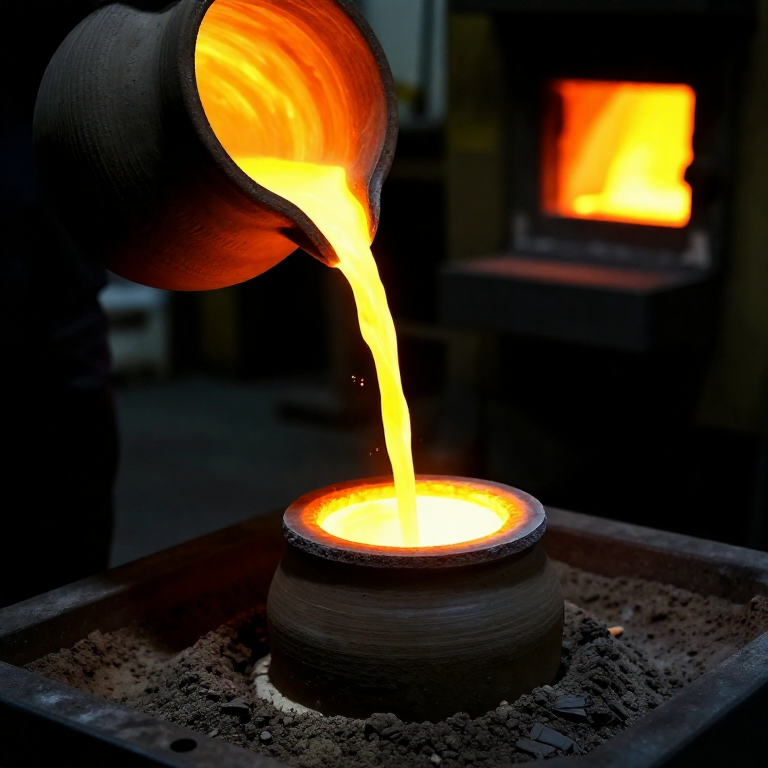
Melt and Pour the Brass
Melt and Pour the Brass
Place brass ingots in the crucible and heat in the charcoal furnace with bellows until fully molten — brass melts at approximately 900-940 degrees Celsius depending on zinc content, appearing as a bright yellow-orange liquid. Brass is more challenging to cast than bronze because the zinc component can boil and vaporise above 907 degrees Celsius, creating porosity. Heat to just above the melting point and pour promptly. Skim any dross from the melt surface. Pour the molten brass into the mould sprue in a single steady stream. The brass should fill the entire mould cavity and rise slightly into the vent channels, confirming complete filling. Allow to cool naturally in the mould for at least one hour — do not quench brass castings, as this can cause stress cracking.
Break Out and Clean the Casting
Break Out and Clean the Casting
Once fully cool, break away the clay investment mould with a hammer to reveal the raw brass casting. Cut off the sprues and vent stubs with a hacksaw. File all cut surfaces smooth and remove any casting flash (thin fins of metal that seeped into cracks in the mould) with files. Inspect the casting for defects — small surface pits can be filled by peening (hammering the surrounding brass over the void) or by brazing. The casting surface will show the texture of the investment mould. For a finer finish, chase (engrave and refine) decorative details using small chisels and punches. Medieval brass candlesticks often featured incised geometric patterns, animal motifs, or inscriptions on the base and knop.
Polish and Finish
Polish and Finish
File the entire surface with progressively finer files — start with a bastard-cut file to remove major roughness, then smooth files, then emery cloth in grits from 120 to 600. For the highest polish, finish with a leather buff charged with jeweller's rouge (iron oxide polishing compound). The finished candlestick should have a bright, warm golden colour characteristic of brass. If the candlestick was cast with a hollow stem (using a wax model built over a clay core), remove the core material by breaking it up and extracting it through the base opening. Medieval candlesticks were often left uncoated, developing a natural patina over time, or were lacquered with a thin coat of shellac to maintain brightness. To use, impale a tallow or beeswax candle firmly onto the pricket spike. The wide base provides stability and the drip tray catches melting wax.
Materiali
4- 200-300 grams pezzoSegnaposto
- 2 kg pezzoSegnaposto
- 500-800 grams pezzoSegnaposto
Strumenti richiesti
6- Segnaposto
- Segnaposto
- Segnaposto
- Segnaposto
- Segnaposto
- Segnaposto
Materiali dei progetti collegati
Related blueprints
Other builds that share materials, tools, or techniques with this one.
CC0 Pubblico dominio
Questo progetto è rilasciato sotto CC0. Sei libero di copiare, modificare, distribuire e utilizzare quest'opera per qualsiasi scopo, senza chiedere permesso.
Supporta il Maker acquistando prodotti tramite il suo progetto dove guadagna una Commissione Maker stabilita dai venditori, oppure crea una nuova iterazione di questo progetto e includilo come collegamento nel tuo progetto per condividere i ricavi.