
Forging a Horseshoe on an Anvil — Farrier's Craft
Istruzioni
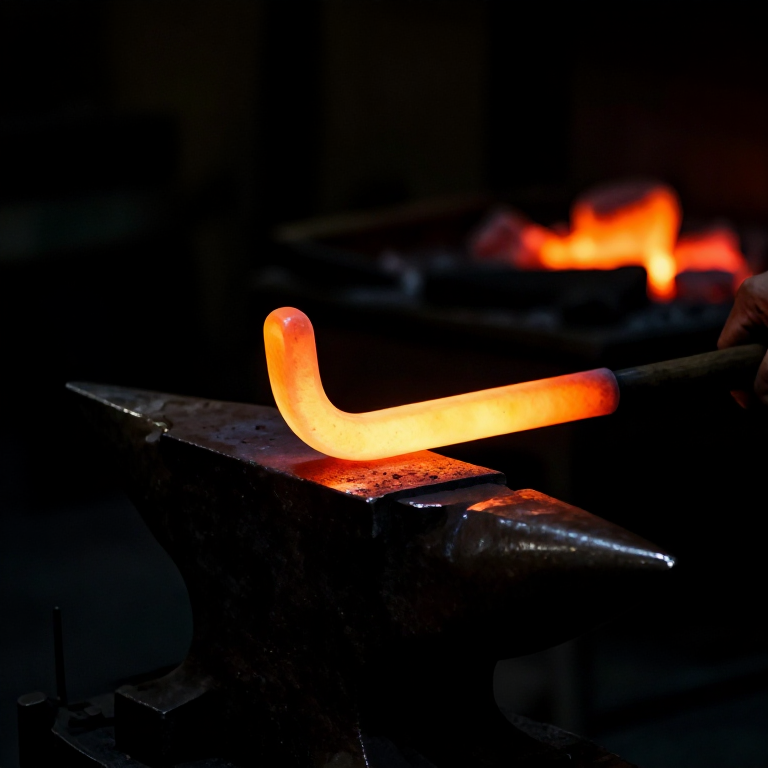
Draw Out and Bend the Bar
Draw Out and Bend the Bar
Heat the iron bar to bright orange (approximately 1000 degrees Celsius) in the forge. Slightly taper each end of the bar by hammering — the heels of the horseshoe are traditionally narrower than the toe. With the bar at welding heat, bend it into a U-shape over the anvil horn. The curve should follow the natural shape of a horse's hoof — roughly semicircular at the toe, with the two branches (heels) running parallel. The overall size depends on the horse — a typical riding horse requires a shoe approximately 12 to 14 cm long and 11 to 13 cm wide. The branches should be slightly longer than needed, as they can be trimmed to fit. Reheat and adjust the curve until the shoe lies flat on the anvil face without rocking, which indicates the ground-contact surface is level.
Materiali per questo passaggio:
Strumenti necessari:
 Anvil
Anvil Forge Tongs
Flatten and Level the Ground Surface
Flatten and Level the Ground Surface
Place the bent shoe flat on the anvil face and hammer the ground surface (the side that contacts the ground) flat and level. The shoe should be approximately 8 to 10 mm thick and uniformly flat on the bottom. Check by placing the shoe on a flat surface — it should sit without wobbling on any point. The hoof surface (the inner face that contacts the horse's hoof) should also be flat, though a slight concavity (seating out) in the centre of each branch can be forged to reduce pressure on the sole of the horse's hoof. The width of the shoe should be approximately 20 to 25 mm — wide enough to protect the hoof wall but not so wide that it extends beyond the hoof edge, which would make the horse prone to stepping on the opposite shoe.
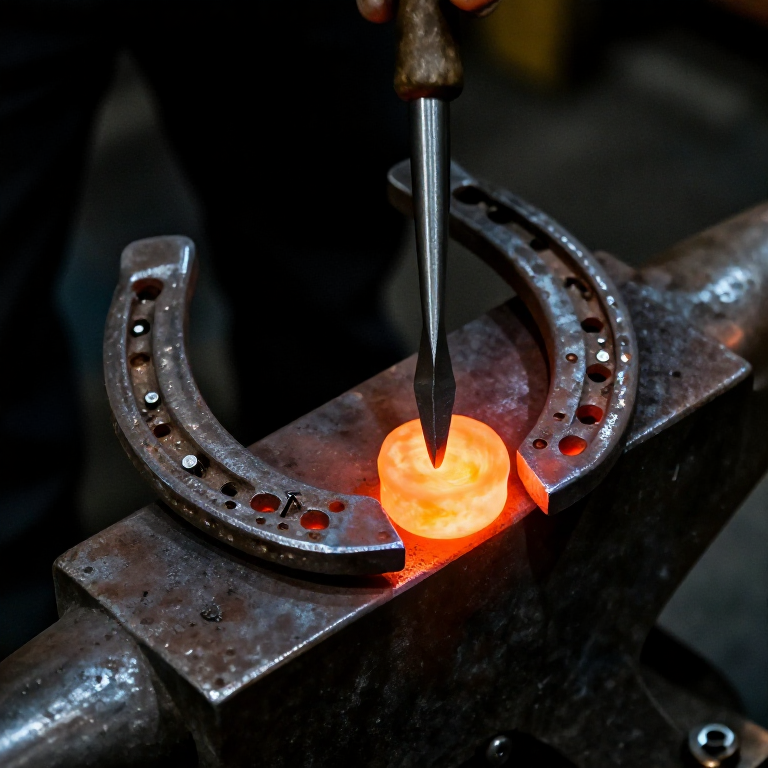
Punch the Nail Holes
Punch the Nail Holes
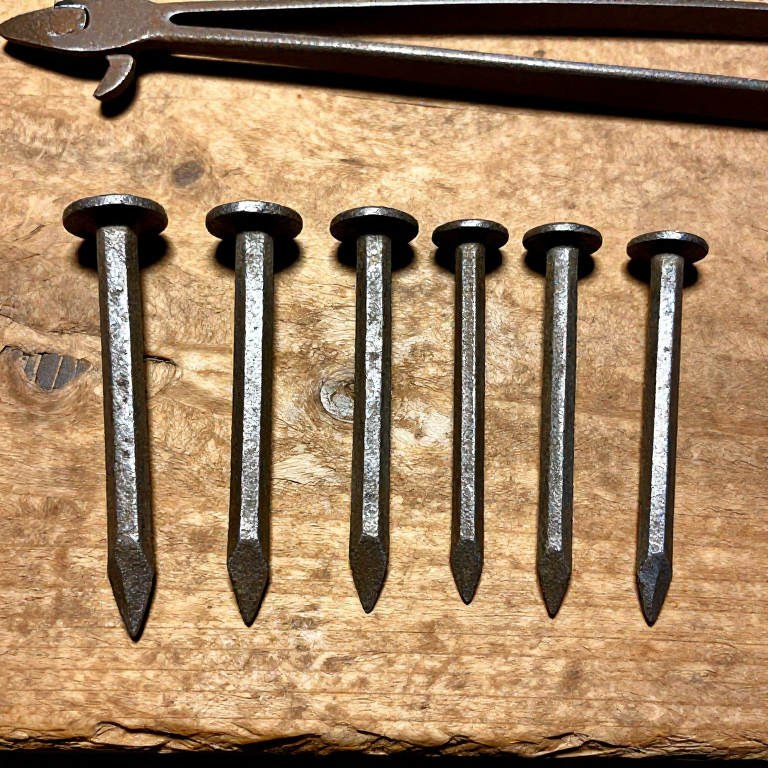
Reheat the shoe and use a pritchel (a tapered square punch) to punch nail holes through the shoe — typically three holes on each branch, spaced evenly along the outer half of the shoe width. Place the shoe hoof-side-up on the anvil, position the pritchel over the desired hole location, and strike firmly to punch through. Flip the shoe and clean the hole from the other side by punching the pritchel through from the ground surface to create a countersunk seat for the nail head. The holes must be positioned in the outer half of the shoe width so that the nails, when driven through the hoof wall, emerge on the outer surface of the hoof wall (the insensitive horn) without penetrating the sensitive inner laminae. This positioning is critical to avoid causing the horse pain and lameness.
Forge the Crease (Fuller Groove)
Forge the Crease (Fuller Groove)
Using a fuller tool or creasing iron, forge a shallow groove (crease or fullering) along the ground surface of the shoe, running through the line of nail holes. This groove serves two functions: it countersinks the nail heads below the shoe surface so they do not wear down prematurely on hard ground, and it provides a channel that improves traction on smooth surfaces. Heat the shoe and press the fuller tool into the ground surface along each branch, creating a groove approximately 3 mm deep and 5 mm wide that passes through each nail hole. The nail heads will sit within this groove, protected from road wear. Without this groove, the nail heads would protrude and wear down rapidly on paved roads, loosening the shoe.
Final Shaping and Finishing
Final Shaping and Finishing
Reheat the shoe one final time and make any last adjustments to the curve and flatness. The heels (branch ends) can be turned down slightly (pencilled) to prevent the horse from overreaching and catching a hind hoof on a front shoe, or turned up (calkins) for additional grip in soft ground. Trim the heels to the correct length with a hardy (hot-cut chisel). Quench the shoe in water — mild steel and wrought iron horseshoes are not hardened, as they need to be ductile enough to be adjusted during fitting. File any sharp edges smooth. When fitting the shoe to a horse, the medieval farrier would heat the shoe again and press it briefly against the trimmed hoof to burn a seat mark, ensuring a perfect fit before nailing. The faint smell of burning horn (keratin, the same protein as fingernails) is normal and does not cause the horse any pain, as the outer hoof wall is insensitive.
Materiali
1- 35-40 cm length, 25x10 mm pezzoSegnaposto
Strumenti richiesti
7- Segnaposto
- Segnaposto
- Segnaposto
- Segnaposto
- Segnaposto
- Segnaposto
- Segnaposto
Related blueprints
Other builds that share materials, tools, or techniques with this one.

CC0 Pubblico dominio
Questo progetto è rilasciato sotto CC0. Sei libero di copiare, modificare, distribuire e utilizzare quest'opera per qualsiasi scopo, senza chiedere permesso.
Supporta il Maker acquistando prodotti tramite il suo progetto dove guadagna una Commissione Maker stabilita dai venditori, oppure crea una nuova iterazione di questo progetto e includilo come collegamento nel tuo progetto per condividere i ricavi.