
Cultivating and Baking with Sourdough — Wild Yeast Bread
Istruzioni
Create the Sourdough Starter
Create the Sourdough Starter
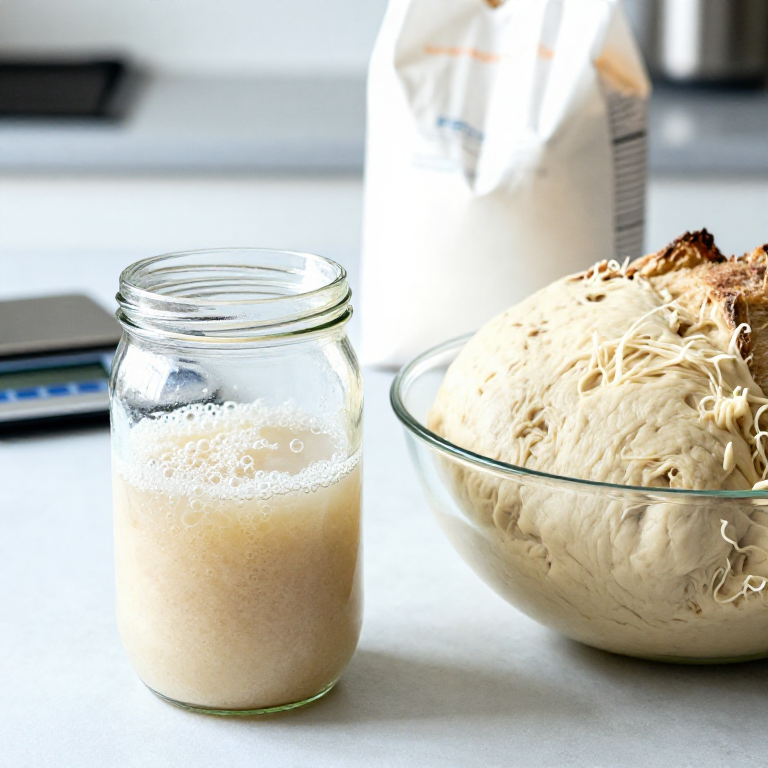
Mix 50g whole wheat flour with 50g water (approximately 25 degrees C) in a clean glass jar. Cover loosely and leave at room temperature (21-24 degrees C). Every 24 hours for the first 5 days, discard half the starter and feed it with 50g flour and 50g water. By days 3-4, you should see bubbles forming — these indicate wild yeast (primarily Saccharomyces and Candida species) and lactic acid bacteria (Lactobacillus and Pediococcus species) colonizing the flour-water mixture. By day 7-10, the starter should roughly double in volume within 4-6 hours of feeding and have a pleasant tangy, slightly fruity aroma. This indicates the microbial community is established and active enough to leaven bread.
Materiali per questo passaggio:
 Bread Flour500g for the loaf, plus extra for feeding starter g
 Rye Flour200g g
 Wateras needed pezzo
 Salt (fine sea salt)10g (2% of flour weight) g
Strumenti necessari:
 Glass Infusion Jar
 Dutch Oven
 Bench Scraper
 Razor blade or lame (for scoring)
 Digital Scale (0.01g)
Mix and Autolyse the Dough
Mix and Autolyse the Dough
Combine 100g of active, recently-fed starter (at peak rise) with 375g water in a large bowl. Add 500g bread flour and mix until no dry flour remains. Cover and rest for 30-60 minutes — this autolyse period allows the flour to fully hydrate and gluten to begin developing without the tightening effect of salt. After the autolyse, sprinkle 10g fine sea salt over the dough surface, add a splash of water to help dissolve it, and incorporate by folding the dough over itself repeatedly. The dough should feel cohesive and slightly tacky but not sticky. Total hydration is approximately 75% (375g water divided by 500g flour), which produces an open, airy crumb.
Bulk Ferment with Stretch and Folds
Bulk Ferment with Stretch and Folds
Over the next 4-6 hours at room temperature (or 8-12 hours in the refrigerator for a cold retard), the starter organisms ferment the dough. Every 30 minutes for the first 2 hours, perform a set of stretch-and-folds: wet your hand, grab one side of the dough, stretch it upward, and fold it over the top. Rotate the bowl 90 degrees and repeat, doing 4 folds per set. This develops gluten structure without traditional kneading. The dough is ready for shaping when it has increased in volume by 50-75%, feels airy and billowy, and shows visible bubbles just beneath the surface. Over-fermented dough (more than doubled) loses its structure and produces flat, dense bread.
Shape and Proof the Loaf
Shape and Proof the Loaf
Turn the dough onto a lightly floured surface. Pre-shape by folding the edges to the centre to create surface tension, then let it rest 20 minutes. Final-shape into a round (boule) by pulling the dough toward you with a bench scraper while tucking the bottom under, creating a taut skin on the top surface. Place the shaped loaf upside down (seam-side up) in a floured banneton or a bowl lined with a floured cloth. Cover and refrigerate for 8-16 hours. This cold retard slows fermentation, develops deeper flavour from increased organic acid production, and makes the dough easier to score before baking. The loaf is ready to bake when it passes the poke test: press a floured finger 1cm into the dough and it springs back slowly, leaving a slight indentation.
Score and Bake
Score and Bake
Preheat the oven to 250 degrees C with a Dutch oven inside for at least 45 minutes. Turn the cold loaf out onto parchment paper, score the top with a razor blade or lame (a single confident slash at a 30-degree angle creates the classic ear). The score allows the loaf to expand in a controlled direction during oven spring. Carefully lower the loaf into the preheated Dutch oven and cover with the lid. The enclosed environment traps steam released by the dough, keeping the crust flexible during the first 20 minutes while the loaf expands. Bake covered for 20 minutes at 250 degrees C, then remove the lid, reduce to 230 degrees C, and bake uncovered for 20-25 minutes until the crust is deep golden-brown and the internal temperature reaches 96-99 degrees C. Cool completely on a wire rack for at least 1 hour before cutting — the crumb continues setting as it cools.
Materiali
4- 500g for the loaf, plus extra for feeding starter pezzoSegnaposto
- 200g pezzoSegnaposto
- as needed pezzoSegnaposto
- 10g (2% of flour weight) pezzoSegnaposto
Strumenti richiesti
6- Segnaposto
- Segnaposto
- Segnaposto
- Segnaposto
- Segnaposto
- Segnaposto
Related blueprints
Other builds that share materials, tools, or techniques with this one.


CC0 Pubblico dominio
Questo progetto è rilasciato sotto CC0. Sei libero di copiare, modificare, distribuire e utilizzare quest'opera per qualsiasi scopo, senza chiedere permesso.
Supporta il Maker acquistando prodotti tramite il suo progetto dove guadagna una Commissione Maker stabilita dai venditori, oppure crea una nuova iterazione di questo progetto e includilo come collegamento nel tuo progetto per condividere i ricavi.