ARTE
BELLEZZA E BENESSERE
MESTIERE
CULTURA E STORIA
DIVERTIMENTO
AMBIENTE
CIBO E BEVANDE
INGEGNERIA INVERSA
SCIENZE
SPORT
TECNOLOGIA
INDOSSABILI
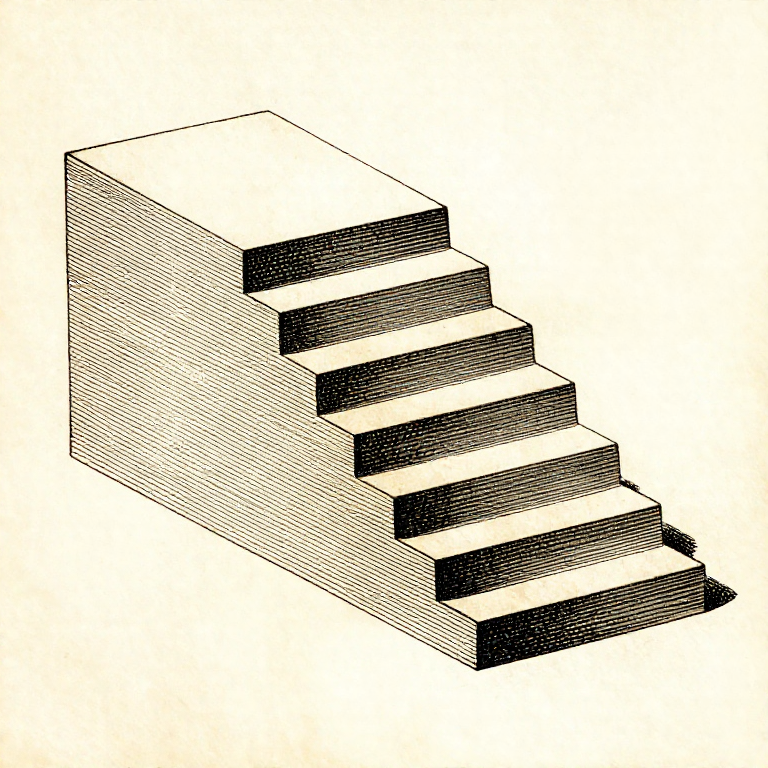


Overhangs, Bridges and Support: What the Machine Can Print Over Thin Air
Each layer is laid on the one below it. Where there is no layer below, the plastic has nothing to sit on — so the question for every sloping surface is how much of each line is still supported by the line under it.
The rule of thumb is 45 degrees, and it is not arbitrary: at 45 degrees each line overhangs the one below by exactly half its width, and half a line is enough to hold. Past that the overhang grows quickly and the plastic droops.
A BRIDGE is the other case: a flat span between two supported ends, printed as a stretched thread across the gap. Bridges work far better than most people expect, and designing to use them is how supports get avoided.
Intermedio
3 hours
Istruzioni
1
1
Why 45 degrees, in numbers
Why 45 degrees, in numbers
Caricamento del notebook Jupyter…
Materiali per questo passaggio:
 Filamento per stampa 3D (PLA)1 pezzo
Strumenti necessari:
 Computer da tavolo
 Software di slicing per file 3MF
 Set di ugelli per stampante 3D
2
2
Bridges: flat spans print better than slopes
Bridges: flat spans print better than slopes
A bridge is printed as a single stretched line pulled tight between two anchored ends. Because it is in tension it stays straight, and a well-cooled bridge of 50 mm or more comes out flat.
The first bridging layer is printed FAST and with full cooling, so the line is drawn thin and sets before it can sag. Slicers detect bridges and do this automatically, which is why a bridge often succeeds where a gentler slope fails.
So a square hole printed with a flat top is often better than one with an arch, and a teardrop-shaped horizontal hole is better than a round one because it turns the unsupported top into a self-supporting point. Designing the shape to suit the process is the last rung of this batch.
Materiali per questo passaggio:
Filamento per stampa 3D (PLA)1 pezzoStrumenti necessari:
 Stampante 3D a filamento (FDM)Software di slicing per file 3MF
 Calibro digitale da 6 pollici
3
3
Support is a cost, so spend it deliberately
Support is a cost, so spend it deliberately
Support material is printed, then thrown away, and it leaves a rough scar on every surface it touched. So it costs time, filament and finish — three things at once.
Use SUPPORT ON BUILD PLATE ONLY where possible. Support that grows from the part itself marks the part; support that rises from the plate marks nothing except where it meets the overhang.
Increase the Z gap between support and part until it releases by hand. A gap of one layer height is usually right: smaller and it fuses on, larger and the overhang above it droops into the gap. It is worth finding your printer's number once and writing it down.
Materiali per questo passaggio:
Filamento per stampa 3D (PLA)1 pezzoStrumenti necessari:
Software di slicing per file 3MF Sbavatore
 Kit di attrezzi per stampante 3D
4
4
Print a test tower before trusting a part
Print a test tower before trusting a part
An overhang test is a small model with faces at a range of angles, printed once per filament and per layer height. Twenty minutes, and it tells you exactly where your machine stops coping.
Keep them, labelled with the filament and settings. A drawer of test prints is the same thing as a shelf of glaze test tiles: a physical record that answers questions faster than any table.
Re-test when anything changes — a new filament, a new nozzle, a different cooling duct. Overhang performance is one of the most machine-specific things in printing, and a number from somebody else's printer is a starting guess.
Materiali per questo passaggio:
Filamento per stampa 3D (PLA)1 pezzo Filamento ABS1 pezzo
Strumenti necessari:
Stampante 3D a filamento (FDM) Lente da orologiaio
Strumenti richiesti
8- Segnaposto
- Segnaposto
- Segnaposto
- Segnaposto
- Segnaposto
- Segnaposto
- Kit di attrezzi per stampante 3D10% commissioneSegnaposto
- Segnaposto
Blueprint correlati
Questi blueprint condividono conoscenze — tecniche, materiali o principi


CC0 Pubblico dominio
Questo progetto è rilasciato sotto CC0. Sei libero di copiare, modificare, distribuire e utilizzare quest'opera per qualsiasi scopo, senza chiedere permesso.
Supporta il Maker acquistando prodotti tramite il suo progetto dove guadagna una Commissione Maker stabilita dai venditori, oppure crea una nuova iterazione di questo progetto e includilo come collegamento nel tuo progetto per condividere i ricavi.