Collaborazione
ARTE
BELLEZZA E BENESSERE
MESTIERE
CULTURA E STORIA
DIVERTIMENTO
AMBIENTE
CIBO E BEVANDE
INGEGNERIA INVERSA
SCIENZE
SPORT
TECNOLOGIA
INDOSSABILI
Pin-Cylinder Box Churn: A Cylinder of Square Pins Turns Through a Row of Pins in the Lid, Then Washes the Butter in the Churn
Buttercup

Creato da

Buttercup

11. novembre 2026IE
0
0
0
0
0

Pin-Cylinder Box Churn: A Cylinder of Square Pins Turns Through a Row of Pins in the Lid, Then Washes the Butter in the Churn

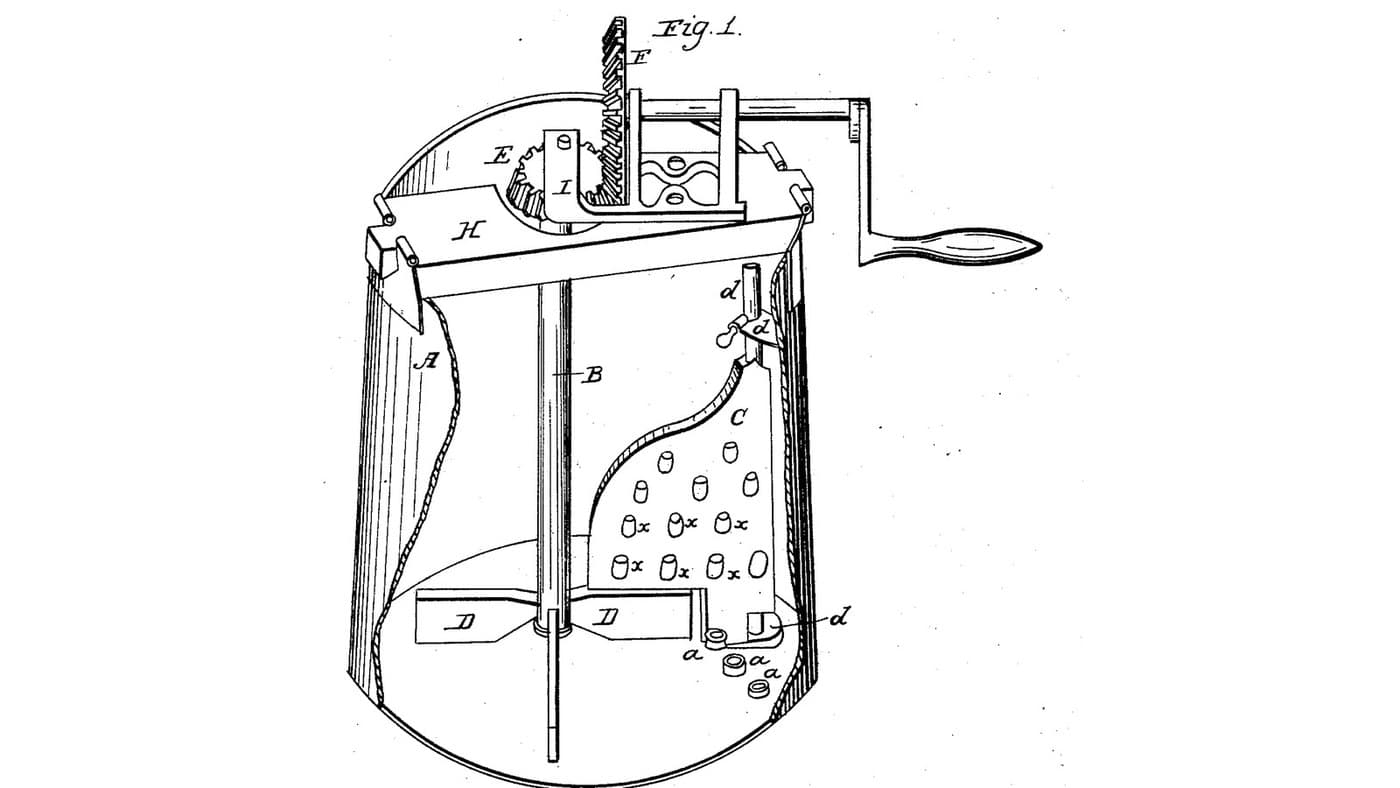
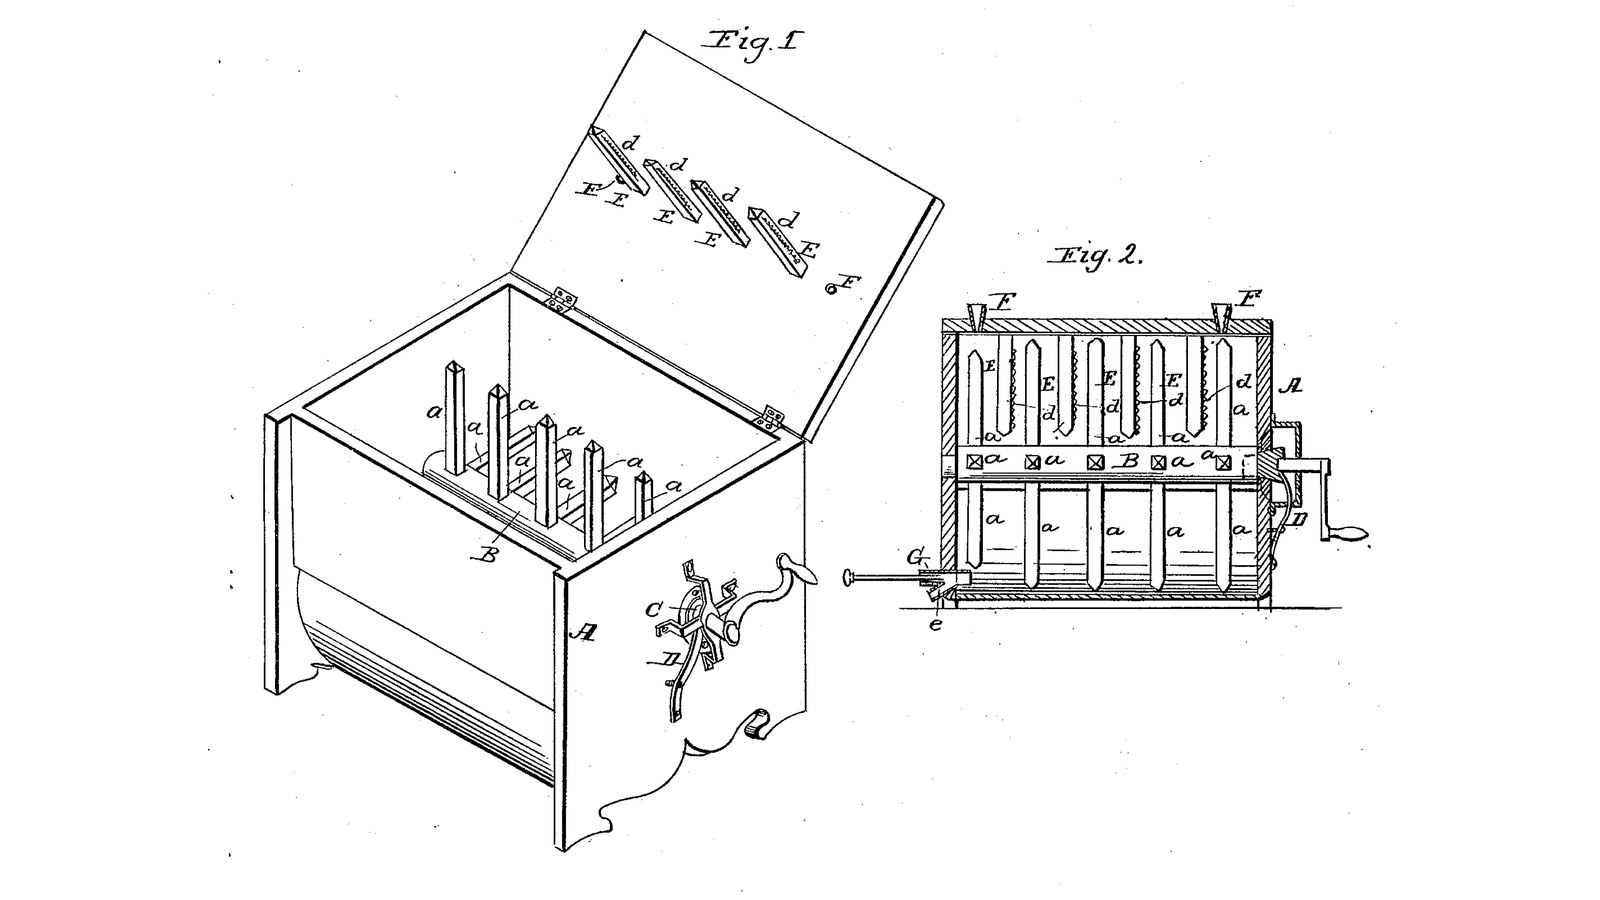
John Park of Joliet, Illinois, received US 29,397, dated 31 July 1860, for a churn and butter-dresser. A box with a half-round bottom holds a cranked wooden cylinder with four rows of square pins, which turn between a row of pins in the lid. The same pins churn the cream, then, with the buttermilk let off by a faucet and water thrown in, wash and work the butter. Toothed metal strips on the lid pins catch hairs, a cone gudgeon pressed by a spring keeps the end tight, and two tubes in the lid let in air. Where the patent gives a size we use it; the rest is ours.
Intermedio
About 3 days

Istruzioni

1

Pins between pins

Caricamento del notebook Jupyter…
2

Cream broken on rows of pins, four months before

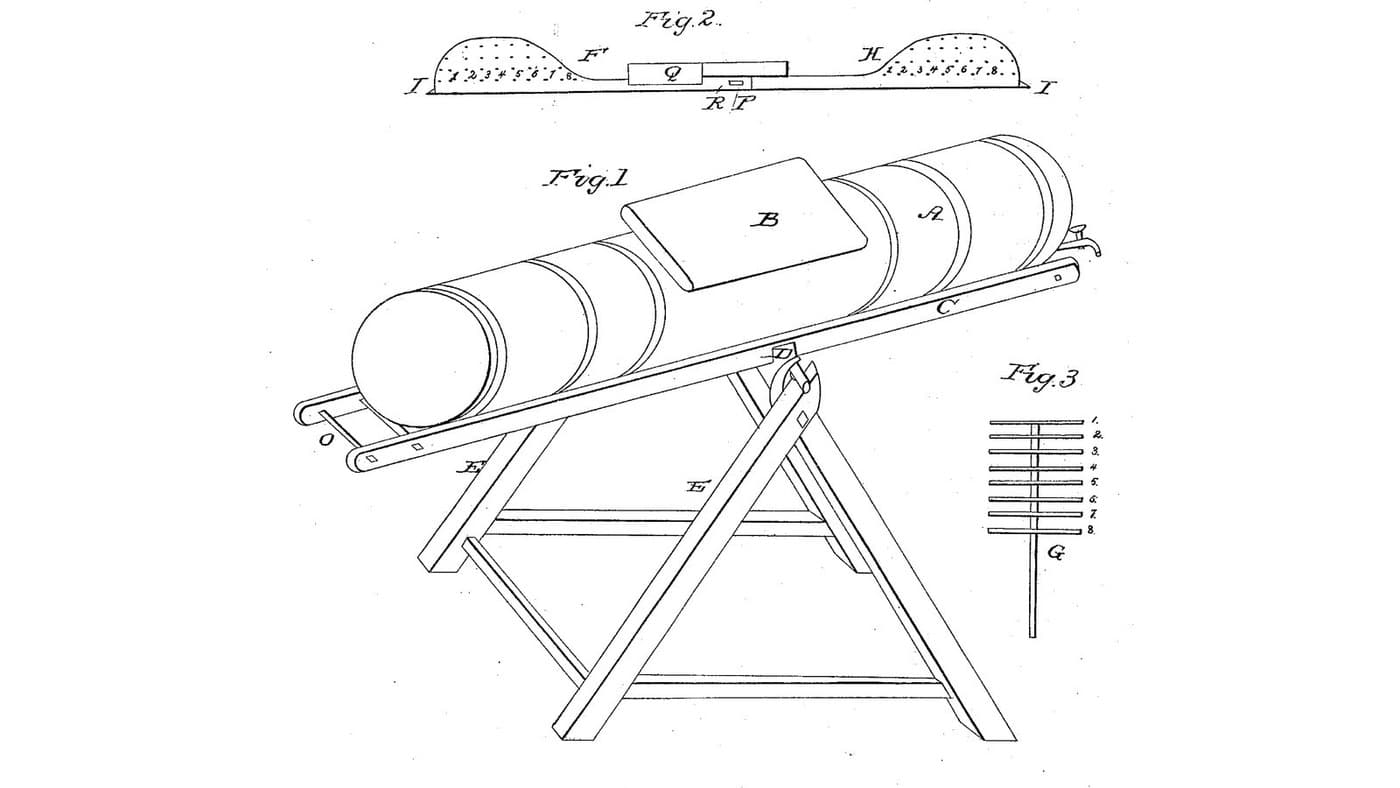
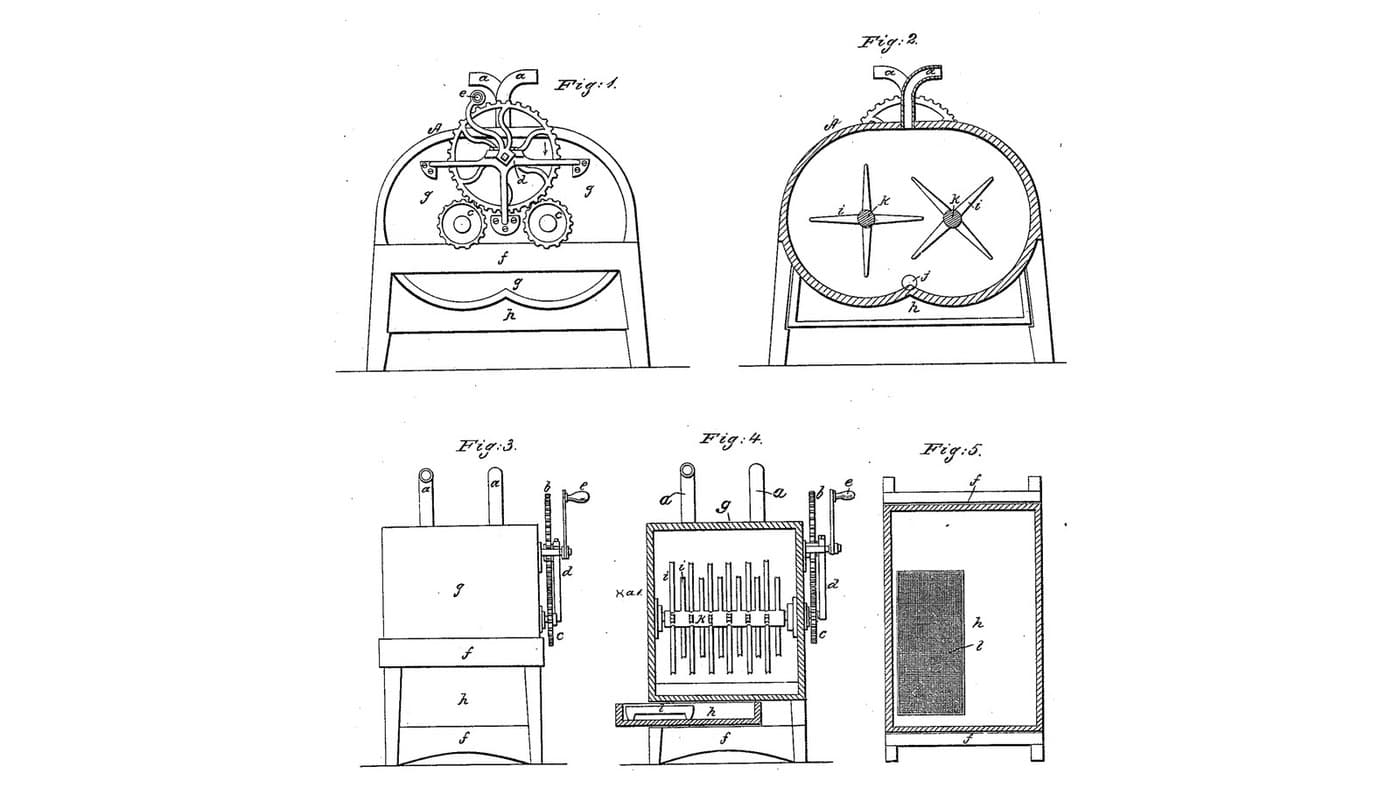
Newbrough's pins stand still and the cream rushes through them. Park's pins turn, through a row of fixed pins in the lid.
3

Read US 29,397

"So when the lid is shut the pins in the cylinder will revolve through between the pins that are in the lid, and break or churn the milk or cream; and when all the milk is let off by a faucet, and a pail of water thrown into the churn, by turning the crank eight or ten times around the pins in the cylinder will press and wash the butter through the pins in the lid."
4

Box with a half-round bottom

Glue up two hardwood ends 22 mm thick, 350 mm wide and 400 mm tall. On each draw the inside: a 300 mm half circle, its centre 250 mm up, with straight sides rising 150 mm above the centre to the top. Rout a groove 1.6 mm wide and 8 mm deep on that line, and cut the bottom edge into feet. Bend a 1.5 mm stainless sheet 516 mm long into a U to fit the line, set its edges into both grooves with silicone sealant, and screw hardwood sides 22 mm thick outside its straight parts. Join the ends through the top corners, inside, with two M8 threaded rods, nuts and washers outside: the patent's iron rods with screws and burrs.

Materiali per questo passaggio:

Tavola di legno duroTavola di legno duro3 pezzi
Lamiera di acciaio inossidabileLamiera di acciaio inossidabile1 pezzo
Sigillante siliconicoSigillante siliconico1 pezzo
Colla da legnoColla da legno1 pezzo
Viti da legnoViti da legno20 pezzi
Barra filettataBarra filettata1 pezzo
Dado esagonaleDado esagonale4 pezzi
Rondella pianaRondella piana4 pezzi

Strumenti necessari:

Sega circolare da bancoSega circolare da banco
BussolaBussola
Seghetto alternativoSeghetto alternativo
Fresatrice verticaleFresatrice verticale
Trapano a batteriaTrapano a batteria
Serie di punte da trapanoSerie di punte da trapano
Seghetto per metalliSeghetto per metalli
Morsetto a barraMorsetto a barra
Set di cacciavitiSet di cacciaviti
Chiave regolabile a rullinoChiave regolabile a rullino
Metro a nastroMetro a nastro
5

Cylinder and its four rows of pins

Turn a hardwood cylinder 76 mm across and 488 mm long (the patent's "about three inches"). Mark six places 80 mm apart, the outer ones 44 mm from the ends, and at each chop four square mortises 25 mm across and 25 deep, a quarter turn apart. Cut 24 hardwood pins 25 mm square ("about one inch") and 127 mm long, point their ends, and glue them in so their points stand 140 mm from the axis, each pinned with a small dowel. Bore a 30 mm hole 40 deep in the crank end for the square boxing and a 10.2 mm hole 20 deep in the other end for the centre rod.

Materiali per questo passaggio:

Tavola di legno duroTavola di legno duro2 pezzi
Colla da legnoColla da legno1 pezzo
Tasselli di legno duroTasselli di legno duro1 pezzo

Strumenti necessari:

Tornio per legnoTornio per legno
Sega circolare da bancoSega circolare da banco
Serie di scalpelli da legnoSerie di scalpelli da legno
Trapano a batteriaTrapano a batteria
Serie di punte da trapanoSerie di punte da trapano
Morsetto a barraMorsetto a barra
Metro a nastroMetro a nastro
6

Print the gudgeon cone

The cone on the gudgeon, 19 mm across at its inner end and 27 at its outer end, 22 long, on a 16 mm bore. PETG, 0.2 mm layers, 30 % infill, 4 walls.
File di designSTLCC0 - Free
7

Print the cone boxing

The boxing the cone seats in, set in the crank end: 40 mm across, 22 long, its bore tapering like the cone. PETG, 0.2 mm layers, 30 % infill, 4 walls.
File di designSTLCC0 - Free
8

Print the square boxing

The boxing glued into the cylinder's crank end: 30 mm across, 40 long, with a 12.3 mm square hole for the gudgeon's square end. PETG, 0.2 mm layers, 30 % infill, 4 walls.
File di designSTLCC0 - Free
9

Print the faucet

The faucet: a tube 76 mm long (the patent's "about three inches"), 20 mm bore, with an outlet tube under it halfway along. PETG, 0.2 mm layers, 30 % infill, 4 walls.
File di designSTLCC0 - Free
10

Gudgeon, spring, crank and centre rod

Glue the square boxing into the cylinder's crank end. Bore the crank end 40 mm at the axis, 150 mm above the half circle's bottom, and seal the cone boxing into it, its wide end outward. Cut a 16 mm stainless rod 139 mm long for the gudgeon and file 38 mm of its inner end square, 12 mm across the flats (the patent's square end is 1.5 inch long). Pin the printed cone on it where it seats in the boxing, slide on a shaft collar as the shoulder, and pin a crank of mild steel flat bar, 120 mm throw, with a hardwood handle, on its outer end. Bend a spring steel strip into a U with a slot for the gudgeon and screw its legs to the end so it presses the collar inward. Bore the other end 10.2 mm at the axis and push a 10 mm stainless rod 51 mm long ("about two inches" by "three-eighths") through into the cylinder.

Materiali per questo passaggio:

Barra di acciaio inossidabileBarra di acciaio inossidabile2 pezzi
Filamento PETGFilamento PETG1 pezzo
Shaft CollarShaft Collar1 pezzo
CoppigliaCoppiglia2 pezzi
Piatto di acciaio dolcePiatto di acciaio dolce1 pezzo
Tasselli di legno duroTasselli di legno duro1 pezzo
Nastro di acciaio armonicoNastro di acciaio armonico1 pezzo
Viti da legnoViti da legno4 pezzi
Sigillante siliconicoSigillante siliconico1 pezzo

Strumenti necessari:

Stampante 3D a filamento (FDM)Stampante 3D a filamento (FDM)
Seghetto per metalliSeghetto per metalli
Lime (lima a mano)Lime (lima a mano)
Morsa da bancoMorsa da banco
Trapano a batteriaTrapano a batteria
Serie di punte da trapanoSerie di punte da trapano
Set di cacciavitiSet di cacciaviti
11

Faucet and its pin

Bore the other end 24 mm through at the bottom, its lower edge just above the sheet, and seal the printed faucet into it with its outlet down. Turn a hardwood pin 19 mm across and 170 mm long with a knob, cut two grooves near its point and fit two O-rings as the patent's rubber packing, so pushed in it closes the tube and drawn back past the outlet it lets the milk run off.

Materiali per questo passaggio:

Tasselli di legno duroTasselli di legno duro1 pezzo
O-ringO-ring2 pezzi
Sigillante siliconicoSigillante siliconico1 pezzo

Strumenti necessari:

Tornio per legnoTornio per legno
Trapano a batteriaTrapano a batteria
Serie di punte da trapanoSerie di punte da trapano
Lime (lima a mano)Lime (lima a mano)
12

Lid with its pins, hair strips and air tubes

Cut a hardwood lid 544 x 350 x 22 mm and hang it on two butt hinges along the back. Cut five hardwood pins 25 mm square, set them in mortises in the lid on its centre line, midway between the cylinder's pin places, reaching 105 mm down with pointed ends, so they stop 7 mm off the cylinder. Cut five strips of stainless strip 12 mm wide, file fine teeth along one edge, and screw one along a corner of each lid pin so the teeth stand about 3 mm ("about an eighth of an inch") proud. Fit two stainless tubes 38 mm long ("about an inch and a half") through the lid near its ends as air tubes.

Materiali per questo passaggio:

Tavola di legno duroTavola di legno duro1 pezzo
Cerniera a libro per mobiliCerniera a libro per mobili2 pezzi
Nastro in acciaio inox laminato a freddo (420)Nastro in acciaio inox laminato a freddo (420)1 pezzo

Tubo di acciaio inossidabileTubo di acciaio inossidabile1 pezzo
Colla da legnoColla da legno1 pezzo
Viti da legnoViti da legno20 pezzi

Strumenti necessari:

Sega circolare da bancoSega circolare da banco
Serie di scalpelli da legnoSerie di scalpelli da legno
Cesoie da lattoniereCesoie da lattoniere
Lime ad agoLime ad ago
Seghetto per metalliSeghetto per metalli
Trapano a batteriaTrapano a batteria
Serie di punte da trapanoSerie di punte da trapano
Set di cacciavitiSet di cacciaviti
13

The build in 3D

FreeCAD model of this build, its front half cut away: the half-round stainless bottom in grooved ends, the pinned cylinder, the lid with its row of pins and hair strips, the air tubes, the faucet and its pin, the cone gudgeon with its spring and crank, and the centre rod.
File di designBLENDCC0 - Free
14

Churn and dress the butter

Pour about 15 litres of heavy cream at about 15 °C, checked with the thermometer, into the box, shut the lid and turn the crank steadily, timing it. When the butter comes, draw the faucet's pin and let the buttermilk run into a bowl. Shut it, throw in a pail of cold water, and turn the crank eight or ten times so the pins press and wash the butter through the lid pins; let the water off and repeat until it runs clear. Sprinkle in the salt and turn a few times to work it through. To take the cylinder out, draw the gudgeon back against its spring and the centre rod back. Lift out the butter and weigh it.

Materiali per questo passaggio:

Panna da montarePanna da montare15 l
AcquaAcqua1 pezzo
Sale marino grossoSale marino grosso1 pezzo

Strumenti necessari:

Termometro a sonda permanenteTermometro a sonda permanente
CronometroCronometro
Bilancia digitale da cucinaBilancia digitale da cucina
Grande ciotola da impasto in acciaio inossidabileGrande ciotola da impasto in acciaio inossidabile
15

Troubleshooting

Pin-cylinder churn troubleshooting.

Flow

Loading...
16

History and honest limits

**John Park** of Joliet, Will County, Illinois, US 29,397, 31 July 1860, "Churn", a churn and butter-dresser. He claimed the rows of pins in the cylinder and lid "for churning, and dressing the butter ready for use while in the churn", the faucet, the cone gudgeon, the spring, the tin strips for catching hairs and the air tubes. His text describes the gudgeon, boxings and spring from a Fig. 3 that is not on the drawing sheet, and some of its letters do not match the two figures; the gudgeon parts here follow the text, in our own form. His strips were tin, his faucet and boxings zinc; ours are stainless and printed. The sizes in quotes are his; all others are ours.

Materiali

22

Strumenti richiesti

22

File di progetto

5

CC0 Pubblico dominio

Questo progetto è rilasciato sotto CC0. Sei libero di copiare, modificare, distribuire e utilizzare quest'opera per qualsiasi scopo, senza chiedere permesso.

Supporta il Maker acquistando prodotti tramite il suo progetto dove guadagna una Commissione Maker stabilita dai venditori, oppure crea una nuova iterazione di questo progetto e includilo come collegamento nel tuo progetto per condividere i ricavi.

Commenti

(0)

Accedi per partecipare alla discussione

Caricamento commenti...