Collaborazione
ARTE
BELLEZZA E BENESSERE
MESTIERE
CULTURA E STORIA
DIVERTIMENTO
AMBIENTE
CIBO E BEVANDE
INGEGNERIA INVERSA
SCIENZE
SPORT
TECNOLOGIA
INDOSSABILI
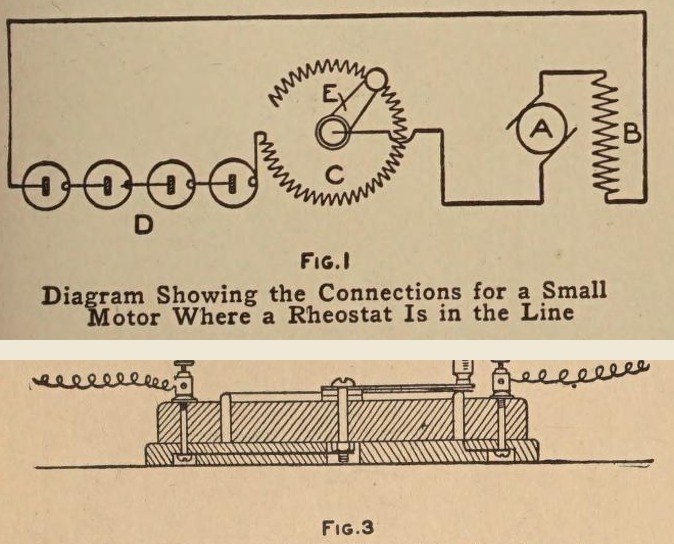


Rheostat: a Small Ring Rheostat for Toy Motors (Boy Mechanic, 1915)
A small variable resistor to set the speed of a toy motor: resistance wire wound on a fibre strip bent into a ring, set in a groove in a hardwood base, with a brass arm that slides round the bared top of the winding.
Wired in series with the motor, it works like a valve in a water pipe.
Source: The Boy Mechanic, Book 2 (1915), pp. 393-394. Unknown: wire alloy. Picture: Figs. 1 and 3 of the book.
Intermedio
Unknown
Istruzioni
1
1
Wind the resistance strip
Wind the resistance strip
Smooth a strip of thin fibre about 1/16 in thick, 1/2 in wide and 10 in long. Wind it with No. 22 cotton-covered resistance wire, close turns from 1/4 in from one end to 1/4 in from the other, securing the ends through small drilled holes and leaving 3 to 4 in free. Bend the strip into a ring round a round object, winding outward, and note its inside and outside diameters.
Materiali per questo passaggio:
 Materiale sconosciuto1 fibre strip
 Filo resistivo in alpacca1 No. 22
Strumenti necessari:
 Trapano a mano
2
2
Make the base
Make the base
Round the corners and top edges of a seasoned hardwood block 1/2 x 4 1/2 x 4 1/2 in, mark the ring's two diameters from the centre, and saw out the circles so the ring fits between them. Screw this onto a second board 1/4 x 4 3/4 x 4 3/4 in from below with countersunk screws. Drill a hole for one wire end, fit two back-connected binding posts in the corners, and cut grooves underneath for the leads; one post goes to the winding, the other to the centre bolt.
Materiali per questo passaggio:
 Tavola di legno duro2 1/2 and 1/4 in
 Viti da legno1 pezzo
 Boccola da pannello2 pezzi
Strumenti necessari:
 Compasso a punte fisse
 Saracco a costolaTrapano a mano
 Cacciavite a taglio
3
3
Make and mount the arm
Make and mount the arm
Cut the arm from 1/16 in sheet brass, 2 in long, 1/2 in wide at one end and 1/4 in at the other. Under the narrow end solder thin spring brass to bear on the ring; fit a small handle on top. Mount it on a 1/8 in brass bolt about 1 in long through the centre, with washers under it, the base hole countersunk underneath 1/2 in wide and 1/4 in deep. Solder a short brass strip to the nut, set in a recess, and lock with a second nut or a spring washer.
Materiali per questo passaggio:
 Lamiera di ottone1 arm, spring
 Metallo sconosciuto1 1/8 in brass bolt
 Rondella piana3 pezzi
 Spring Washer1 pezzo
 Lega saldante stagno-piombo1 pezzo
Strumenti necessari:
 Cesoie da lattoniereTrapano a mano
 Saldatore elettrico
4
4
Bare the track and finish
Bare the track and finish
Set the ring in its groove. Sand the insulation off the top edge of the winding so the spring contact touches the wire. Give the wood a coat of shellac.
Materiali per questo passaggio:
 Vernice alla gommalacca1 pezzo
Strumenti necessari:
 Carta abrasiva
 Pennelli fini
Materiali
11- 1 fibre stripSegnaposto
- 1 No. 22Segnaposto
- 2 1/2 and 1/4 inSegnaposto
- 1 pezzoSegnaposto
- Segnaposto
- 1 arm, springSegnaposto
- 1 1/8 in brass boltSegnaposto
- 3 pezziSegnaposto
- 1 pezzoSegnaposto
- 1 pezzoSegnaposto
- 1 pezzoSegnaposto
Strumenti richiesti
8- Segnaposto
- Segnaposto
- Segnaposto
- Segnaposto
- Segnaposto
- Segnaposto
- Segnaposto
- Segnaposto
Questo progetto realizza
CC0 Pubblico dominio
Questo progetto è rilasciato sotto CC0. Sei libero di copiare, modificare, distribuire e utilizzare quest'opera per qualsiasi scopo, senza chiedere permesso.
Supporta il Maker acquistando prodotti tramite il suo progetto dove guadagna una Commissione Maker stabilita dai venditori, oppure crea una nuova iterazione di questo progetto e includilo come collegamento nel tuo progetto per condividere i ricavi.