Collaborazione
ARTE
BELLEZZA E BENESSERE
MESTIERE
CULTURA E STORIA
DIVERTIMENTO
AMBIENTE
CIBO E BEVANDE
INGEGNERIA INVERSA
SCIENZE
SPORT
TECNOLOGIA
INDOSSABILI
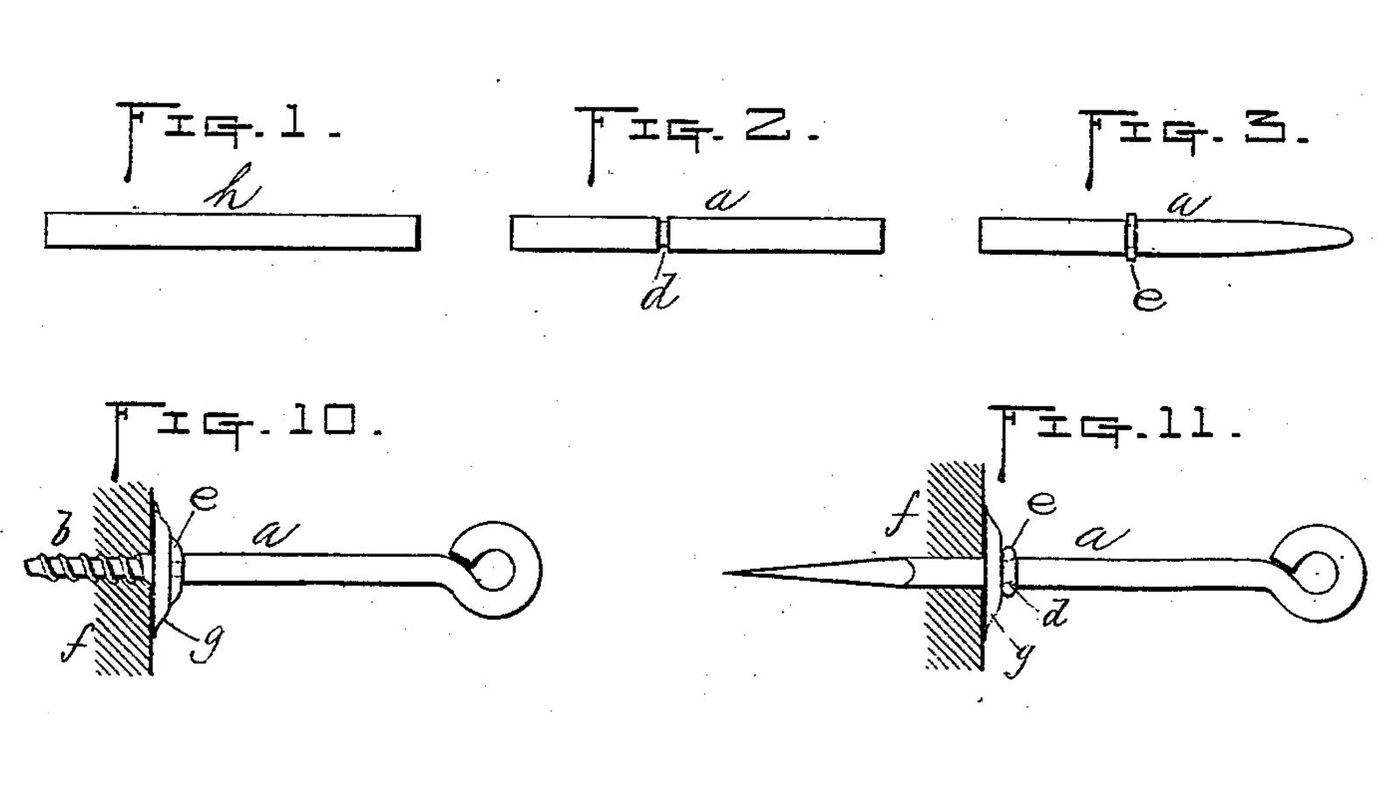


Screw Eye: Parmelee's One-Piece Wire Eye with a Stop-Ring
A screw eye bent from one piece of wire, by Arthur W. Parmelee of Worcester, Massachusetts (US 350,209, 1886). One end is threaded to turn into wood, the other bent into a closed eye. His addition is a ring closed into a groove around the shank: it stops the screw at the right depth, looks neat, and is left a little loose so the eye can turn without marking the wood under it.
The patent gives no metal or sizes. Iron wire, the 3 mm size, the pliers and the die are ours. The picture: Figs. 1-3 and 10-11 of the patent.
Principiante
30 minutes
Istruzioni
1
1
Cut a piece of wire
Cut a piece of wire
Cut a straight piece of iron wire about 3 mm thick (ours), long enough for the screw, the shank and the eye (Fig. 1).
Materiali per questo passaggio:
 Filo di ferro1 pezzo
Strumenti necessari:
 Righello
 Tronchesine
2
2
Cut the groove
Cut the groove
File a narrow groove right round the wire, a screw length from one end (Fig. 2). Parmelee cuts it or presses it in.
Strumenti necessari:
 Set di lime ad ago
 Morsa da banco
3
3
Point the screw end
Point the screw end
File that end to a tapering point (Fig. 3).
Strumenti necessari:
 Lima per metalliMorsa da banco
4
4
Thread the screw end
Thread the screw end
Cut a screw thread on the pointed end "in the usual way". Ours: a die in a die stock, run on as far as the point allows.
Strumenti necessari:
 PortafilieraMorsa da banco
5
5
Bend the eye
Bend the eye
Bend the other end into a closed round eye, the end turned in against the shank (Fig. 10).
Strumenti necessari:
 Pinze a becchi tondi
 Pinze a becchi piatti
6
6
Make the split ring
Make the split ring
Bend a short piece of the same wire round into an open ring that just slips over the shank (Figs. 9 and 11).
Materiali per questo passaggio:
Filo di ferro1 pezzoStrumenti necessari:
TronchesinePinze a becchi tondi7
7
Close the ring into the groove
Close the ring into the groove
Slide the ring onto the groove and squeeze it until its two ends meet in a continuous band. Leave it a little loose, so the eye turns while the ring stays still against the wood.
Strumenti necessari:
Pinze a becchi piatti8
8
Turn it into the wood
Turn it into the wood
Turn the screw into the wood by the eye until the ring meets the surface: the ring is the depth stop. Parmelee also allows washers under the ring; we leave them out.
Materiali
1- 2 pezziSegnaposto
Strumenti richiesti
8- Segnaposto
- Segnaposto
- Segnaposto
- Segnaposto
- Segnaposto
- Segnaposto
- Segnaposto
- Segnaposto
Questo progetto realizza
Blueprint correlati
Questi blueprint condividono conoscenze — tecniche, materiali o principi
CC0 Pubblico dominio
Questo progetto è rilasciato sotto CC0. Sei libero di copiare, modificare, distribuire e utilizzare quest'opera per qualsiasi scopo, senza chiedere permesso.
Supporta il Maker acquistando prodotti tramite il suo progetto dove guadagna una Commissione Maker stabilita dai venditori, oppure crea una nuova iterazione di questo progetto e includilo come collegamento nel tuo progetto per condividere i ricavi.