Collaborazione
ARTE
BELLEZZA E BENESSERE
MESTIERE
CULTURA E STORIA
DIVERTIMENTO
AMBIENTE
CIBO E BEVANDE
INGEGNERIA INVERSA
SCIENZE
SPORT
TECNOLOGIA
INDOSSABILI
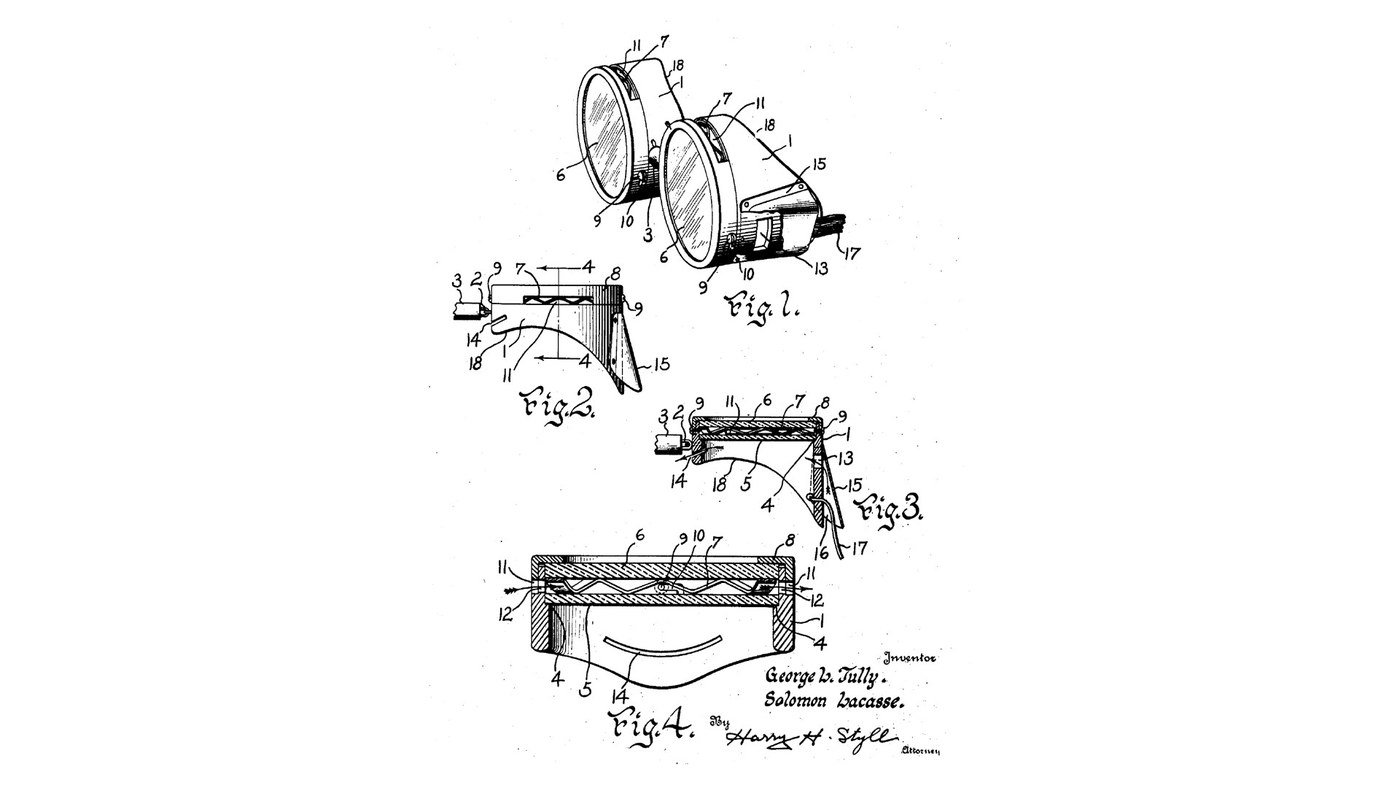


Shaded Forge Goggles: Ventilated Eye Cups with a Coloured and a Clear Lens (Tully, US 1,679,105)
Molten metal and glass give off a strong glare, and goggles worn over hot work steam up.
George L. Tully and Solomon Lacasse of the American Optical Company (filed 1927, US 1,679,105) made goggles for welders and "those employed in handling molten metal, glass and similar products": hard-rubber or Bakelite eye cups with a coloured inner lens against the glare and a cheap clear outer lens that is easily replaced, held apart by a crimped spring under a bayonet cap. Slots let air through between the lenses and inside the cup, so the lenses do not steam up.
This rung turns the eye cups from ebonite, cuts the lenses and assembles the goggles. Not given: any size, the metal of the cap, spring and chain, the band's material and the shade of the coloured glass.
Source: G. L. Tully and S. Lacasse, US 1,679,105 (1928). Picture: the patent's Figs. 1-4.
Intermedio
About 6 hours
Istruzioni
1
1
Read US 1,679,105
Read US 1,679,105
"The inner lens being preferably of colored glass to reduce the glare from the molten material and the outer lens being of plain glass. Colored glass is expensive, whereas the outer plain glass is cheap and economical. If the outer glass is broken it can be easily replaced, or if it becomes scratched or marred so as to become semi-opaque a new lens can be quickly and easily inserted for the old one."
2
2
Turn the eye cups
Turn the eye cups
Turn two annular eye cups from ebonite (hard rubber, one of his two materials) on the lathe. Inside each, leave a shouldered flange near the front to carry the inner lens. Cut the eye side of the cup on an angle and shape it to fit the face. Saw two slots opposite each other through the wall in front of the flange, between the lenses, and two more behind the flange for air between the inner lens and the eye. The sizes are ours.
Materiali per questo passaggio:
 Barra di ebanite1 as required
Strumenti necessari:
 Tornio per metalli
 Set di utensili da tornio (HSS)
 Seghetto per metalli
 Set di lime ad ago
 Occhiali di sicurezza
3
3
Cut the lenses
Cut the lenses
For each cup, cut a round inner lens from coloured glass and a round outer lens from plain glass to fit the cup, and grind their edges smooth.
Materiali per questo passaggio:
 Lastre di vetro colorato2 pezzi
 Lastra di vetro2 pezzi
Strumenti necessari:
 Tagliavetro
 Mola abrasivaOcchiali di sicurezza
4
4
Make the caps, springs and shields
Make the caps, springs and shields
For each cup make an annular cap that fits over the cup's front flange, with two bayonet slots in its lower edge and two slots opposite each other that line up with the cup's front slots. Crimp a ring of thin metal into a wave to sit between the lenses. Bend a shield closed on three sides and open at the bottom to cover one of the rear slots, and rivet it to the cup.
Materiali per questo passaggio:
 Metallo sconosciuto1 as required
Strumenti necessari:
 Cesoie da lattoniereSet di lime ad ago
 Trapano a colonna
 Set da ribadire
 Martello a penna sferica
5
5
Fit the lenses
Fit the lenses
Drop the coloured lens onto the cup's flange, lay the crimped spring on it, then the clear lens, and slide the cap on so its bayonet slots pass over two stud screws in the cup. Turn the cap and tighten the screws. The spring lets the outer lens yield if it is struck. To change a lens, loosen the screws, slide the cap back and push the lenses out from inside.
Materiali per questo passaggio:
 Viti da metallo4 pezzi
Strumenti necessari:
 Set di cacciavitiTrapano a colonna
6
6
Bridge and band
Bridge and band
Join the two cups with a short chain covered with rubber tubing. Fix an elastic head band to the outer sides of the cups with an adjustable buckle.
Materiali per questo passaggio:
Metallo sconosciuto1 as required Tubo di gomma1 as required
 Materiale sconosciuto1 as required
 Fibbia di ottone con ardiglione1 pezzo
Strumenti necessari:
Set di cacciaviti7
7
The patent drawing
The patent drawing
US 1,679,105, Figs. 1-4: the goggles (1), a cup from the side with the shield (2), a section through cup, lenses and cap (3) and a section through the lenses and spring (4). Public domain (expired patent).
8
8
History and honest limits
History and honest limits
Tully and Lacasse filed on 16 May 1927 for the American Optical Company of Southbridge, Massachusetts; the patent was granted on 31 July 1928.
The patent gives no sizes and no shade for the coloured glass, so our goggles are not rated to any welding or furnace filter standard; do not rely on them for electric-arc welding. The cap, spring, chain and shield metal and the band's elastic material are not named (unknown).
Materiali
8- 1 as requiredSegnaposto
- 2 pezziSegnaposto
- 2 pezziSegnaposto
- 1 as requiredSegnaposto
- 4 pezziSegnaposto
- 1 as requiredSegnaposto
- 1 as requiredSegnaposto
- Segnaposto
Strumenti richiesti
12- Segnaposto
- Segnaposto
- Segnaposto
- Segnaposto
- Segnaposto
- Segnaposto
- Segnaposto
- Segnaposto
- Segnaposto
- Segnaposto
- Segnaposto
- Segnaposto
Questo progetto realizza
CC0 Pubblico dominio
Questo progetto è rilasciato sotto CC0. Sei libero di copiare, modificare, distribuire e utilizzare quest'opera per qualsiasi scopo, senza chiedere permesso.
Supporta il Maker acquistando prodotti tramite il suo progetto dove guadagna una Commissione Maker stabilita dai venditori, oppure crea una nuova iterazione di questo progetto e includilo come collegamento nel tuo progetto per condividere i ricavi.