
ARTE
BELLEZZA E BENESSERE
MESTIERE
CULTURA E STORIA
DIVERTIMENTO
AMBIENTE
CIBO E BEVANDE
INGEGNERIA INVERSA
SCIENZE
SPORT
TECNOLOGIA
INDOSSABILI
The Tube-in-the-Back Fountain Brush: Turn the Tube and the Jets Become a Soak
YourGrandma

Creato da

YourGrandma

6. ottobre 2026IS
34
0
0
0
0

The Tube-in-the-Back Fountain Brush: Turn the Tube and the Jets Become a Soak

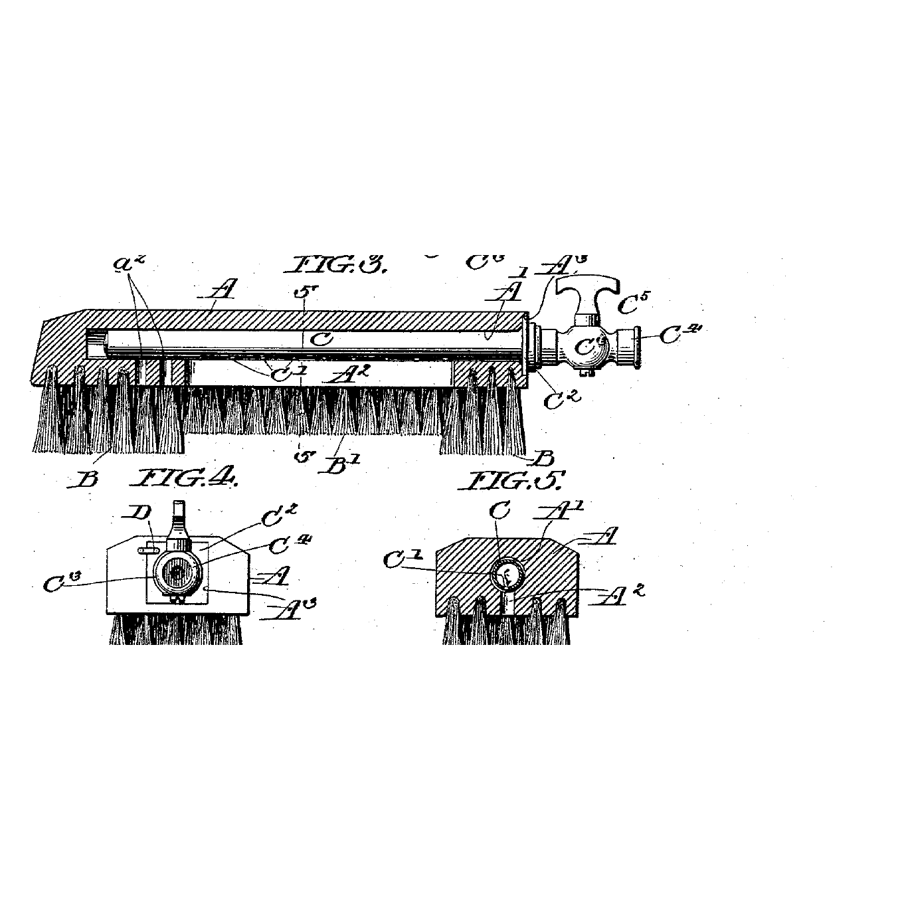
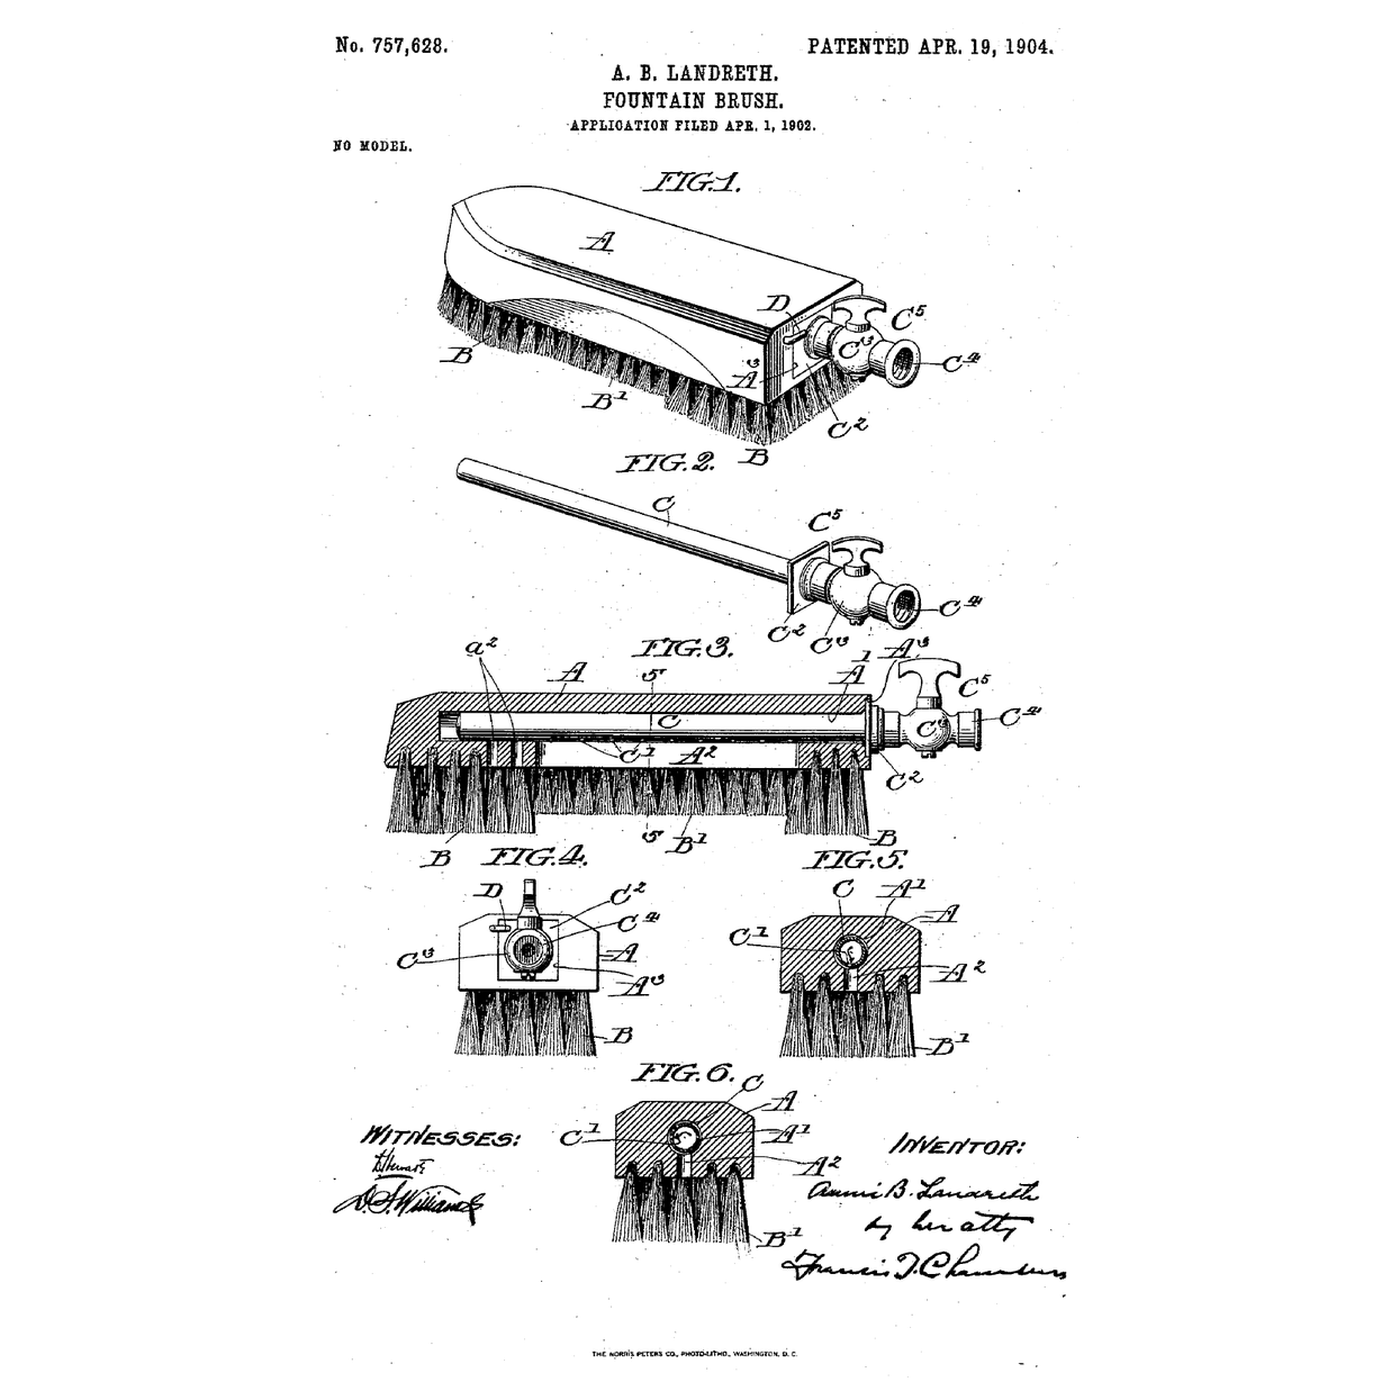
A scrubbing brush dipped in a bucket runs dry in seconds, and a hose beside it floods the floor. Annie B. Landreth of Bristol, Pennsylvania, received US 757,628, dated 19 April 1904, for a fountain brush "of great simplicity of construction": a recess bored lengthwise into an ordinary brush's back with openings to its face, and a perforated tube on a cock that slides in; a square plate on the tube sits in a square depression, so the holes can face the openings or be turned a quarter turn against the recess walls. This rung compares the jet with the turned-away flow, then bores a scrub brush, fits a tube and tap, and measures both settings.
Intermedio
About 3 hours

Istruzioni

1

Jet against soak

Caricamento del notebook Jupyter…
2

A scrubbing brush improved before it

The embedded blueprint holds two brush heads on a sprung holder. Landreth leaves the brush ordinary and feeds water through a bore in its back.
3

Read US 757,628

"Thus the perforations may register with the openings a² a², as indicated in Fig. 5, or the fountain-tube may be turned to an angle of ninety degrees, so that the perforations C' face the lateral sides of the recess A', as indicated in Fig. 6, and in this way the force due to the pressure of the water-supply is broken and the water will pass out of the openings without force."
4

Bore the back

Clamp a scrub brush with a back at least 22 mm thick, bristles down. Drill a 12 mm hole 160 mm deep along the back's centre from one end, keeping the bit level.

Materiali per questo passaggio:

SpazzoloneSpazzolone1 pezzo

Strumenti necessari:

Morsa da bancoMorsa da banco
Trapano a batteriaTrapano a batteria
Set di punte a centroSet di punte a centro
RighelloRighello
Occhiali di sicurezza trasparentiOcchiali di sicurezza trasparenti
5

Drill the openings

From the bristle face, between rows, drill seven 3 mm holes into the bore, 20 mm apart.

Strumenti necessari:

Trapano a batteriaTrapano a batteria

Serie di punte da trapanoSerie di punte da trapano
Pennarello indelebilePennarello indelebile
6

Cut the square depression

Round the bore's mouth, chisel a 30 mm square 2 mm deep.

Strumenti necessari:

Serie di scalpelli da legnoSerie di scalpelli da legno
MartelloMartello
RighelloRighello
7

Make the tube

Cut 160 mm of 10 mm copper tube. Squeeze one end shut in the vice and solder it. Drill seven 1.8 mm holes in a line to match the openings.

Materiali per questo passaggio:

Tubo di rameTubo di rame1 pezzo
Stagno da idraulica senza piomboStagno da idraulica senza piombo1 pezzo

Strumenti necessari:
TagliatubiTagliatubi
Morsa da bancoMorsa da banco
Cannello a propanoCannello a propano
Trapano a batteriaTrapano a batteria
Serie di punte da trapanoSerie di punte da trapano
Guanti resistenti al caloreGuanti resistenti al calore
Disossidante da idraulicoDisossidante da idraulico
8

Solder on the square plate

Cut a 28 mm square of brass sheet, drill it 10 mm in the centre, slide it on 160 mm from the closed end with one edge square to the holes, and solder it.

Materiali per questo passaggio:

Lamiera di ottoneLamiera di ottone1 pezzo
Stagno da idraulica senza piomboStagno da idraulica senza piombo1 pezzo

Strumenti necessari:

Cesoie da lattoniereCesoie da lattoniere
Trapano a batteriaTrapano a batteria
Serie di punte da trapanoSerie di punte da trapano
Cannello a propanoCannello a propano
Guanti resistenti al caloreGuanti resistenti al calore
Disossidante da idraulicoDisossidante da idraulico
9

Fit the tap and button

Fit the ball valve and a hose connector to the open end with brass fittings and PTFE tape. Screw a 10 × 40 mm brass strip beside the depression as a turn-button.

Materiali per questo passaggio:

Valvola a sferaValvola a sfera1 pezzo
Raccordi in ottoneRaccordi in ottone1 pezzo
Nastro di PTFE per filettiNastro di PTFE per filetti1 pezzo
Lamiera di ottoneLamiera di ottone1 pezzo
Vite da legno #8 x 1"Vite da legno #8 x 1"1 pezzo

Strumenti necessari:
Chiave regolabile a rullinoChiave regolabile a rullino
Set di cacciavitiSet di cacciaviti
10

The build in 3D

FreeCAD model of this build, not of the patent: a 200 × 60 × 26 mm back with a 12 mm bore 160 mm deep, seven 3 mm openings, a 30 mm square depression, the perforated tube with its square plate, valve and turn-button.
File di designBLENDCC0 - Free
11

Compare the two settings

Connect the garden hose. With the holes facing the openings, hold the brush face-up and measure how high the jets rise; time a litre into the jug. Turn the tube 90°, lock it, and repeat.
Passo 11 - Image 1

Materiali per questo passaggio:

AcquaAcqua1 pezzo

Strumenti necessari:

RighelloRighello

Brocca graduataBrocca graduata
CronometroCronometro
Tubo da giardinoTubo da giardino
12

A brush that sprays, leaks or will not lock

Tube-in-the-back fountain brush troubleshooting.

Flow

Loading...
13

History and honest limits

**Annie B. Landreth** of Bristol, Pennsylvania, filed US 757,628 on 1 April 1902; it is dated 19 April 1904. The nozzle carries a cock and the usual hose coupling; the square plate and depression may be any shape that holds the tube at the chosen angle, and a turn-button holds it in use. The attachment can be inserted and withdrawn instantly, leaving the sides and back free to hold the brush in the ordinary way. **Honest limits.** She gives no sizes; ours are examples. The notebook ignores the loss in the bore. Your jet heights and times are the result.

Materiali

9

Strumenti richiesti

19

File di progetto

1

CC0 Pubblico dominio

Questo progetto è rilasciato sotto CC0. Sei libero di copiare, modificare, distribuire e utilizzare quest'opera per qualsiasi scopo, senza chiedere permesso.

Supporta il Maker acquistando prodotti tramite il suo progetto dove guadagna una Commissione Maker stabilita dai venditori, oppure crea una nuova iterazione di questo progetto e includilo come collegamento nel tuo progetto per condividere i ricavi.

Commenti

(0)

Accedi per partecipare alla discussione

Caricamento commenti...