Collaborazione
ARTE
BELLEZZA E BENESSERE
MESTIERE
CULTURA E STORIA
DIVERTIMENTO
AMBIENTE
CIBO E BEVANDE
INGEGNERIA INVERSA
SCIENZE
SPORT
TECNOLOGIA
INDOSSABILI
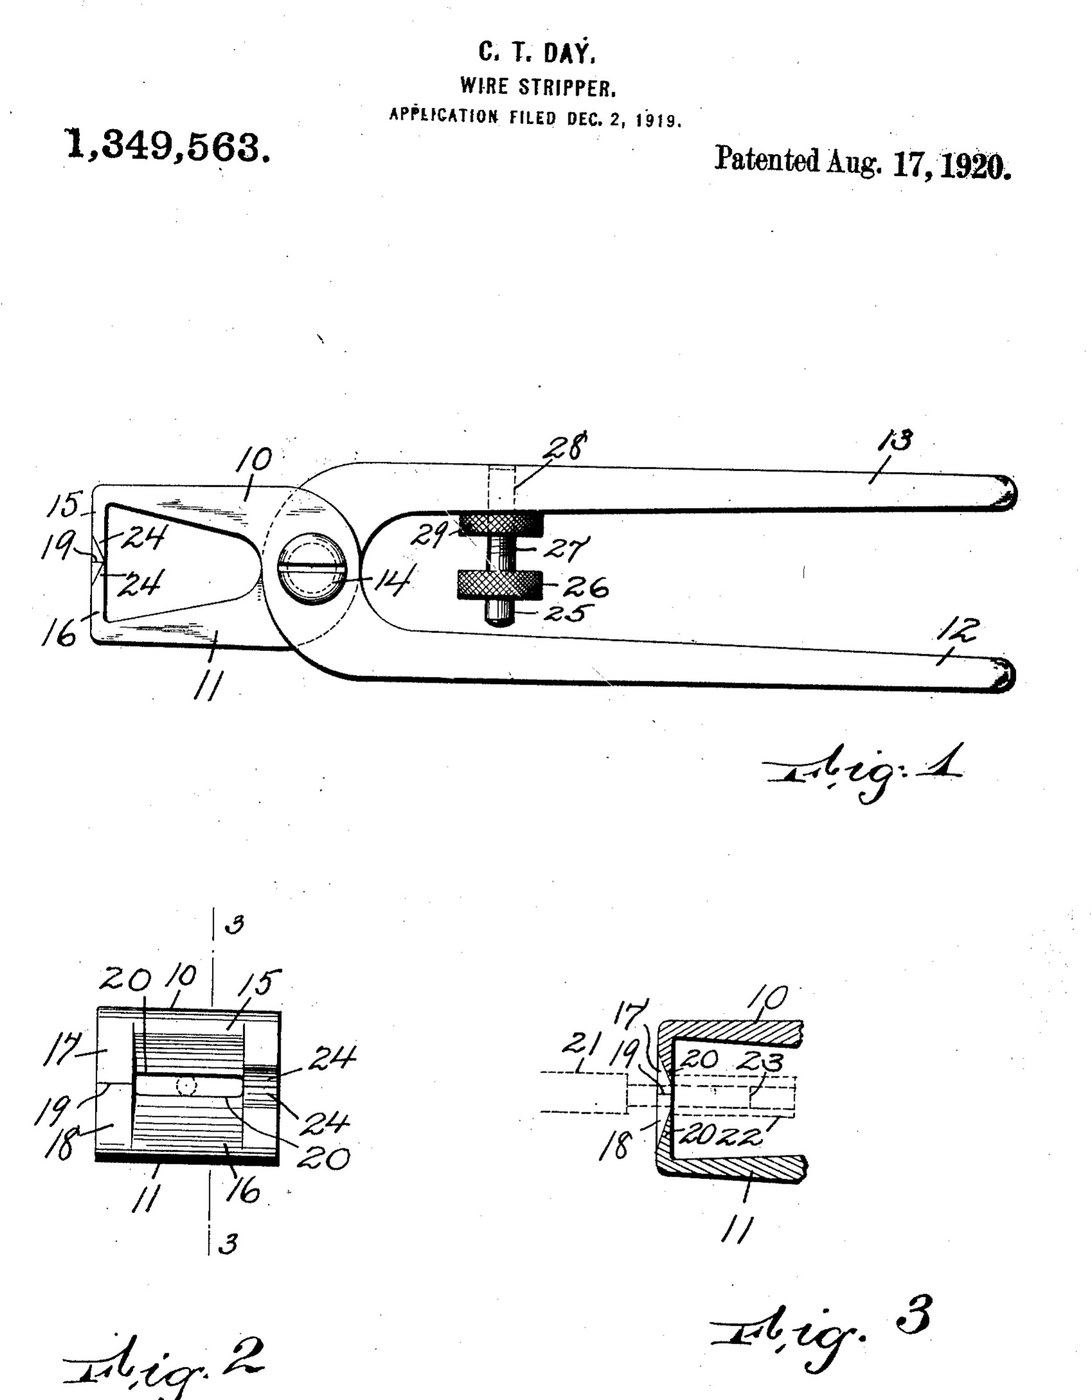


Wire Strippers: Pliers with Straight Parallel Stripping Edges (Day, US 1,349,563, 1920)
Pliers whose jaws stop with their two straight stripping edges exactly one wire-core apart. Grip the wire anywhere along the edges and twist: the insulation is cut through all round, but the copper is never nicked. A screw stop between the handles sets the gap for larger wire, and cutting edges beside the stripping edges cut the wire through.
Result: wire strippers that strip insulation without damaging the conductor.
Source: C. T. Day, US 1,349,563 (1920). Unknown: the metal, sizes and hardening. Picture: the patent drawing.
Intermedio
Unknown
Istruzioni
1
1
Forge the two jaw-handles
Forge the two jaw-handles
Make two pieces like a pair of pliers: each a jaw with a long handle, pivoted together by a bolt. Bend each jaw's end inward. Ours: tool steel forged and filed. Not given: the metal, sizes.
Materiali per questo passaggio:
 Barra piatta di acciaio per utensili1 jaws and handles
 Metallo sconosciuto1 pivot bolt
Strumenti necessari:
 Forgia
 Incudine
 Martello
 Trapano a colonna
 Dimensioni sconosciute
2
2
Shape the cheek pieces and stripping edges
Shape the cheek pieces and stripping edges
Give each inward jaw end a cheek piece; the cheek faces meet when the jaws close and stop them closing further. Set back from those faces, file two straight, parallel stripping edges, much longer than the gap between them, so that with the jaws shut they stand apart by exactly the diameter of the wire's metal core. On the other side of the stripping edges, opposite the cheeks, file cutting edges that meet, for cutting the wire through.
Strumenti necessari:
 Lima per metalliDimensioni sconosciute
3
3
Add the stop, harden, and strip a wire
Add the stop, harden, and strip a wire
For use on a larger wire, drill and tap a hole in one handle and fit a stud with a hand piece and a threaded end. Screwed in, its free end meets the other handle and stops the jaws closing so far. A lock nut holds the setting. Harden the edges. To strip, lay the wire across the jaws anywhere along the stripping edges, close them and turn the pliers right and left with the wrist: the insulation is cut through all round, and a pull slides its end off the core. Not given: how they are hardened.
Materiali per questo passaggio:
Metallo sconosciuto1 stud and lock nutStrumenti necessari:
Trapano a colonna Serie di maschi e filiere
 Forno per trattamenti termici
 Tinozza di tempra
Materiali
2- 1 jaws and handlesSegnaposto
- 1 stud and lock nutSegnaposto
Materiali dei progetti collegati
Questo progetto realizza

CC0 Pubblico dominio
Questo progetto è rilasciato sotto CC0. Sei libero di copiare, modificare, distribuire e utilizzare quest'opera per qualsiasi scopo, senza chiedere permesso.
Supporta il Maker acquistando prodotti tramite il suo progetto dove guadagna una Commissione Maker stabilita dai venditori, oppure crea una nuova iterazione di questo progetto e includilo come collegamento nel tuo progetto per condividere i ricavi.