Collaborazione
ARTE
BELLEZZA E BENESSERE
MESTIERE
CULTURA E STORIA
DIVERTIMENTO
AMBIENTE
CIBO E BEVANDE
INGEGNERIA INVERSA
SCIENZE
SPORT
TECNOLOGIA
INDOSSABILI
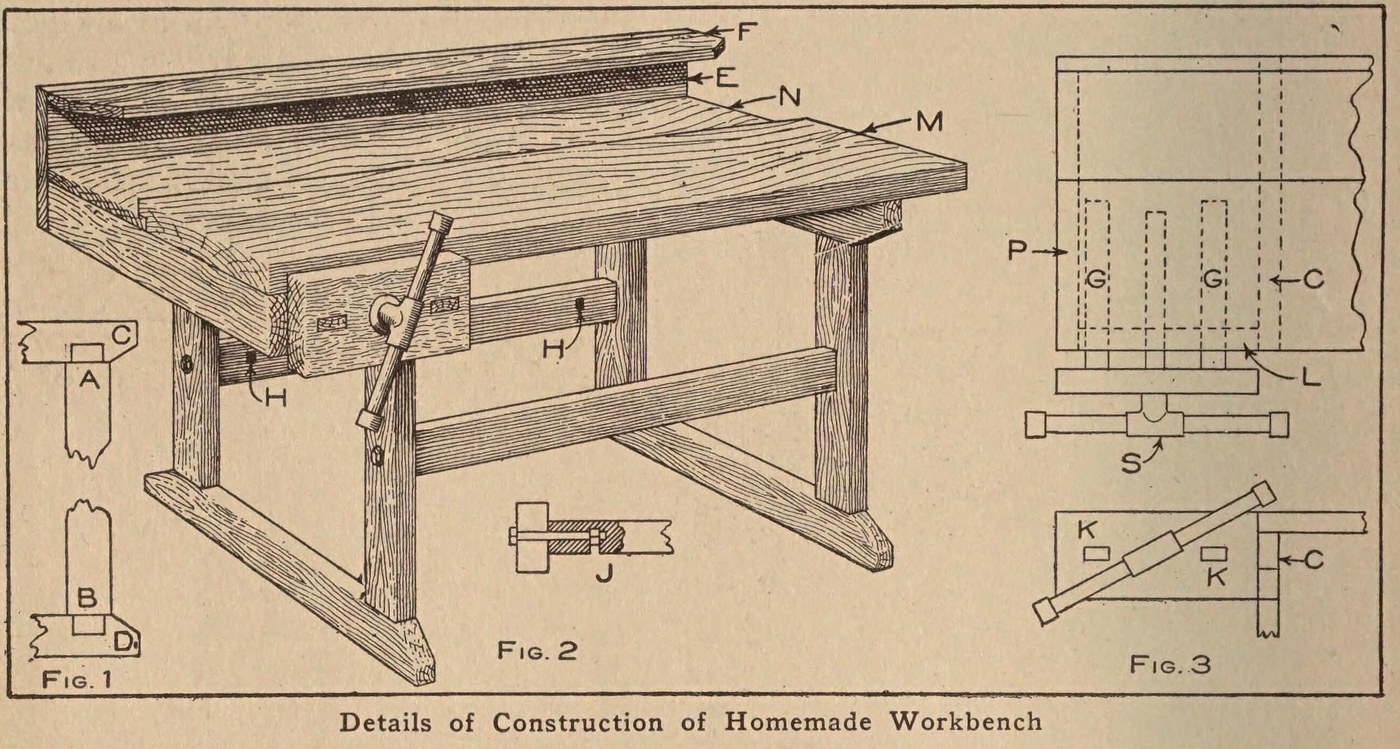


Workbench: a Pine Bench with a Plank Top and Vise (Boy Mechanic, 1913)
A boy's first workshop bench: two mortised pine leg frames bolted to braces, a 3 1/2 ft top of one 2 x 12 in plank with a back board, a tool rack behind, and a wooden vise on an iron bench screw.
Source: C. E. McKinney, Jr., 'Homemade Workbench', The Boy Mechanic, Book 1 (1913), pp. 442-443. Picture: Figs. 1-3 of the book.
Intermedio
Unknown
Istruzioni
1
1
Make the two leg frames
Make the two leg frames
Cut four 2 x 4 in pine legs 23 in long with a tenon on each end 1/2 in thick, 3 1/2 in wide and 1 1/2 in long (Fig. 1, A and B). Cut four crosspieces of the same stock 20 in long, mortised in the narrow edge 1 1/4 in from each end, and slope their corners from the leg out to the middle. Fit each pair of legs to a pair of crosspieces to make the two supports.
Materiali per questo passaggio:
 Legname di pino1 2 x 4 in: legs, crosspieces
Strumenti necessari:
 Sega a mano
 Scalpello da mortase
 Martello
2
2
Brace them together
Brace them together
Join the supports with two 2 x 4 in braces 24 in long, ends sawn square. Bore through each leg and 4 in into the centre of each brace end, bore an intersecting hole on the back of each brace for the nut, and draw each joint tight with a 3/8 x 6 in bolt (Fig. 2, J). A cross brace on the back stops rocking when planing.
Materiali per questo passaggio:
Legname di pino1 2 x 4 in: braces Bullone a testa tonda e collo quadro4 3/8 x 6 in
Strumenti necessari:
Sega a mano Trapano a manovella con punta
 Chiave regolabile a rullino
3
3
Fit the plank top
Fit the plank top
Make the main top M from one 2 x 12 in plank 3 1/2 ft long. Rabbet its back edge 1/2 in to take a back board N of the same length, 8 1/2 in wide and 7/8 in thick. Screw the top to the top crosspieces with long screws.
Materiali per questo passaggio:
 Tavola di legno duro1 2 x 12 in, 3 1/2 ft
 Tavola di pino1 back board
 Viti da legno1 long
Strumenti necessari:
Sega a mano Pialletto
 Cacciavite a taglio
4
4
Add the tool rack
Add the tool rack
Nail a board E 10 in wide to the back of the bench and fasten a 2 1/2 in board F on top of it at right angles; both 7/8 in thick and 3 1/2 ft long. Bore holes or cut notches in F to hold tools.
Materiali per questo passaggio:
Tavola di pino2 7/8 in, 3 1/2 ft Chiodi1 pezzo
Strumenti necessari:
Trapano a manovella con puntaSega a manoMartello5
5
Fit the vise
Fit the vise
Fasten an iron bench screw in a 2 x 6 in block 12 in long. Mortise two guide rails 7/8 x 1 1/2 in and 20 in long into the block; they slide in mortises in a 2 x 4 piece L bolted under the top, which holds the bench-screw nut between the two mortises. Nail L to a top crosspiece and to a 2 x 4 piece P bolted under the top at the end (Fig. 3).
Materiali per questo passaggio:
Legname di pino1 2 x 6 block, 2 x 4 pieces, guide rails Vite da banco per l'intaglio1 pezzoBullone a testa tonda e collo quadro1 for L and PChiodi1 pezzo
Strumenti necessari:
Sega a manoScalpello da mortaseTrapano a manovella con puntaChiave regolabile a rullinoMartelloMateriali
7- 1 2 x 6 block, 2 x 4 pieces, guide railsSegnaposto
- 1 for L and PSegnaposto
- 1 2 x 12 in, 3 1/2 ftSegnaposto
- 2 7/8 in, 3 1/2 ftSegnaposto
- 1 longSegnaposto
- 2 pezziSegnaposto
- 1 pezzoSegnaposto
Questo progetto realizza

CC0 Pubblico dominio
Questo progetto è rilasciato sotto CC0. Sei libero di copiare, modificare, distribuire e utilizzare quest'opera per qualsiasi scopo, senza chiedere permesso.
Supporta il Maker acquistando prodotti tramite il suo progetto dove guadagna una Commissione Maker stabilita dai venditori, oppure crea una nuova iterazione di questo progetto e includilo come collegamento nel tuo progetto per condividere i ricavi.