コラボレーション
アート
美容とウェルネス
工芸
文化と歴史
エンターテインメント
環境
食品と飲料
リバースエンジニアリング
科学
スポーツ
テクノロジー
ウェアラブル
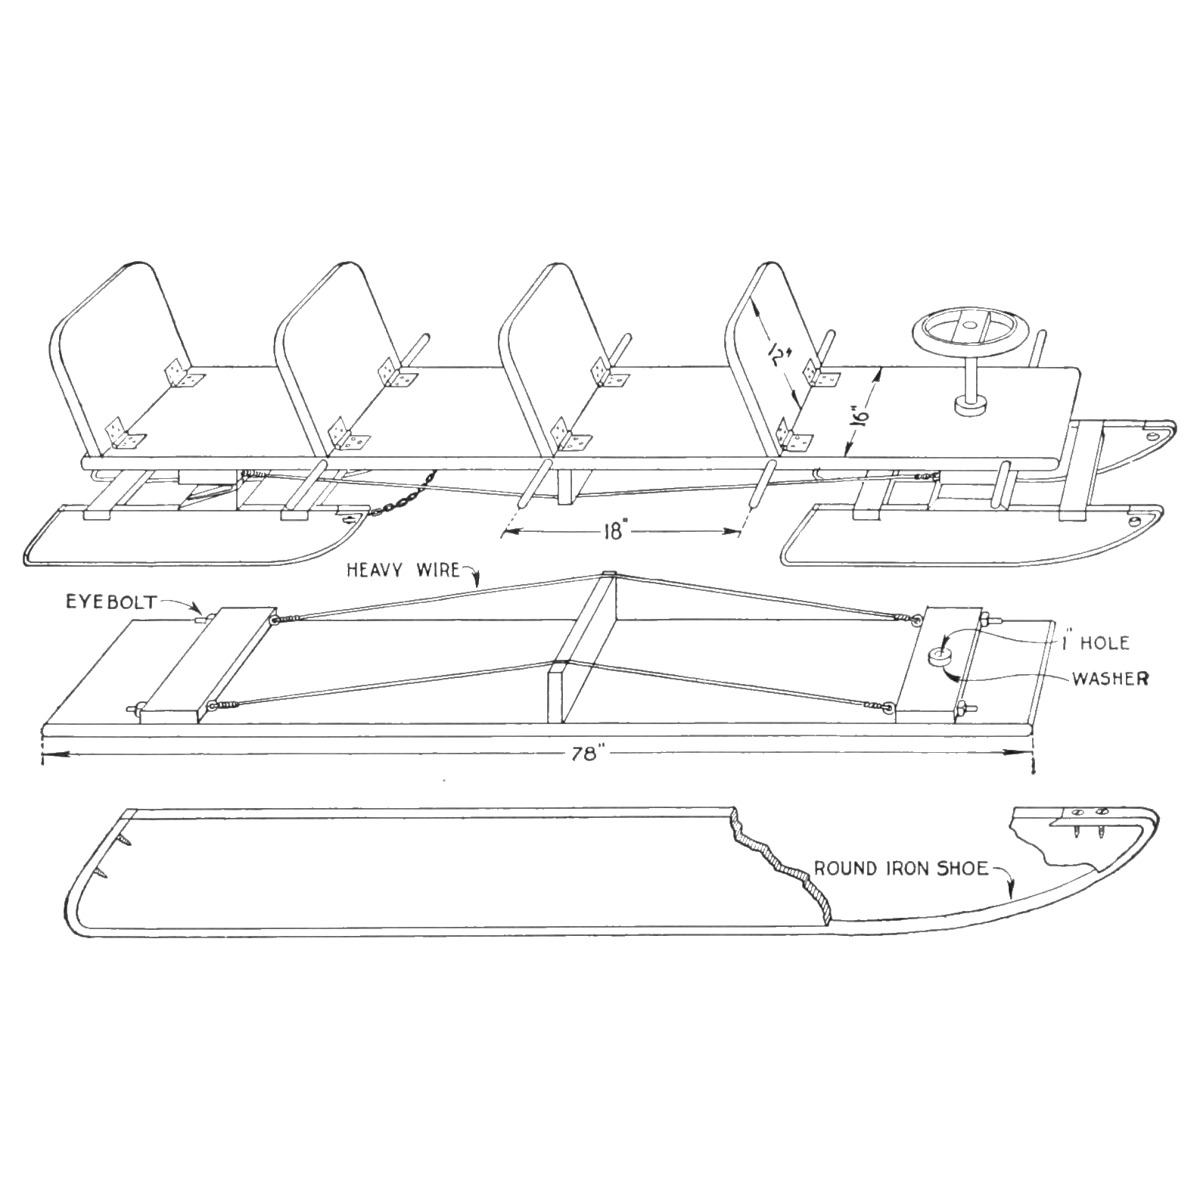


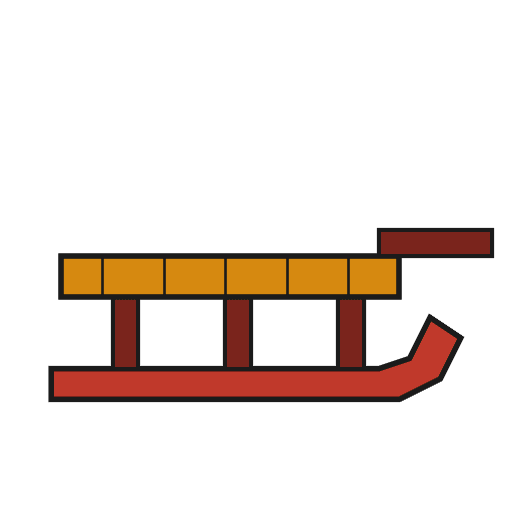
Four-Passenger Coasting Bobsled: Iron-Shod Ash Runners, Hinged Rear Sled and Hoop Steering Wheel (Boy Mechanic, 1915)
R. H. Allen's four-passenger coasting bob from The Boy Mechanic, Book 2 (1915): a 6-1/2 ft top board with four hinged seat backs, carried on two short sleds with ash runners shod in 5/8 in round iron. The rear sled rocks on a wedge and hinges to follow the ground; the front sled steers by a broom-handle post and a wheel made from a nail-keg hoop. Every size is his.
中級者
About 3 days
手順
1
1
His list of materials in centimetres
His list of materials in centimetres
Jupyter ノートブックを読み込み中…
2
2
Read The Boy Mechanic, Book 2
Read The Boy Mechanic, Book 2
"Any wood may be used for the sled, except for the runners, which should be made of ash." His list of materials: 1 top 6-1/2 ft x 16 in x 1-1/4 in; 4 runners 22 x 4 x 1 in; 4 crosspieces 16 x 3 x 1 in; 3 pieces 16 x 5 x 2 in; 1 piece 16 x 5 x 1 in; 1 shore 16 x 3 x 1 in; 4 seat backs 12 x 16 x 1 in; 1 dowel 3 ft x 1 in; 4 rods 5/8 in x 30 in; 4 eyebolts 1/2 x 6 in; 3 hinges 5 in strap; 8 hinges 3 in strap.
3
3
Shape and shoe the runners
Shape and shoe the runners
Cut one ash runner to shape and use it as the pattern for the other three. Cut a groove about 1/4 in deep along the under edge to take the curve of a 5/8 in round iron rod. Bend each rod to fit in the groove, up the back of the runner and over the top at the front; flatten the ends and drill two holes in each for wood screws (a blacksmith can flatten them, he says). Screw the irons on.
このステップの材料:
 堅木の板1 個
 鉄の丸棒4 個
 木ねじ1 個
必要な工具:
 手のこぎり
 糸のこ(コーピングソー)
 のみ
 石炭炉
 金床
 鍛冶ハンマー
 万力(ベンチバイス)
 ハンドドリル
 鉛筆
4
4
Build the two sleds
Build the two sleds
Notch the top edges of each pair of runners for the 16 x 3 in crosspieces, near the ends, so the crosspieces lie flush with the runner tops and the notches of each pair line up. Fit them snugly, fasten with long, slim wood screws, and stiffen each joint inside with a small metal brace.
このステップの材料:
 松板1 個木ねじ1 個
 隅金具(コーナーブラケット)8 個
必要な工具:
手のこぎりのみハンドドリル5
5
Make the rocking rear joint
Make the rocking rear joint
Cut a heavy 2 x 5 in crosspiece sloping across its width, from 2 in thick at one edge to a feather edge at the other. Fix the three large strap hinges to the sloping face, and fasten the piece solidly on the rear sled's runners with its centre 8 in from their front ends. This lets the rear sled rock but not turn sideways.
このステップの材料:
松板1 個 鉄の長蝶番3 個木ねじ1 個
必要な工具:
手のこぎり 台鉋ハンドドリル
6
6
Mount the front sled crosspiece
Mount the front sled crosspiece
Fasten the supporting crosspiece on top of the front sled's runners with its centre 11 in from their front ends.
このステップの材料:
松板1 個木ねじ1 個必要な工具:
ハンドドリル メジャー(巻尺)
7
7
Brace the top board
Brace the top board
Round both ends of the top board and plane it smooth. Underneath, fit two crosspieces, each with two 1/2 in holes bored through its width near the ends for the eyebolts: one with its centre 12 in from the rear end, the other 8 in from the front. Screw them on. Set the shore in the centre of the board, run wires over it between the eyebolts, and draw the eyebolts up until the wire is taut over the shore, so the long board cannot sag.
このステップの材料:
松板1 個 アイボルト4 個
 鉄の針金1 個木ねじ1 個
必要な工具:
手のこぎり台鉋 曲柄錐と錐先メジャー(巻尺)
8
8
Fit the seat backs and foot rests
Fit the seat backs and foot rests
Round the top corners of the four backs and cut the bottom ends at a slight angle for a slant. Hinge them to the top board with the small strap hinges every 18 in, starting at the rear. Bore 1 in holes about 1 in deep in the edges of the top board every 18 in, beginning about 5 in from the front, and drive in pins 4 in long cut from the dowel, as foot rests.
このステップの材料:
松板1 個鉄の長蝶番8 個 堅木のダボ1 個木ねじ1 個
必要な工具:
手のこぎり曲柄錐と錐先メジャー(巻尺)9
9
Make the steering
Make the steering
Cut a broom handle to 18 in and fasten one end in a hole bored centrally in the 5 in crosspiece of the front sled. Bore a hole in the top board through the centre of the crosspiece underneath; put two metal washers on the stick and run it up through the hole, then fasten a hardwood collar to it just above the board so the top cannot lift off the sled. For the wheel, fasten a piece of wood across a nail-keg hoop, cover the hoop with garden hose and wrap it with twine; bore the centre of the crosspiece to fit the broom handle and screw it on.
このステップの材料:
 ほうき1 個
 平ワッシャー2 個堅木の板1 個
 鉄の輪1 個
 ゴムホース1 個
 ジュートひも1 個木ねじ1 個
必要な工具:
手のこぎり曲柄錐と錐先ハンドドリル10
10
Join the sleds and fit the ropes
Join the sleds and fit the ropes
Fasten the rear sled to the top board with screws through the free wings of the hinges into the crosspiece. Bore holes in the front ends of all runners and attach a chain or rope: the rear one's loop to the underside of the top board, the front one for drawing the sled.
このステップの材料:
木ねじ1 個 鉄の鎖1 個
必要な工具:
曲柄錐と錐先ハンドドリル11
11
Troubleshooting
Troubleshooting
Bobsled troubleshooting.
Flow
Loading...
12
12
History and honest limits
History and honest limits
From "Four-Passenger Coasting Bobsled" by R. H. Allen, in **The Boy Mechanic, Book 2**, Popular Mechanics, 1915 (Project Gutenberg 44585; checked on the archive.org scan boymechanicbook200chic2, pp. 24-26). The runner shape comes from his drawing, not from figures. The scan calls the steering collar a hardwood collar; the Gutenberg text drops "hardwood". The tools and metric figures are ours.
材料
15- 1 個プレースホルダー
- 4 個プレースホルダー
- 8 個プレースホルダー
- 1 個プレースホルダー
- プレースホルダー
- 8 個プレースホルダー
- 4 個プレースホルダー
- 1 個プレースホルダー
- 1 個プレースホルダー
- 1 個プレースホルダー
- 2 個プレースホルダー
- 1 個プレースホルダー
- 1 個プレースホルダー
- 1 個プレースホルダー
- 1 個プレースホルダー
必要な工具
12- プレースホルダー
- プレースホルダー
- プレースホルダー
- プレースホルダー
- プレースホルダー
- プレースホルダー
- プレースホルダー
- プレースホルダー
- 1 vendor sell this, none ship to you yetプレースホルダー
- プレースホルダー
- 1 vendor sell this, none ship to you yetプレースホルダー
- プレースホルダー
この設計図で作るもの
関連ブループリント
これらのブループリントは知識を共有しています — 技術、材料、原理
CC0 パブリックドメイン
このブループリントはCC0で公開されています。許可を求めずに、自由にコピー、修正、配布、あらゆる目的で使用できます。
メイカーを応援するには、ブループリント経由で製品を購入してください。メイカーには メイカーコミッション がベンダーにより設定されています。または、このブループリントの新しいイテレーションを作成し、自分のブループリントにコネクションとして含めて収益を共有できます。